Glad you were able to track it down, Tom (and that it’s something easy to correct)
Mine seems to have crashed. I was exploring the mode groups, options, and taking measurements. While I was switching to another mode group something messed up and now it’s stuck in a single, sub-lumen, moonlight mode.
Config can no longer be accessed.
…and I thought it was me. Yes you have to be fast at config but it certainly is an improvement. I’m satisfied and hope others are well with it.
If Microsoft made flashlights…
Microsoft? I though VW had something to do with this? ![]()
Made a bit more progress this evening. Read back in the fuses and code of two more of these drivers, so all 3 read in so far have the low fuse byte set to 0x7A.
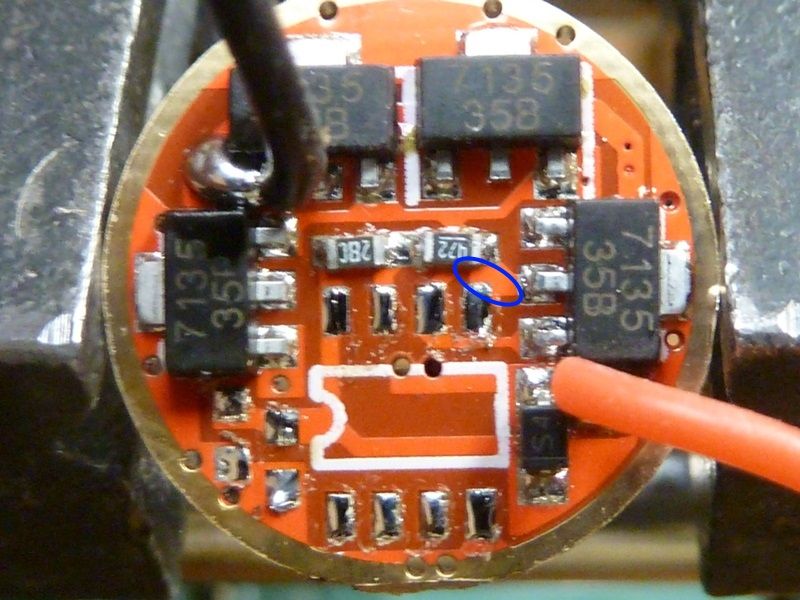
Also I see that pin #5 of the MCU is grounded on these drivers, making it grounded to pin #4 as well. No idea why they did this, but if I cut the trace to isolate pin #5 it seems then I can connect up to the MCU with the USBASP programmer -- this worked on two drivers so far. The black clips seem to have better side clearance than the blue Pomona clips. On some boards though, the R1/R2 resistors can get in the way of the black clip, but not sure if it's enough to not connect.
I'll post pics.
I often wonder why they (manufacturers) choose to change things that work good for the worse without any apparent reduction in cost…
It’s probably just a personality somewhere, see’s something he wouldn’t do that way, changes it, moves it on all smug in his decision and whatdyaknow, doesn’t work. Power play, more or less.
Ok, feeling much more confident now that the grounding of pin #5 is why we cant get the USBASP programmer to flash firmware. I had the pin grounded on one driver - repeatedly tried, but could get it to connect. I was able to cut the trace from pin #5 clean, and now I am able to connect both with the black clip and blue clip.
the MOSI signal used on pin #5 by the programmer is pretty critical. MOSI is output from the USBASP, and MISO (pin #6) is serial input to the USBASP.
Interesting on a 105C, pin #5 is Star 2, so if Star 2 is grounded, same problem I'd think. For Star 3 and 4, they are not used by the USBASP.
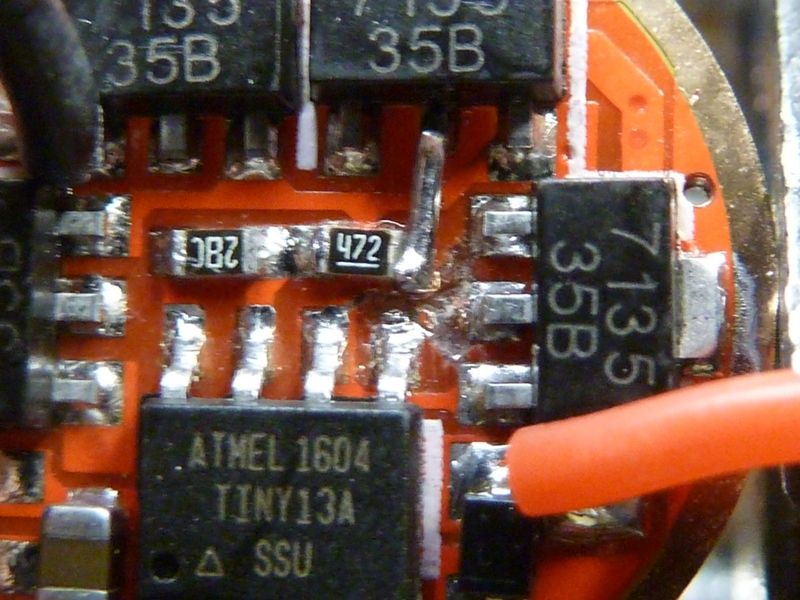
This shows where to cut the trace on pin #5. It's tricky, because you still need GND connected to the 4.7k resistor:
Might be hard to see here, but this driver below has the trace cut, but I also cut in between the 7135 GND on the right and the 4.7K, so, had to add a jumper to the 7135 above. I flashed the low byte fuse to 0x75 on this one and all is working properly so far on the bench. Timing of strobes is corrected.
Need to install this in a light and bang on it for a while.
Dunno bout the other problem of getting stuck in a moon mode - hard to relate that issue to this one. It seems like the EEPROM got corrupted, but that doesn't explain it all. Really it should not be run at that high of a speed though - makes the config UI difficult at a minimum.
I'm kind of amazed so many of these lights and drivers have been sold with this flaky fuse setting. The driver with this firmware is a great deal though.
Excellent find Tom! I opened up my clear C8, and even with additional 7135’s stacked I was able to slice that trace to separate pin 5 from ground. Now the timing works fine, changing modes is as it should be. I had already re-flashed the MCU so now all is well. Thanks for finding this, such a simple thing to do to get the firmware fully operational on this light. ![]()
Wait, so just cutting that trace fixes the timing? Or it needs a reflash too? I don’t even have my light yet and may not keep the factory driver anyway, but I’m curious.
Yeah, I was wondering the same thing. I would think cutting the trace just allows you to flash without removing the MCU from the PCB.
You need to cut the trace, then that enables you to flash using the USBASP programmer. The you need to set the low byte fuse to 0x75, and that fixes the timing. Dunno if that's all though - dunno, I did that and installed the driver in a VG-10, but it always seems to have next mode memory. Dunno yet what's goin on with this...
Why does the switch have to be so far deep into the tail cap? I find it more difficult to turn light on and off. It’s almost like you have to use the tip of your thumb,rather than the meaty part.
I wish they would raise the switch. Still lots of room and still be able to tail stand.
I have no problem pressing the button on mine with the meaty part of my thumb. I dont have a depth guage, but it looks like the highest point of the swtich cover sits about a 1/32 of an inch below the rim of the tailcap , at least on mine.

My Clear C8 tail cap is such that I can use the joint of my thumb to activate the switch, no problem using the thumb tip either way.
I just ran through some settings changes and mine works nice and smooth, not fast, not slow, plenty of time to make a selection without being excessive either way. I have last mode memory engaged, works fine, presently using level 2 for the moon mode with 4 more higher levels.
I stacked an extra 6 7135 chips previously, so it’s running very nice now.
I programmed mine once without memory or flashy modes. So far it’s been working great. Basically it’s set and forget. No plans on changing the program.
I will say I like the style of switch boot the astrolux lights use that have a “taller center” section that sticks up a bit compared to the edge of the boot. It seems easier to press in the lights I have it in. Although I like the total size of the convoy boot better (16mm vs 14mm?).
Sorry, I’am a newbie. Can anybody tell me how can I get 15% off for this C8? I click on the link in the first post but cannot see anywhere to pun 15% off code, and who is Simon so I can send him a message?
You need to message Simon on AliExpress and tell him you’re a member here. He will apply the discount to your order.
https://www.aliexpress.com/store/330416?spm=2114.10010108.0.0.eHJcnx