Thanks for the feedback. I am definitely not feeling pressured to do anything, but I am interested in getting my light in a reliable, easy to use state and also understand more about how it all works. I definetly love taking things apart, but don’t want to do it without the right tools.
Thanks for the contact info also.
As far as unscrewing the bezel goes, are the two pieces the hex sided one and the smooth one with the clear glass? Sorry, my flashlight lingo is a bit lacking.
The bezel starts at the seam that is just to the left of the switch in the below picture.
Here is what you will see after you unscrew the bezel and unsolder the wires from the LED base. Unfortunately, it also appears to be thread locked. I should warn you that Red thread lock melts around the melting point of solder. So you will be taking some risk it you take it apart. I see the plastic LED isolator distorted some when I took mine apart.
Thank you for the detailed explanation and pictures. This is all been a great help.
I got a chance to examine the head under the microscope today. It looks like there is residue on the contact surface for the body. I was able to clean it with isopropol alcohol. Looks much better. Hoped it would work better, but not sure if the battery I just put in is good or not, and I only have one with me presently. I’ll get to check a for sure good battery when I get home. Only thing not working now is I don’t get any more lumens on the highest mode, which has never been the case. Suspect it is a weak battery. As I posted in a different thread, I am in the process of reconditioning some several year old Nimh batteries.
One thing I wonder about this interface is it is uncoated aluminum to either gold or more likely copper. What keeps this interface from being gooped up over time by oxidation?
I’ve just got an Archer 1A V3 and the rear switch seems more recessed behind the boot than I would have expected, this makes switching it on and off…temperamental. I quite often have to use the tip of my thumb or nail to get the switch to click.
Thrunite Direct are going to send me a replacement switch to try, but I was wondering if you’d seen this behaviour in your light?
Sanding down the rear washer may raise the switch up a bit, but I don’t want to start messing with it until I’ve decided whether I’m keeping it!
I have no trouble at all turning the light off and on, whether it be momentary or clicked on. The switch displacement for momentary is at most 1/10 or an inch, and for full on it only goes to about even with the recessed surface of the tail.
Hope the new switch fixes your problem, I still really like light.
Thanks for the replies. I’ve stripped the tailcap down and everything is there and in the correct order.
The momentary activates at a reasonable level, but it just takes too deep a press to latch. I’ve compared it to the switch on the similar sized Fenix LD12, and that latches at a much more usable level.
It’s even possible that it’s working as designed, but I just don’t like it :person_facepalming:
Thrunite are on holiday until Feb 10th, and this was supposed to be a gift before then, so it look like it’s going to be an Amazon return
ImA4Wheelr I must say thanks for the nice review and the excellent pictures!
I purchased one of these lights in March and am having an issue with it changing modes without pressing the side switch, most of the time it will go to strobe and stay there.
I’m thinking I may have a bad solder joint between the e-switch PCB and the driver PCB.
I’ve sent an email to ThruNite Direct so hopefully they can help, because I don’t really want to mess with trying to open this thing up and deal with the red locktite.
If I have to though your pictures and review will make it a lot easier!
My experience regarding working with Thrunite has been excelent. I ended up returning my 1A V3 for a replacement unit, and the new works fine. I only had to pay shipping on my side, ~$2.50. Eva from TN gets back to me within a day whenever I have a question.
Quick question for the OP, how were you able to disassemble the side switch? The side switch on my rocks laterally forward and backward and it’s a bit annoying. Thanks.
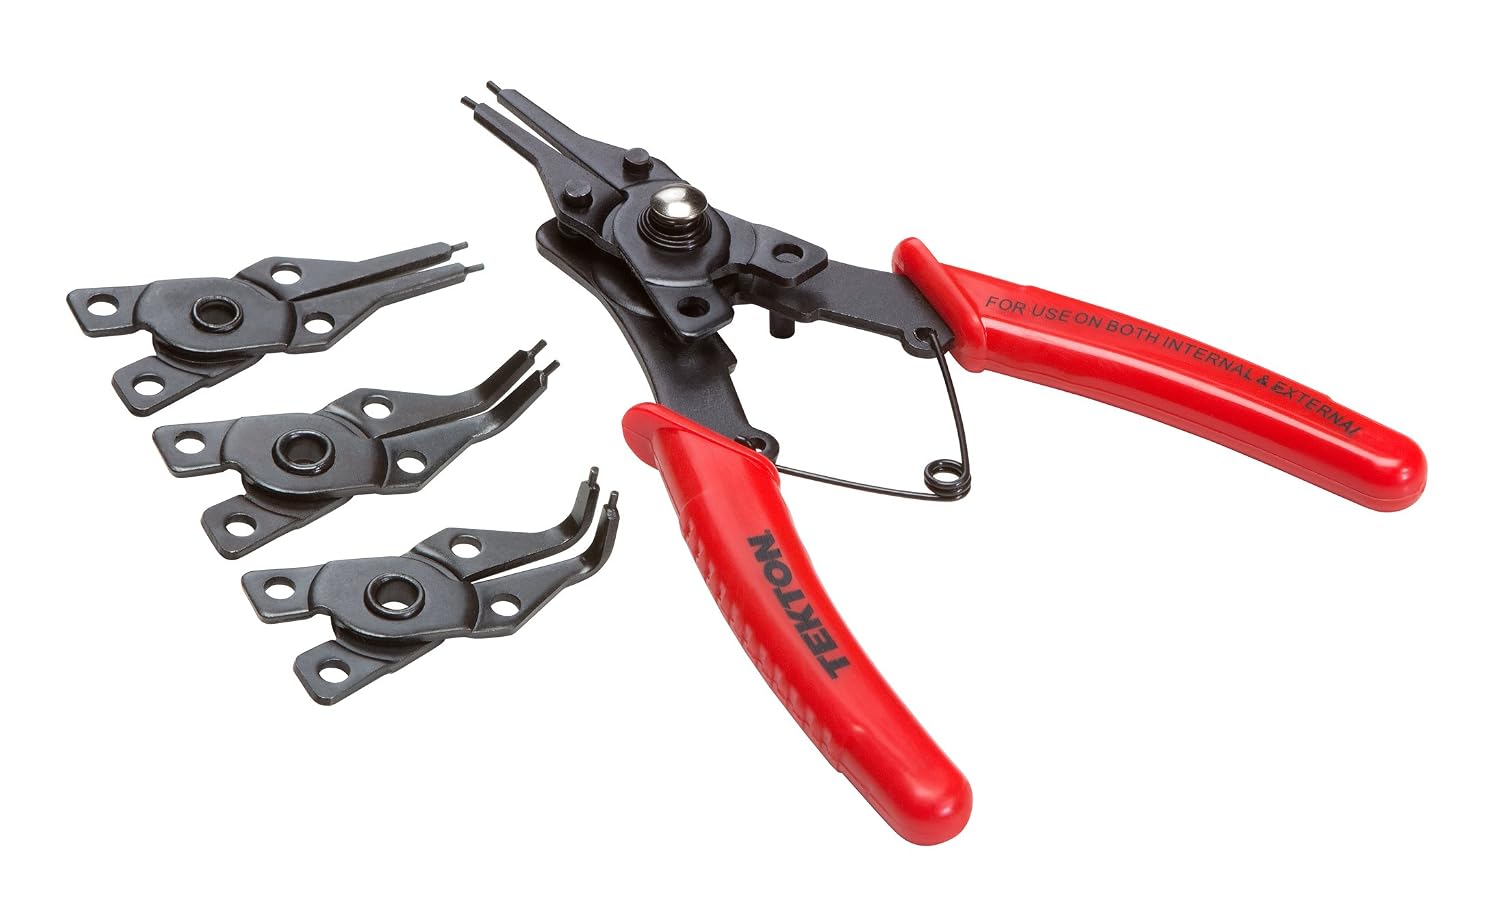
Hi uuelle and welcome to the forum. The switch cover is held in place by a threaded retaining ring. There are notches that you can use to tighten it by turning the ring clockwise. You could use some needle nose pliers (applying opening force to get the jaw ends tight in the notches). If you neeedle nose pliers are too large, you could use small scissors, large tweezers, or anything that will fit and allow opening pressure to be excerted against the notches. The ideal tool would be snap ring pliers (see example in second picture below). Best of luck.
Thank you very much for the info and the welcome.
Took it apart just now with a set of tweezers. Despite adding a bit of silicone grease, the switch still has quite a bit of play and toggles fore and aft upon reassembly. It is what it is.
Thanks again for the info and taking the time to answer my question.
You're very welcome. Sorry I couldn't help. I recomment you to contact BLF member Snow White. He's a ThruNite rep. From what I understand about ThruNite, they'll want to solve the problem.
I am going to swap out the rubber seal to see if it’d help. If not, I’ll definitely get in touch with Thrunite. Thanks again. You’ve been immensely helpful.
Hi, my Thrunite Archer 1A V3 just died on me today :(.
I think something hard just broke the side switch. When i press the switch real hard, the light flickers and changes modes, but goes off when i release the switch.
I successfully opened up the lamp, but I#m miserable failing getting the driver out of the middle piece. is it screwed, press fit or how is it held in place so snug?
I removed the batterytube, reflector head and bezel using heat, unscrewed the stainless sidebutton bezel, unsoldered and unscrewed the LED und cooling pad.
so now i’m left with the middle part with the Serial Number and the driver inside.
ImA4Wheelr can you help me and give me a hint how you got the driver out of the housing?
Also do you have an idea where to get a replacement Switch?
Maybe I’m betting on the wrong horse and somebody has an idea what the Problem could be, if it’s not the sideswitch?
thank you in Advance and kind Regards from freezing Austria
Hi julzZz303. I don't recall any issue pulling the driver out. Sounds like the driver was a very tight press fit or got some thread lock on it. You might be able to pry it down from the side-switch hole or push it out from above through one of the emitter shelf holes. You will have to be very careful because that driver is loaded with components.
Before you go further, have you ruled out the tail switch? Flickering sounds like a connection issue and the tail cap is the most likely source of a connection problem. If you haven't, see how the light works without the tail cap on. Somehow bridge contact between the bottom of the cell to the non-anodized part of the battery tube.
Regarding replacement switches, you can buy variety packs of a hundreds with switches for cheap via Ali and Ebay. They are very handy to have on hand. I use them to fix/mod my lights and all kinds of special projects. Have used them to make vap mods from scratch, fuel kill switches for cars, etc.
I will try to look at my light tonight if I still have it, but I think I gave it to my nephew. I'll report back.
EDIT: I just occured to me what is probably holding your driver. My driver was partially potted. If they assembled the light before the compound was cured, it may have made contact and fused to the host. The stuff isn't very strong. It crumbles when picked at, but it would probably make removing the driver very difficult. You could probably pick at the stuff from the emitter shelf holes, but be careful to not use much force. You don't want to break a component in the process. Here are some pics of the driver. Just right click and press "View" to see full size.
With potting compound removed:
EDIT: Finally confirmed that I gave the light to my nephew. All I can think to suggest beyond above is to remove the bezel, lens, and reflector. Then, put some alcohol around the driver's perimeter in hopes that it softens up any glue or whatever is holding your driver in place.