Haha nice
You’re right, a .2 probably will be more lumens less throw since I can’t dedome it, the g3 was a pretty big disappointment.
Who knows though, maybe if the lumen increase is high enough I can deal with a bit less throw.
8k lumens maybe?
This is supposed to be a more practical reflector “flashlight” with spill and lots of lumens, I already have a crazy throw flashlight!
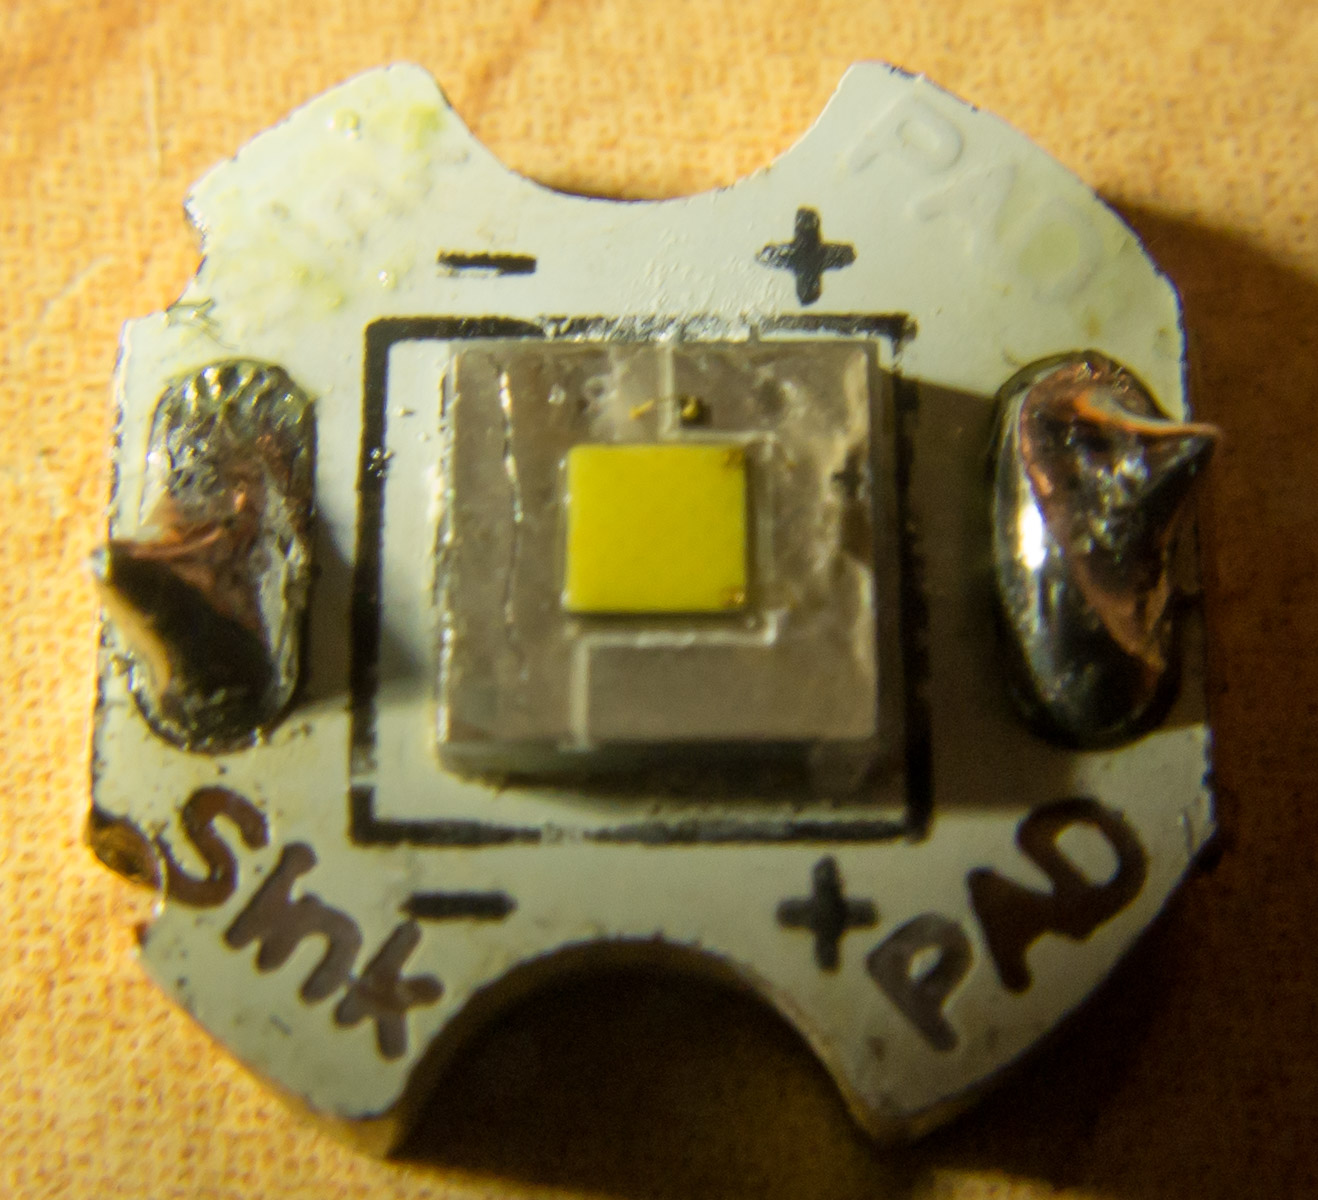
The P2 1C I have is shaved-dome though, I will not be dedoming it because I want to have some protection over the dies since I often drop or touch them accidentally xD
Still should get over 6k lumens which is already 2x more than the Hellfighter HID lamp does.
This afternoon I will be trying to get that last darn screw out, once that happens I can start installing my Neutrik plug.
Even though it’s still not converted to LED I would love to get it working and take it out for some pics with the stock HID setup!
So far I have done the P2-1C TN42 with dome on, shaved and de-domed, and changed the FET to a SIR404 shortened the 18awg leads till their banjo string tight and running 4 VTC5A’s right off the charger, getting 12.82 amps on the hit, so now I’m trying to figure out how to stuff 4 of my 20700A Pany’s in it! :person_facepalming: It’s never ending!!!
So I’ll be watching, can’t wait to see the results, in the meantime I have a few more of these things to mod for my Buddies!
Nice collection
When finish this hellfighter should perform like one of those TN42s modded with the XHP70, but with better cooling so it can run continuously at 12A.
btw I finally managed to drill the darn screw out, it took a few hours of work, but I got the hole rethreaded and now can attach the light back to the handle!
Next step is to widen the back hole to fit the plug.
Yup, plenty of space inside.
I would rather not have a fan though because that would mean cutting vents into the beautiful aluminum body, so what I will try is using multiple thick heatpipes to transfer heat from the LED to the body and radiate it that way.
Haha that’s definitely possible, battery and cooling in a backpack, only LED and reflector in the light
Some day I will build that, although not soon cause I have no money :C
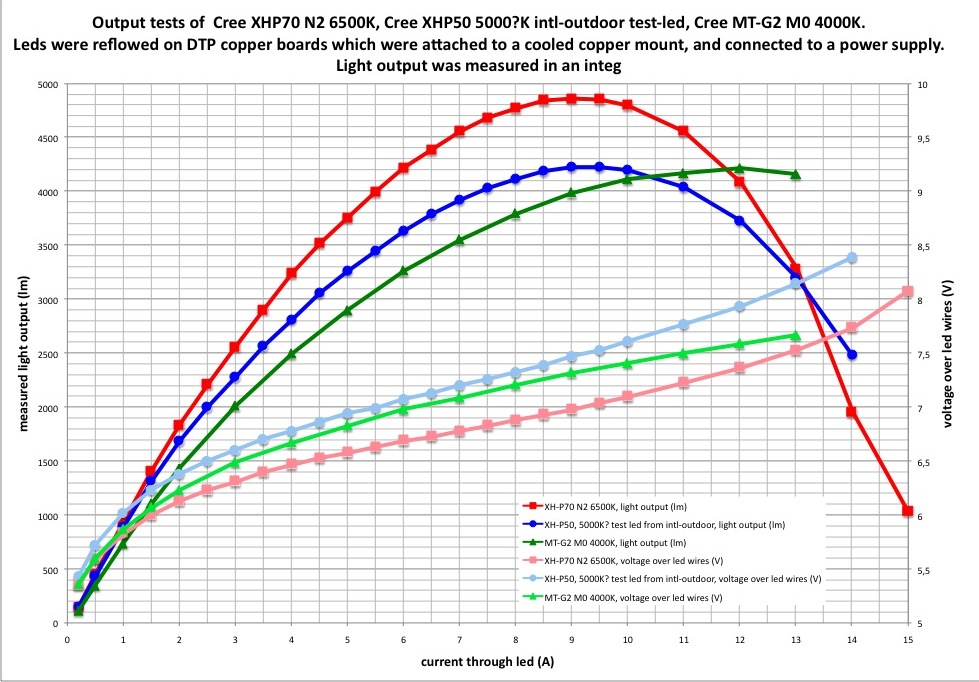
Cree PCT - way more practical than any datasheet! Together with measurements from djozz that show high-current performance it is possible to calculate most values and get very realistic results.
Of course, it is all specualtion until someone actually tests the XHP-50.2, but I think it will be very good.
By convention, the larger L2 dies on the XHP70 can handle higher outputs than the XHP50 G2 dies.
The harder you drive the LED, the more difference there is.
The tests in the link you showed are only for very low currents, so the difference is minimal.
The 50.2 is actually not much brighter than the old 50, it’s just more efficient.
Hopefully someone can make a graph of the 50.2 outpupt soon.
I second the suggestion about using something other than a drill-bit on the 1” hole. Reamer, countersink, something to gradually open it up, maybe even a Dremel to grind away the inside of a scribed 1” circle.
Or if you can get a step-bit to at least 25mm, that should do it. I (carefully!) use a 20mm to match-mod Minimags.
Haha thanks
I’ll try the countersink bit, the regular drill bit didn’t work very well.
If bits don’t work I may just try widening it with a rounded file, it will take a while but should work out.
Finally got the hole drilled and the new plug inserted!
Took like 12 hours to get this part done… was a huge pain to shape such thick aluminum.
This was the easy piece, only a few mm of aluminum.
7075 aluminum is really tough!
The plug was pressure fitted with a hammer, it will never go anywhere.
Unfortunately I didn’t think about the plug that needed to fit inside the connector, so after pressure fitting the plastic socket I realized the plug didn’t fit.
Then I ended up spending 6 more hours grinding away at the inside of the plug with files to make the plug fit again.
In hindsight I should have spent the extra 2 hours to widen the hole in the aluminum a millimetre more…
Soldered the wires coming from the switch too.
All closed up!
Here’s the end result. Pretty clean IMO, minimal scratches to the aluminum handle during the whole process.
Here is what I did for the external battery case. This case can be used for any flashlight or device that takes 12v, I just need to put a connector on the device and it plugs right in!
Got the batteries on sale for about $50 each
4x 3s, 11.1v, 6Ah, 65C continuous, 130C peak, aka 780A per battery!
Total is 24Ah so it should last about 3-4 hours at full power with the XHP70 I will use.
Made a 4x parallel connector for the batteries.
It’s a tight fit inside the case, everything fits just perfectly.
The connector from neutrik is very good quality. The cable is 10/3 SOOW, about 1m long. One conductor is unused.
There is a on/off switch and a voltmeter on the case, I used a 0.28” DROK meter from amazon, very good quality.
Can be carried by hand or easily put in a backpack with the cable coming out.
Thanks
I take the pics at full res and upload them to imgur without compressing or resizing because that takes long to do.
People who want to see the original can just right click and open in new tab and see the full pic.
I just set them to 50% width here otherwise they go off the right of my screen.