new batch is almost ready to go I said I start ordering stuff when 30 drivers are requested and will order parts for 50
There’s only one 7135 on there so it looks pretty easy to swap out. Maybe you have an old driver you don’t need that you can strip a 7135 off of. If not, MTN Electronics sells them super cheap.
I actually have a stip of 7135’s, just have to get some more practice in before attempting. I think dealing with these itty bitty parts is how I messed up my original driver (resistor mod), total noob, and not steady 63 yr old hands. BTW, there’s 8 7135 on one side and the single on the other….???
Oh yeah, post #102 shows the backside. So 9 in total. I wish I knew how to narrow it down to find the faulty one.
Removing all of them and cleaning the pads is not too hard, but soldering new ones would be a pain by hand. You’d need a hot air reflow station and solder paste to do it quick and easy.
Its some pretty bad luck. If you really want to fix it, maybe ask Richard at MTN if he could do it.
I hope it’s a rare occurrence.
Package delivered today. I’ll force myself to wait for the solder station I ordered that’s scheduled for delivery wednesday before starting on the lvp mods for the 2s light but will install one as-is in the D01. I’ve been searching for another grey D01 but the major sources are out of stock so it will remain 1s3p until I find another, make a 2s battery tube, or cut and extend the 1s tube.
Wait what? ![]() Grey battery tube for a D01? :smiling_imp:
Grey battery tube for a D01? :smiling_imp:

I’ve been trying to get an idea how these are made and I found a really good video on reflow ovens. There’s lots of good info here.

Lexel, are you using a small oven like this or a different method?
I got my driver today!
I haven’t installed it yet.
For you guys with L6’s and who want to know when your rear switch is on and off as well as more easily find the side switch in the dark, then check out this thread starting at post 265.
I try my best to describe how to make a lighted side switch that comes on when the tail switch is on. It’s handy whenever you have a driver that can turn the flashlight on and off with the side switch.
I haven’t installed my TA driver yet, but I have the pads labeled where you would connect the switch and led power. I’ll be confirming all this soon.
2 decently bright leds caused a 0.4 milliamp drain. I use my light for brief blasts here and there at work and the tail switch stays on roughly 40 hours per week, then I recharge the batteries. This extra drain has no effect at all for me.
Now sitting on a shelf with the tail switch on for months at a time I’m sure would drop your battery voltage. Then again, if it’s going to sit and not be used, then turn the tail switch off. Duh. Lol
Amp draw while on standby was 0.48 milliamps. About 0.4 of that is the LEDs I added. So the driver itself is only about 0.08 milliamps. That’s lower than I expected. My Kaidoman version FX30 driver had a 1.45 milliamp draw all by itself.
I hope this helps others.
Installed one of the narsil TA drivers into my skilhunt h03 tonight. Every thing is working great, except for the indicator led which I’m sure is user error. I’ll open it up later and figure out what I did wrong.
Thanks lexel for putting these together. They all look great. Now I got a few more projects to keep me busy for a little while.
Here’s a little video of my TA driver with Narsil in an L6.

Make sure the led positive is on the indicator resistor and that polarity is correct.
I don’t know which driver you have, but there are pictures in the 1st post. It shows 2 points where the indicator led is attached. The one with the resistor is positive, the other is negative. Of course the little led your using will also have a positive and negative marking on it.
I found some instructions for version 1.2 of Narsil, but I don’t know how to enter the config mode and make changes. Can anyone explain it to me or make a video maybe?
Thanks.
Narsil v1.1 manual has same instructions to enter config modes as newer ones
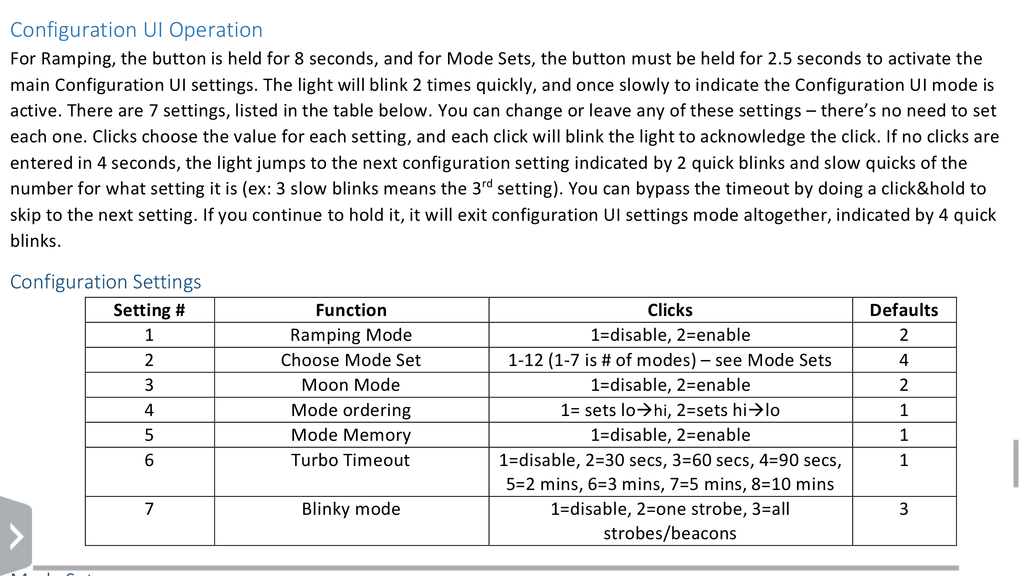
Configuration UI Operation
For Ramping, the button is held for 8 seconds, and for Mode Sets, the button must be held for 2.5 seconds to activate the main Configuration UI settings. The light will blink 2 times quickly, and once slowly to indicate the Configuration UI mode is active. There are 7 settings, listed in the table below. You can change or leave any of these settings – there’s no need to set each one. Clicks choose the value for each setting, and each click will blink the light to acknowledge the click. If no clicks are entered in 4 seconds, the light jumps to the next configuration setting indicated by 2 quick blinks and slow quicks of the number for what setting it is (ex: 3 slow blinks means the 3rd setting). You can bypass the timeout by doing a click&hold to skip to the next setting. If you continue to hold it, it will exit configuration UI settings mode altogether, indicated by 4 quick blinks.
That’s just a copy and paste from the manual which is not too clear for my understanding.
So I hold down the side switch 8 seconds to go onto config mode. That I know.
If I want to disable all blinkies for instance, do I then click 7 times and wait for a confirmation, then click once to change the setting? Maybe it blinks once to confirm?
Then do I press and hold the switch to exit?
It will progress though each setting number. It will flash 5 times to indicate your on setting number 5, then make your choice, let it time out or skip to go to setting 6. To disable bpinkies wait until it gets all the way to setting 8, then press one time.
Yes to exit just press and hold
Just enter config mode holding eswitch 8 seconds
Light aknowleges that
Then take your time and let the lights cycle through all of it
Its similar to Bistro, just when you see in Bistro a buzz to do a half press to enter, now click sideswitch 2 times to choose option 2 or 3 times for option 3
I’ll try it out. I’ll let it go until I see 7 flashes then click once. Hopefully that works. Once I get the hang of it I’ll do a video so others know what to expect.
Sadly, I don’t have a light with Bistro. I know, I know. I’m probably the only person left who doesn’t. :cry:
Alright, I think I figured out the config mode, but it’s not working.
I ignore the first 2 blinks then count out the rest. When it gets to 7 normal blinks I press the button once and the light comes on once. Then I get the 4 or 5 flashes saying it’s finished.
The problem is I still have strobes and biking flashes, etc…
Here is the setting sheet for Narsil v1.1 and v1.2.
It shows that number 7 is for the blinkies and that 1 click should disable them. I’m not sure why it’s not working.
The first couple times I did my single click after 7 blinks I got a confirmation blink. A few times I didnt. Once it took 2 clicks to get a single confirmation blink.
Hmmm, it’s possible my lighted side switch is interfering with the signal. DBCustom has a different driver and his lighted side switch was interfering with basic operation like ramping up and down. He swapped his 50k resistor with a 75K and it started working fine. I’m using a 15k, so I’m gonna try upping my resistor size and see if that works.
could you split the ground from LED and switch, that definately get rid of problems
I will test this out on a Narsil v1.4 light