6th Annual Scratch Made Light Contest - Flashy Mike's machined project

Ok, let me just throw my hat into the ring for the first time. Don’t know yet if this is a good idea since it’s pretty uncertain whether I’ll finish this project at all - perhaps because it’s not feasible due to the limited tools I own, because of lack of time or money or just because of missing skills.

Two events happened in the near past: I’ve been camping with wife and kids (first time after decades) - and I got my first 3d printer.
During camping I missed a lantern which I could place on the camping table, e. g. for reading or playing games. I don’t like the common camping lights since they are still too bright in the center which causes dazzling, I’m pretty sensitive to that. Whenever possible I prefer indirect lighting.

I did some rough tests with my Q8 and some ugly parts printed with my new 3d printer and the result turned out pretty well.

So the following project idea grew in my mind. This sketches are pretty rough, quickly created with Tinkercad. Lots of details are still missing.


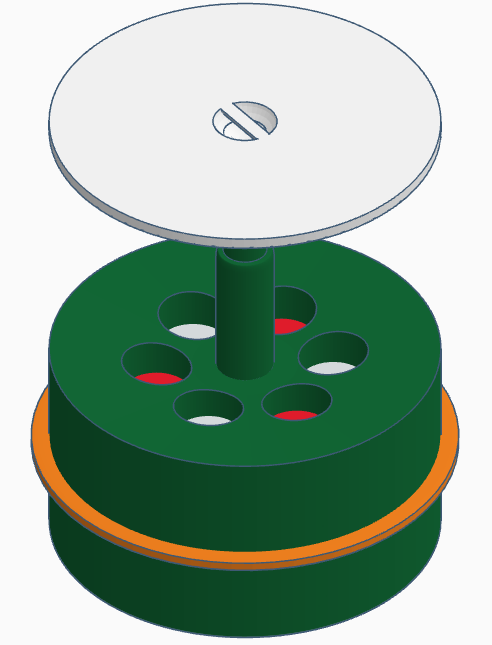
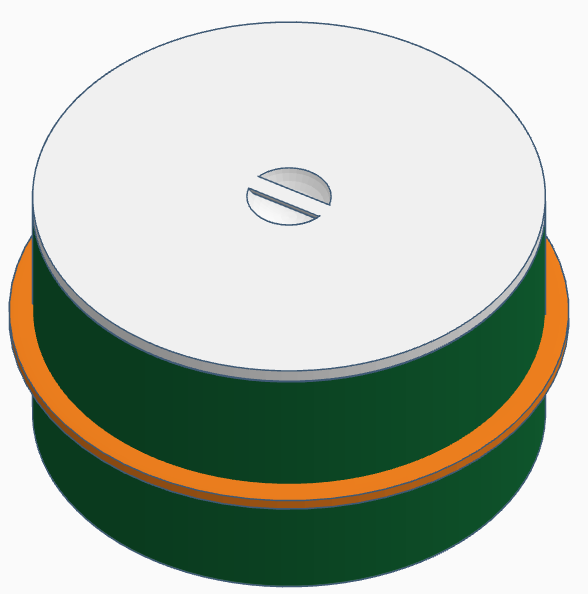
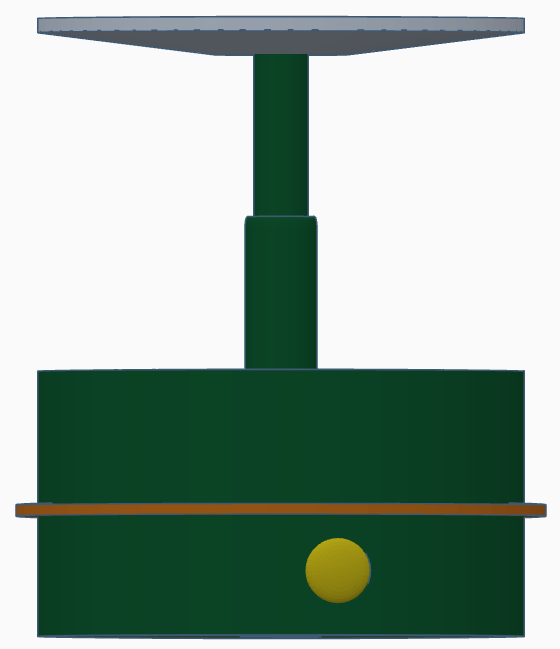
Some (intended) technical facts:

- 3 white LEDs and 3 red or orange LEDs arranged in a circle,
pointing to the retractable reflection shield on top of the light.

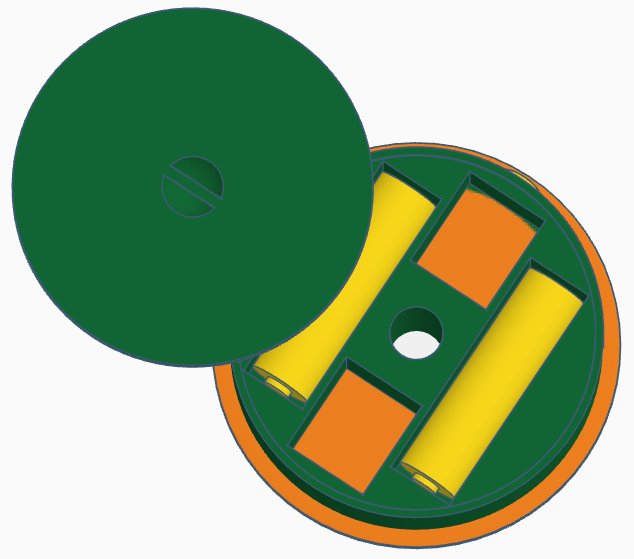
- powered by 2 protected 18650 cells,

  • probably USB charging.

Casing will be 3d printed, so I’m joining the machined category, I guess. There is a copper or aluminium disk in the middle of the casing which protrudes a couple of millimeters to help spread the heat - which is hopefully not too much since this light will not be driven hard. As white LEDs I intend to use 3 of the beautiful Nichia 219B out of my hopefully soon arriving ROT66 (I have a special idea for the ROT66 where I don’t need all of these LEDs). Don’t know yet if I finally add the 3 color LEDs but I think it will be nice to mix them with the white LEDs for a comfortable tint in the night or to simulate candle flicker. I could even use XM-L RGBW LEDs which enables me to add disco light (my son loves this idea).

The casing will probably be made of ABS filament, since it’s more resistant to heat than PLA and can be sanded easily to achieve a smoother surface. Have seen the planned telescope system for the reflection shield in my selfie stick, hopefully I’ll get this working with my 3d printer as well. Mounting points are planned for top and bottom of the casing, in order to hang this lantern to the ceiling. If possible I’ll make the reflection shield removable in order to have the option of direct lighting when required. Don’t know yet if I’ll add magnets since I probably don’t have a usage case for them.

The LED boards will be mounted to the metal disc, glued or soldered, don’t know yet. Still wondering if I’ll use reflectors (have a couple of spare S2+ reflectors left after triple mods) or optics. Probably narrow optics are better since I want as much light as possible to hit the reflection shield. They shall sit pretty deep in the casing, I don’t want to see direct light from the LEDs from the side.

The reflection shield will probably be kind of a cone in order to spread the light around. Unfortunately it has - when 3d printed - steps which negate the intended purpose since their surface mostly has a right angle to the beam. I might sand this cone (or smoothen it with acetone) and cover it with reflection paint for better light distribution.

If I find the time I might even design a fitting driver board, otherwise I’ll just use one of my existing ones.

Finally I have another nice gimmick in my mind for this lantern which I’ll reveal later when I know for sure it will be realized.

Looks interesting, I hope you do get it made in time :+1:

Subscribed :wink:
And don’t forget to PM =the= for your thread to be added to the contest!
Good work :+1:

Nice idea! This will be a very unique lantern for table-top lighting!

Here’s an idea: Do you really want to make everything 3D printed? You maybe could use a piece of aluminum to make the reflector cone. If you can find a thick enough piece of Aluminum plate or bushing/washer, you could drill a center hole (if using plate), put a bolt through, and spin it on a hand drill held down with clamps. Then file the cone shape with a hand file while it spins. After, maybe you could 3D print something to plug the hole that will also be the hanger for the top.

Good luck Mike! What printer do you have?

We are living in a flat, unfortunately without a dedicated room which is suitable for metal working. Neighbours won’t like me using machines here, and I won’t like the cuttings all over my room.
Apart from that, I really like the idea to use as much 3d printed parts as possible, as a proof of concept.

Btw., I don’t see an advantage in using aluminium for the reflection shield. I need diffuse reflection, just like the ceiling of my room, and the aluminium won’t be much better for this purpose, I guess. It mainly adds weight.

Its a Creality3D Ender-2:
https://www.creality3d.cn/ender-2-p00093p1.html

A very nice device, small, mostly prebuilt and with a reasonable price tag. I like it a lot, did some improvements meanwhile. The little thing is printing all the day …

Whether you finish in time or not to me doesn’t matter.
I was looking at your pictures thinking they looked pretty good when I read they are pretty rough. I’d like to see your good sketches. :slight_smile:
All the best for the build and the surprise.

Well, my thought was that you might want as much reflection as possible, even if (or especially if) it is diffuse. But I understand your limits on machine noise and dust/debris. It should work well enough with the reflective paint I think. I’m looking forward to seeing your build.

” Flashy Mike ”
Nice entry idea :+1:
You may want to consider Chrome MonoKote http://www.monokote.com/metallic.html
You can heat shrink it tight on the cone for reflection. I used this Monokote when making RC Planes with my son yrs ago. Use a light heat gun to shrink it tight after super gluing it down around the edges.

:beer:

I have the same printer, indeed a nice and small device. What improvements did you do? Lately I installed a E3D V6 clone on mine together with a firmware upgrade to the latest marlin, have not printed a lot after the change but the few prints I did came out great.
Also did some smaller upgrades like belt tensioners, filament guide and a tilted lcd mount.

Do have to say that I kinda expected a little bit better print quality out of the box after seeing many reviews. But I do like this small machine!

Up to now only the simple ones, like filement guide, silent fans for board and hotend. Designed and printed a small plate for the bottom of the hot end to stop the fan blowing partly onto the printed object (when using ABS). Designed and printed a simple filament roll holder since the filement string had too much tension when pulled from the holder on top of the Z-Axis.
Haven’t changed the power supply’s fan yet, since it was a too tight fit with the ordered silent 20mm fan (stock one is 15mm). Still looking for a fitting silent 60x60x15 fan with suffizient flow.

Got the green ABS for the lantern yesterday, currently searching for the best slicer settings.

Looks interesting. I considered making the cone of two parts anyway, so I could hide the glued foil around the edges with a flat plate on top.

Good luck with the build, Flashy Mike :+1: :beer:

Unfortunately I haven’t done much for this build in the last days but I got more familiar with 3D design and printing. I created my first designs with Tinkercad which is great for beginners but lacks features for advanced designers. So I downloaded Fusion360 which is more capable. As in other products of this company I had my problems with the user interface but was able to create my first design after an evening (and after lots of grumbling and google search).

To learn more about the capabilities of my printer - and in order to know what I can do in my camping lantern design - I designed and printed a couple of screws and bolts in different sizes. Turned out surprisingly well, the smallest one in this picture is M3!

First prototype of the mechanism for the rectractable reflector. The thinner component will be screwed at the top end into the reflector. Prototype is shorter than planned for the final build in order to save filament and time during testing. Perhaps I’ll add one more segment if necessary. Currently printed with PLA, probably will be made of green ABS for final build.

Can’t see 2 of the pics but looks like you’re making progress :+1:

Nice project, the first contest entry as I remember that will heavily lean on 3D printing :+1:

Which of the pics can you see? There is a green rendering, and 2 fotos with orange parts, one of the fotos with 2 separate components. I’m using google fotos for this pics and there might be a problem with links.

On my laptop I can see all the pics.

On my desktop, this is what I see: