That’s unfortunate. It would be really nice to be able to optionally disable them through some other means than untwisting the tailcap. One case I have in mind is when using the light in moonlight, unless even then they’re not bright enough to influence the main emitters’ tint noticeably.
The presence of 2.5V in the light is a bit puzzling to me, but I suppose that must just be due to a resistor controlling current to the button LED’s.
I don’t suppose the aux LED board uses an ATTiny. If it does, perhaps its feasible to customize its firmware so the aux LED’s can have a few modes controlled by loosening and tightening the tail cap. But then that’s an extra program to develop in addition to the Anduril / Narsil customizations.
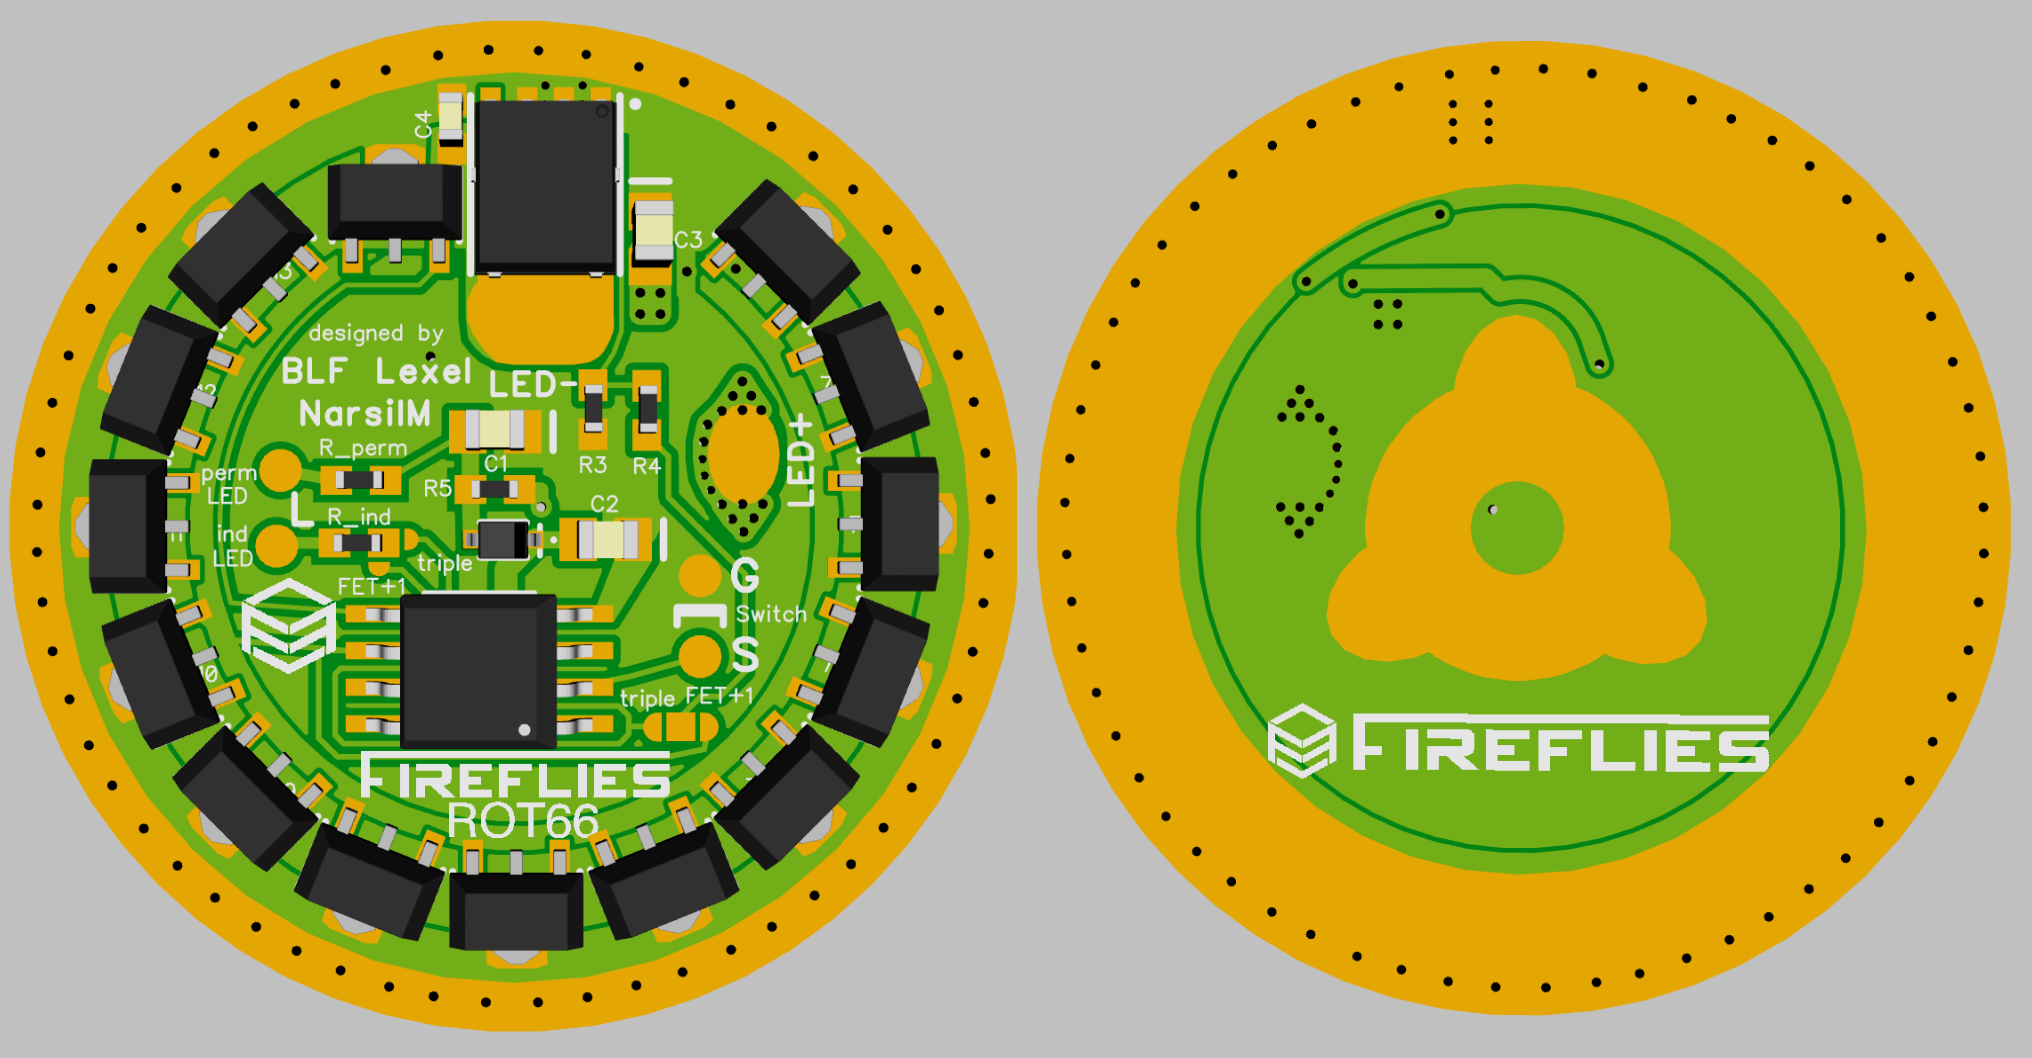
I’m not sure what controller the aux LED board uses, but it’s very small and says “EDM2” on it.
The 2.5V channel is actually 3.95V coming from the MCU pin, but then it goes through something to lower the voltage, and then it goes to feed the button LEDs. The aux LED board could probably be powered from the same pin, but it would need to be hooked up before the voltage-reducing parts… and that requires changes to the driver PCB.
How does the MCU maintain 3.95v on the pin if the battery voltage is say 3.2v?
Lexels drivers use a resistor to reduce switch led current. You could tap in before the resistor.
If we look at the driver:
At 9:00 we see the R_ ind and R_perm. The perm is a source of permanent power for a switch light. The ind is the MCU controlled output. You can probably power the aux board from the ind if you tap into the right side of the resistor. The left side is the output.
It doesn’t. It’s basically just battery voltage minus ~0.25V.
I’ll try it, but it’s very small.
…
Okay, managed to get the wire connected there, and it’s working. It turns red at about 3.55V now instead of 3.30V, but that’s okay. Also, it can’t do the “low” mode like the button LEDs do, so it turns off instead.
This is what I was trying to do earlier, but while squinting at the driver I didn’t see a good place to attach anything. The inward side of that resistor is just barely big enough for a thin wire though.
No, low mode is way too low for the aux LED board to work. It turns off when it senses low voltage, and the “low” mode is far below its “off” threshold.
Anyway, I did some quick measurements. My light box is not calibrated with anything resembling a reputable reference light, so these numbers should not be taken very seriously, but here is what I got at some key levels:
219B version:
115/150: 780 lm (highest regulated mode)
125/150: 1353 lm
130/150: 1822 lm
SST20 4000K:
115/150: 923 lm
125/150: 1485 lm (highest regulated mode)
130/150: 1911 lm
Levels 115 and 125 are the top of the Nx7135 regulated modes, depending on which driver is used (7 or 14 chips).
I included level 130 because it is the “panic” threshold. Above this level, any overheat condition will cause the light to quickly ramp down to level 130. Below this level, it does normal PID regulation to search for a stable level.
From Lexel’s description there is an LDO regulator on board, which could account for the 0.25V drop. It also supposedly drops out at 3.0V, which seems a bit high to me, but safe.
Presumably the aux. MCU has some way of sensing Vbatt before the regulator. Otherwise it would be rather pointless. Given that it only does one trivial job anyway, it seems to be rather a waste. Perhaps if serial comms. could be established with the prime MCU via the button LED circuit, there could be some potential for clever tricks.
Not really sure what the purpose of the regulator is, (or the MCU) but heigh-ho.
The aux LED board expects a direct connection to the battery. This allows it to measure voltage directly. It then has its own LDO for powering the LEDs at a consistent brightness.
The 0.25V drop is from the diode the MCU uses for reverse polarity protection.
Today I have Andruil from 30.09. Version 219 flashed. In Moon mode, the LED flickers. Can the problem be solved? Floor level is at 2.At level 3, the problem is not.
I tried six Fireflies lights/drivers and none of them flickered on level 1/150. The lowest level runs at the very edge of the hardware’s capabilities though. Are the batteries low? Is there a loose or extra-long wire?
Regardless, part of the reason why the floor level is adjustable is because of hardware variations. If the lowest level is too low, use a higher floor.
Batteries were full and cable to the led I exchanged they are 25mm. I will test it with the original cable. It does not bother much and if I go to level 3. Thank you very much
I built a C8F triple with a FET+1 driver from Mountain Electronics. I have to put it on 3 as well otherwise it flickers. This is with different driver and LEDs (LH351D) and 1S battery. Probably the 7135 chip cant go lower.
Last I checked, Mtn uses the 380mA chips with a sailboat on them, and they don’t perform well at all at low levels. Acting weird at level 1 is probably normal for those.
Fireflies uses the 350mA raptor claw chips though, which are generally very good at low levels.
This is not the answer you want, but if they used Loctite, it breaks down somewhere between 150° C (max rated service temperature) and 250° C (temp they recommend for removal).
I use a heat gun from time to time to remove Loctited bolts, but bolts don’t have electronic components or solder, which melts somewhere around 180° C.
I don’t know if it weakens somewhat below that temperature. Heating the light might work, or it might kill it before you actually break down the adhesive.
For those who don’t already own the light, I noticed yesterday the website does now have the option to select an unglued bezel, warrantied only against defects on arrival.
Unless money is really tight I would just sell the glued one and order a new one if you absolutely must access the bezel. It’s not worth the risk of melting the optic and other damage when you can order it unglued from the factory.