25-11-18
Time is running short, & I don't even have a working light. Time to sort that out today....
I needed to make a lens to protect the LEDs, & found some donor material in the form of a clock, which had untill then been hanging on the wall, mocking me... :)

With the lens cut to size, I could finally attach the LEDs to the faceplate. Each star was screwed down, then the wiring was run & tested, prior to bolting everyting together.

Inside the Lantern head houses all of the electronics; 4*18650 cell holders in parallell, a USB charging board, & the driver.
The remainder of the wiring was installed, including a seperate toggle switch for the charging circuit, to prevent cell drain when the Lantern is in storage.
I tested everything again, using a temporary Nanjg style driver, mainly to work out what kind of maximum current I needed. After settling on 1.4 Amps, I set about putting together a dual-channel driver, running a seperate slave board on the 2nd channel, rather than a FET.
Unfortunately, there was an issue with the driver &/or firmware, & I wasted a bunch of time trying to fault-find, before putting it aside, & rummaging around for another driver.

I found an early prototype Q8 diver that needed a few parts put back on it, but it was too big to fit into the Lantern head.... So out came the cut-off wheel to reduce the driver size.
The slave board was attached in the same manner as before, & then I flashed the ATtiny85v with Anduril. After testing, I insulated the driver, & secured it to the back of the switch plate with velcro, so it can easily be removed & re-flashed in the future.

Finally with a functioning light, I turned my attention back to the body. After getting Jack out of the way, who looked like he was performing a "quick change act", I attached a velcro strap to the Lantern top. This will allow it to be attached to a variety of objects, rather than just having a hook or handle.

You may have spotted a small round grey bag early on in the build - it's an important part of the Survival Shack, namely being a mini alcohol stove. It's very compact, the fuel is sealed in it during transportation, & it has a mug/pan stand. ....I can smell fuel now... Jack might be getting ahead of himself...

WOOOOFFFF!! Jack has lit the stove inside the shack, & he's slopped fuel everywhere...

...A few hours later (wasted at the Emergency ward), & we return home to find the shack ruined.... I guess that makes the decision easy for me; I wasn't keen on how bulky the Shack had become, so I will have to change direction at the eleventh hour!!

------========------
27-11-18
So without the Shack to hang from, the Lantern has no way to stand up by it's self, for use on a table, etc. I spent time thinking about some kind of fold out leg setup, but ended up with a nice simple solution, using some offcuts from last year's build.
I fabricated a set of four legs, that simply insert into holes drilled into the top of the lantern. The holes are a tight fit, but to stop the legs pushing through too far, & also to add stability to it, I soldered stoppers made from the end of some bullet casings.

Here's how they attach, & the Lantern in "table top" mode;

And of course, the night shots!!

27-11-18
Now that there's no "Shack", we'll need something nice to keep the survival set together. To recap, the survival kit comprises of;
* 10w Solar panel, supplying power to 4 USB stepdown modules capable of 3A output each
* Tomo S4 powerbank
* Mini alcohol stove & lighter
* USB rechargeable Lantern assembly
I spoke to my friendly canvas guy again to see what materials he had on hand. Luckily he's a bit of a hoarder, & also a nice guy. I was able to choose pretty much anything I saw, & get a lunch-time tuition in 'quick-bag-making'....
Enter the "Survival Sack"
I chose some camo canvas (of course...), & some padded lining;

Next, the sections are cut out to size, & the outer canvas is glued to the inner padded lining.
The center section is one long piece, which a zipper is sewn into, then seperated. Handles & tags are then sewn in place, prior to the final trim piece, which is sewn around the perimiter, to hide all the seams & strengthen them.

28-11-18
The "Sack" has been completed. It would have been nice to have additional pockets, etc., but I'm pretty happy with how it turned out;

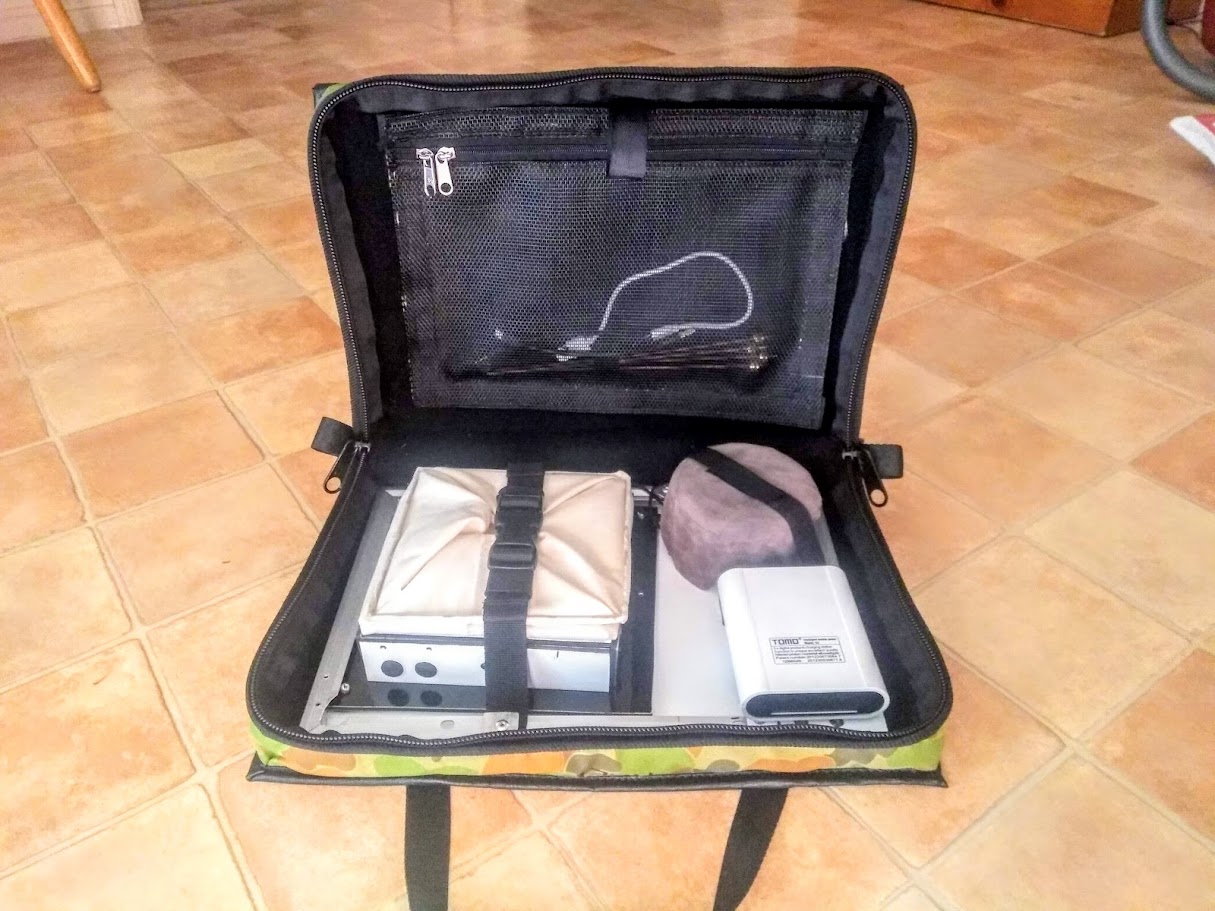
To keep all of the components from floating around whilst in transit, they needed to be tied down. The Tomo powerbank has been secured by some "3M Dual Lock", which is like a Velcro, but much more rigid.
The stove is secured by a Velcro strap, & the Lantern has an adjustable clasp style strap, & also a small square of the 3M Dual Lock on one end. The Lantern head is also sized such that it will tuck under the lip of the solar panel frame.

Here's all of the components in place & strapped down;

The Lantern can also be charged whilst inside the Sack, from the powerbank. Here's the completed Sack, with all components in place;

It's surprising how much light is produced at the 1.4A max. Even the 350mA channel is ok, for extended runtimes, although it's proving difficult to get an accurate photo with my 'phone.
----------=============----------
30-11-18
...Never too late to add a little more to the build.... :)
I found I was missing a pocket to stow smaller items such as spare USB cords, the Lantern stands, etc, so I Made up a simple removeable pocket which is velcro'd to the inside of the Sack;

So that's it for the build - I'll post some additional photo's in the OP shortly.
Cheers! :BEER:


