Hello everyone ... today we will see the brand new Astrolux S43 that Banggood kindly sent me for the review.
The flashlight can be purchased directly from this link and using the coupon 9f1297 you can get a substantial discount on the sale price.
The copper version is also available: Astrolux S43S to this link with coupon BGS43S
.jpg)
Packaging and content
The Astrolux S43 arrives in a rigid carton pack, with a thick layer of foamed packaging inside that holds and protects the flashlight during transport. The package includes:
• The flashlight (Astrolux s43)
• The wrist strap
• Spare O-ring
• 18350 tube
• Belt clip
• Glass-breaker + ¼ -3/8 adapter
• User manual
.jpg)
.jpg)
.jpg)
.jpg)
.jpg)
.jpg)
.jpg)
.jpg)
Main Feautures
•Use 4x Nichia 219C or 4x Cree XP-G3.
• Maximum power up to 2100 lumens (XP-G3) 1600 lumens (Nichia 219C)
• Max Beam Intensity: 8500cd (XP-G3) 5500cd (Nichia 219C)
• Maximum Distance: 184m (XP-G3) 148m (Nichia 219C)
• High efficiency constant current circuit
• Intelligent charging module with micro USB charging port
• Made of HAIII aeronautical grade aluminum alloy with anodized hard finish.
• Protection against over-discharge and overcharge • Status LED under the power button.
• Ultra-clear mineral glass reinforced with anti-reflective coating
• TIR lens • Battery control function
• LED with "breath" function that shows the cell voltage
• Emergency tactical spike useful as a glassbreaker or for self defense
• Waterproof according to IPX6
• Impact resistance up to 1.5 meters.
• Possibility to mount the flashlight on tripods
• Color Tint: 6000-7000K (XP-G3) 5000K (Nichia 219C)
• User Interface: NarsilM V1.3
Dimensions and weight
• Weight without battery: 88g (version 18650) 74g (version 18350)
• Weight with battery: 135g (version 18650) 96 (version 18350)
• Belt clip weight: 8g
• Glass-breaker weight: 8g
• Weight S43 with battery, glass and clip: 147g (version 18650) 108g (version 18350)
• Max / Min head diameter: 30mm / 27mm
• Body diameter: 27mm
• Length 122mm (version 18650) 89mm (version 18350)
Default UI: "Smooth ramping"
[/size] This feature-rich UI provides for smooth ramping of the light output between 0 and 50%, with an easilyaccessible 100% TURBO mode.
Turn the S43 ON:
single-click the button, S43 turns ON using the previously used light output level
Ramp light level:
press&hold button
Reverse ramp:
while ramping in one direction, release button briefly and press&hold again
Instant TURBO:
double-click
Turn the Lamp OFF:
single-click
MOON mode:
from OFF: press the button and release as soon as the S43 turns on
Strobes:
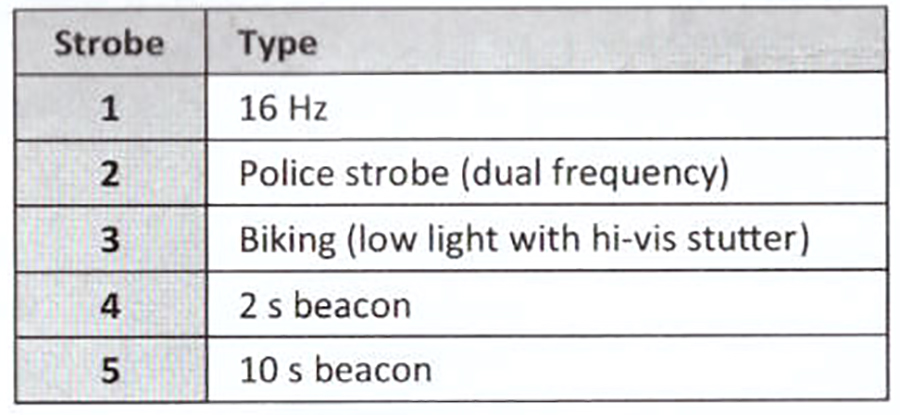
double-click for TURBO, and then double-click again The strobes are deactivated by default. To enable strobes you must klick 3 times in setting #4 (ramping) or setting #8 (modes). (Use single-clicks to cycle forward through the different types of strobes, but you have to be quick: If resting on a strobe longer than 1.2 s it locks in and the next singleclick is OFF. Press&hold at any time to cycle backwards through the strobes.)
Battery status:
triple-click (4 blinks, a short pause, then 1 blink would indicate 4.1 V average per cell, for example)
Electronic lock-out:
four clicks to disable the S43, same to re enable the Lamp
MOMENTARY mode:
five clicks (loosen and retighten the tail-cap to return to normal operation)
Factory reset:
triple-click (battery status mode), then double-click (driver temperature mode), double-click again (firmware version mode), then press&hold for about 2 s. Four blinks confirm a successful reset. [size=150]
Alternative UI: "Mode-sets"
[/size] The S43 is factory-set to operate using the contemporary
RAMPING
user interface, as described in the previous section. However, the S43 can also be operated using a more conventional
MODE-SET
style user interface. (See next section for detail on how to set UI options). Using the
MODE-SET UI
the output does not ramp, it steps from one mode to the next using single-clicks.
Turn the S43 ON:
single-click
Next mode:
single-click before the current mode ‘locks in’ (1.2 s)
Previous mode:
press&hold
Last mode [100%]:
from OFF: press&hold
Turn the Lamp OFF:
single-click button, after restingon a mode more than 1.2 s (mode locked in)
Strobes:
press&hold The strobes are deactivated by default. To enable strobes you must klick 3 times in setting #4 (ramping) or setting #8 (modes). (Use single-clicks to cycle forward through the different types of strobes, but you have to be quick: If resting on a strobe longer than 1.2 s it locks in and the next singleclick is
OFF
. Press&hold at any time to cycle backwards through the strobes.)
Battery status:
from OFF: single-click followed by press&hold (4 blinks, a short pause, then 1 blink would indicate 4.1 V average per cell, for example)
Electronic lock-out:
from OFF: double-click followed by press&hold, same to reenable the S43
Factory reset:
from OFF, single-click followed by a press&hold (battery status mode), then double-click (driver temperature mode), double click again (firmware version mode), then press&hold for about 2 s. Four blinks confirm a successful reset.
Switch backlighting
To disable the backlighting of the switch, just operate this way: while in "checking battery mode", press and hold the switch until the S43 flashes twice. After a flash a single click to disable the status LED of the switch
Momentary On
It's a hidden option that needs activation. Simply press the power button 5 times consecutively to activate Momentary On. This function is only available if you are in "RAMPING" mode. To disable the Momentary On, simply unscrew and screw the tailcap back on
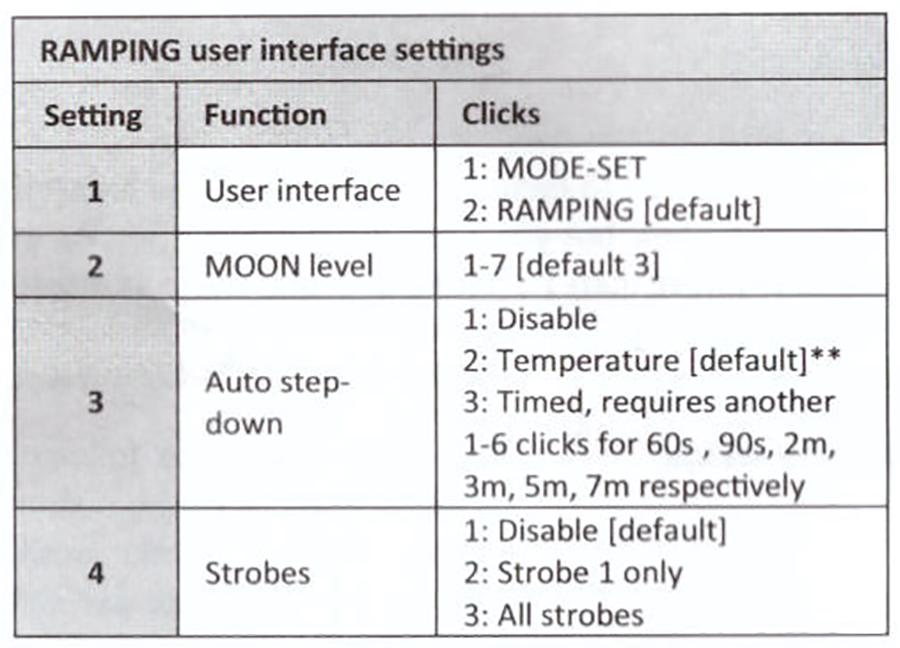
“RAMPING” e “SET MODE”: User Interface Setting
To switch from one interface to another or to configure the current one, simply hold down the power button for 16 seconds if you are in "RAMPING UI" or for 3 seconds if you are in "MODE SET UI". A double flash followed by a single flash will indicate that we will enter the "User Interface Setting". At this point (assuming that the current UI is the "RAMPING") the GT Mini, with a series of flashes, will indicate sequentially the functions that can be configured:
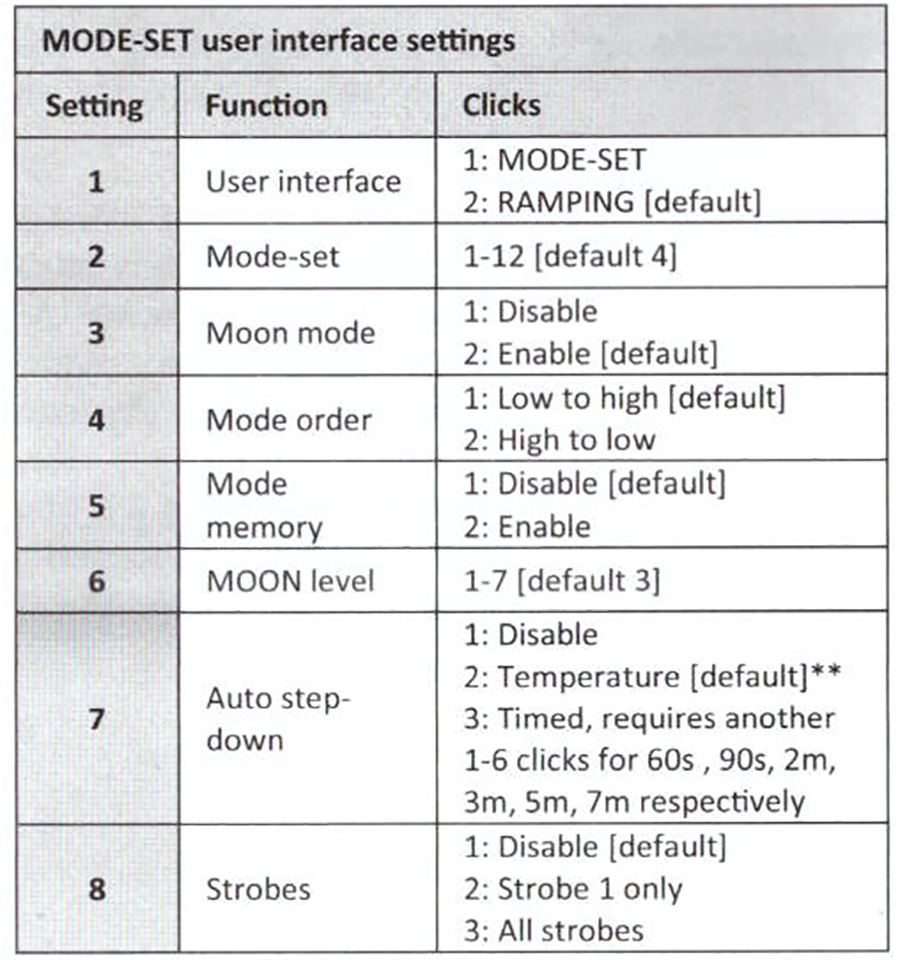
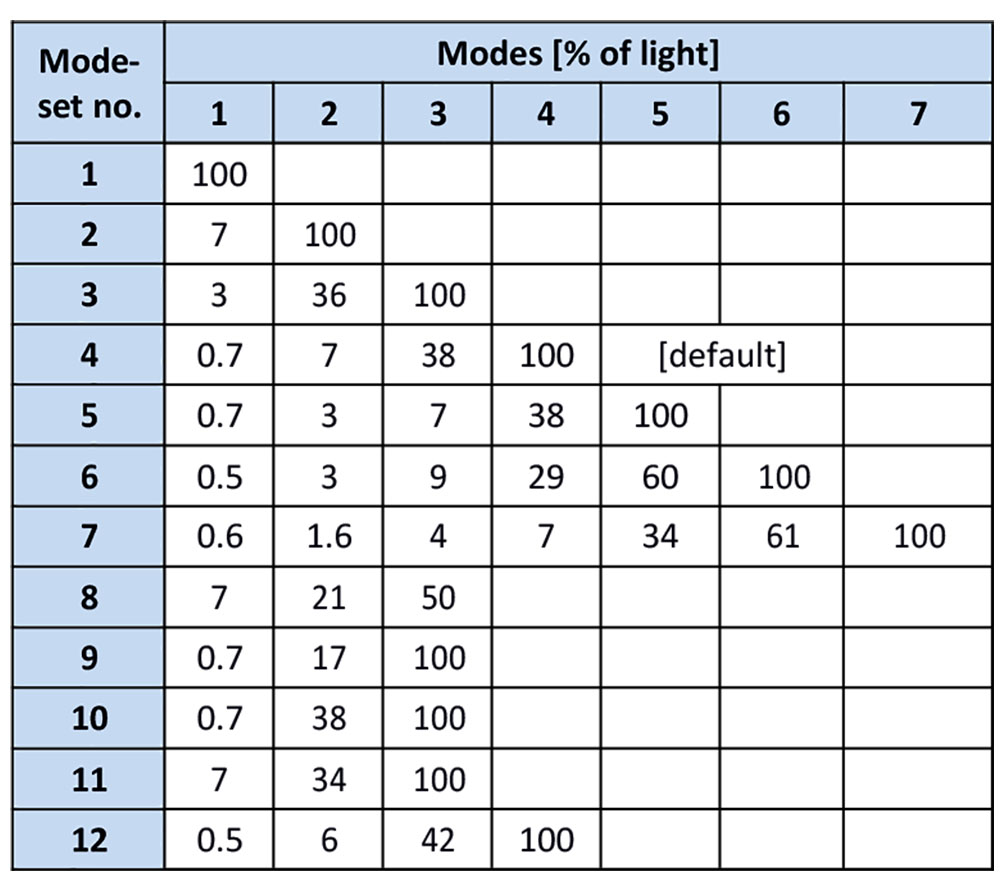
In a similar way it is possible to configure the "MODE SET UI" interface with the following functions:
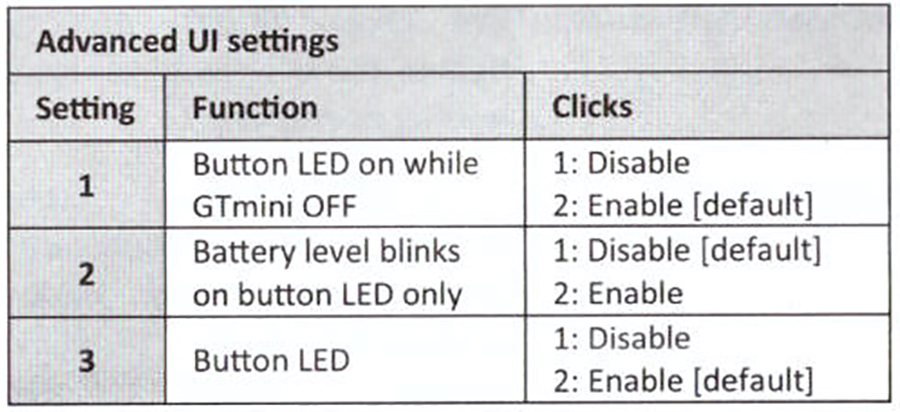
Advanced Interface Settings
There are also advanced settings of the interface that can be configured according to your tastes:
The discharge curve on the "Turbo" level is shown below. By default a thermal stepdown is set, therefore the Astrolux S43 after the first moments in which it clearly exceeds the declared 1600 lumens (it also touches the peak 2500lumen), drops dramatically on a very low level of about 115 lumens.
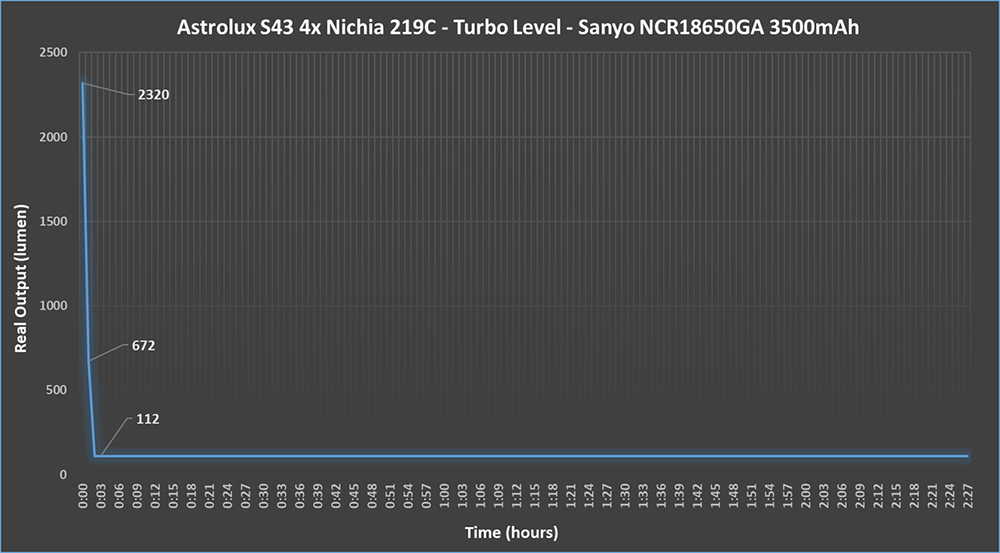
I tried to re-run the test by disabling thermal protection, but in this case the flashlight becomes unmanageable and in just 3 minutes dangerously exceeds 70 degrees keeping the output on levels above 1900 lumens. Having with me the lightbox and the previous versions Astrolux S41S Colored and S42 I performed some additional tests obtaining, using as power a Sanyo NCR18650GA 3500mAh, the following results:
S41S Color – Turbo - measured 1354 lumen
S42 - Turbo – measured 1392 lumen
S42 - with s43 tailcap – Turbo – measured 1568 lumen
S43 - with s42 tailcap - High Level “Ramping UI” (50%) – measured 1123 lumen
S43 - with s42 tailcap - Turbo – measured 2074 lumen
S43 - High Level “Ramping UI” (50%) – measured 1280 lumen
S43 - Turbo – measured 2320 lumen
The tests show that the S43 has a higher output than previous versions and significantly higher than the state Astrolux for the Turbo. Moreover, the S43 tailcap, with its double spring at the negative pole, allows an exceptional conduction of the current and therefore a higher output compared to previous versions. The measured values are to be considered peak, taken in the moments immediately following the switch-on. Furthermore, all measures are made with non-professional tools and may therefore also be deviating from the real values.
Main differences between Astrolux S42 and S43
The Astrolux s43 evolution of the younger sister s42, brings important and interesting news especially from the point of view of firmware and drivers.
Firmware S43: “Tom E’s open-source GPL NarsilM v1.3 adapted by Texas_Ace”
Driver S43:“Texas Avenger FET Driver with charging”
Also aesthetically the differences are substantial: The S43 is longer (about 8mm) while the head and tailcap are about 1mm wider than the S42.
.jpg)
.jpg)
Change the charging port that in this new model is improved and safer in terms of waterproofing.
.jpg)
The finning in S43 is deeper and more accentuated. The knurling that in S42 was present both in the body and in the tailcap, in the S43 is present only on the tailcap.
.jpg)
.jpg)
.jpg)
The threads are identical so it is possible to indulge, for those who have the previous versions, in creative compositions with different colors and parts. The various parts can also be replaced with the parts from the Astrolux S41 and s42.
.jpg)
.jpg)
Astrolux S43: The body and the materials
The Astrolux S43 is a compact and massive EDC flashlight, small in size when used with the 18350 reducer tube and a little bit long if used in the 18650 configuration.
.jpg)
Thicknesses are abundant as well as weight. In the hand gives a nice feeling of solidity and strength.
.jpg)
.jpg)
It is very comfortable to hold and the side button is easily identifiable in any condition.
.jpg)
.jpg)
.jpg)
.jpg)
.jpg)
The S43 can be dismantled essentially in 3 parts: head, central body and tailcap
.jpg)
In the head there are the 4 LEDs (Nichia 219C) and a quad-reflector TIR with purely diffusion characteristics.
.jpg)
.jpg)
The side power button is surrounded by a copper-colored ring. Very soft to activate, at the pressure it emits a shimmering "click".
.jpg)
.jpg)
.jpg)
.jpg)
On the opposite side of the power button is the USB charging port. This is well protected and isolated from water and dirt thanks to a gray rubber stopper. A small tab facilitates the opening operations.
.jpg)
.jpg)
.jpg)
The anodization is well done and the knurling is present on the tailcap. The central body is instead smooth and has only horizontal grooves for the installation of the belt clip.
.jpg)
.jpg)
.jpg)
.jpg)
The bezel is quite protruding and effectively protects the lens
.jpg)
The dissipation fins are deep
.jpg)
The tailcap, without glass breaker and screw, is flat and allows you to use the flashlight in tailstanding. There is also a small hole for inserting the laynard.
.jpg)
At the bottom of the tailcap there is a standard thread for attaching to a tripod or compatible supports. A handy adapter / reducer is also supplied to transform the thread from 3/8 "to 1/4".
.jpg)
.jpg)
Included is also a metal spike, useful in emergency situations such as glassbreaker or for personal defense. To install it, just screw it in the tail.
.jpg)
.jpg)
.jpg)
.jpg)
.jpg)
Here's the flashlight with the glass breaker mounted
.jpg)
.jpg)
.jpg)
The threads are anodized and allow the physical lockout of the interface.
.jpg)
.jpg)
At the negative pole we find two golden springs, very thick and rigid
.jpg)
.jpg)
At the positive pole, a large golden protruding button that allows to use both Top Button and Flat Button cells.
.jpg)
.jpg)
.jpg)
No batteries are supplied with this Astrolux. Given the great absorption, it is recommended to use quality and high drainage cells. For my tests I used a 3500mAh Sanyo NCR18650GA.
.jpg)
Here is the S43, in the 18350 configuration, flanked by an Armytek 18350 battery
.jpg)
Below is the detail of the flashlight with 18350 and 18650 batteries inserted inside
.jpg)
.jpg)
The lettering is well done. We find it only in the head with the company logo and the model of the flashlight.
.jpg)
The clip is of quality, very robust and thick
.jpg)
.jpg)
.jpg)
.jpg)
.jpg)
.jpg)
.jpg)
.jpg)
Beam, Tint e Beamshots
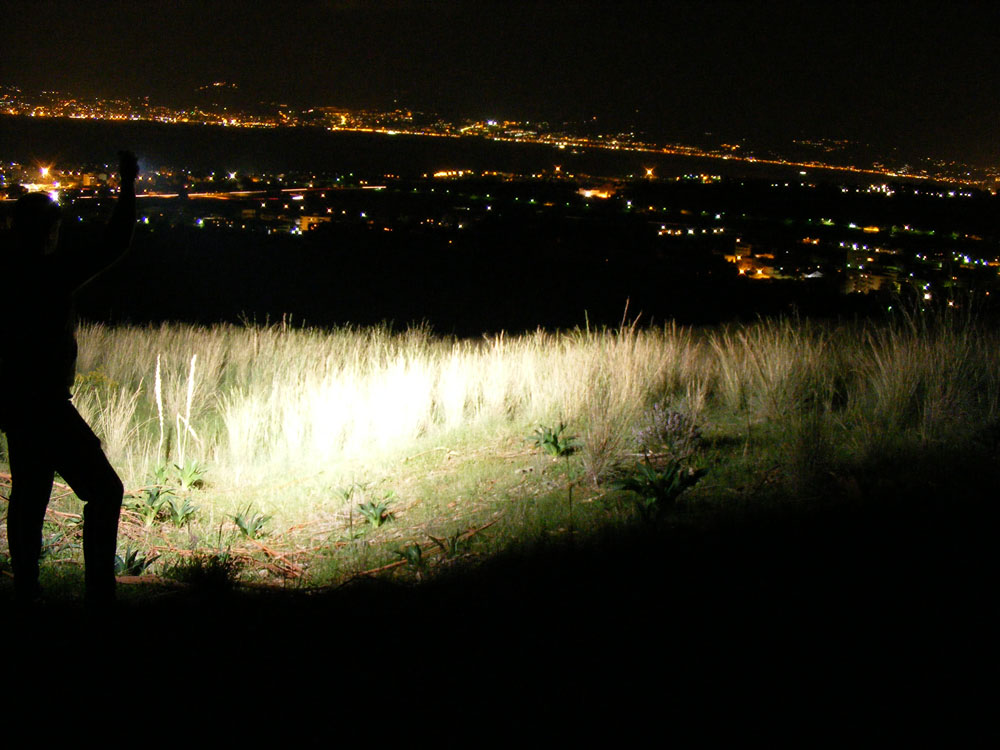
The beam of the Astrolux S42 is very wide and uniform. The four Nichia LEDs provide beautiful natural light with excellent color rendering. The color is warm, much more than the S41S 4xNichia 219B I own. At Turbo (declared 1600lumen) it is possible to light up everything in front of you up to a distance of 60-70 meters. In daily use the beam is usable for different scenarios, especially for short distances. The presence of an interface based on "ramping" is a winning choice, because in a quick and precise way you can select the level that best suits your needs. Alternatively, you can use the classic interface that cycles on different levels, choosing from the many available settings. [size=120]
Beamshot #1
Beamshot #2
Beamshot #3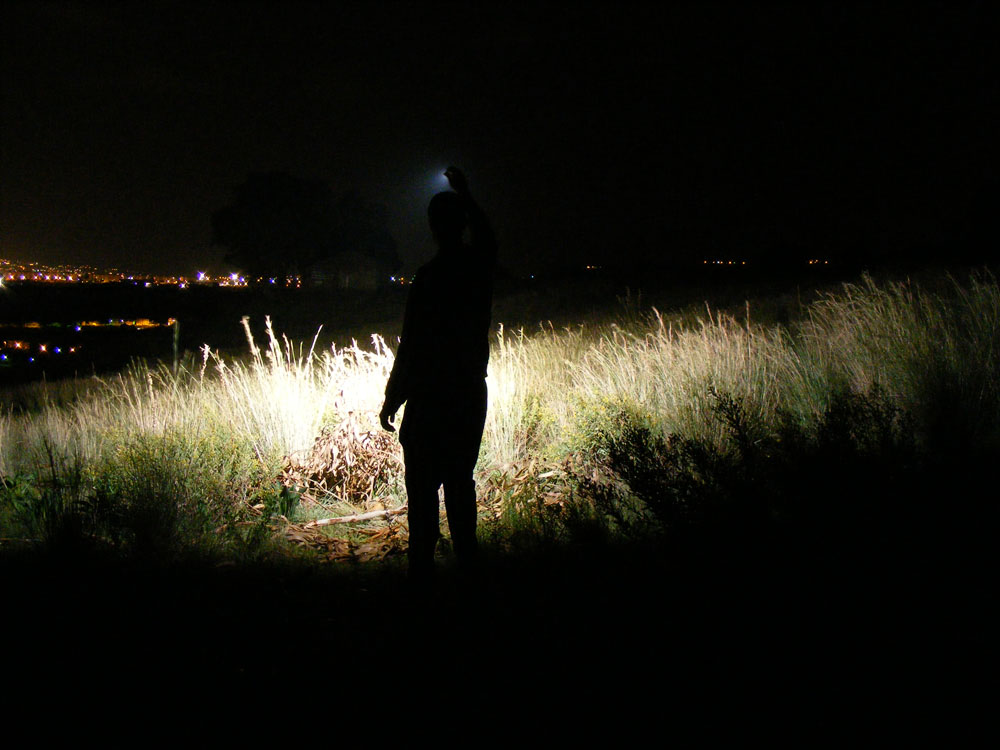
Beamshot #4
Beamshot #5
Beamshot #6
Beamshot #7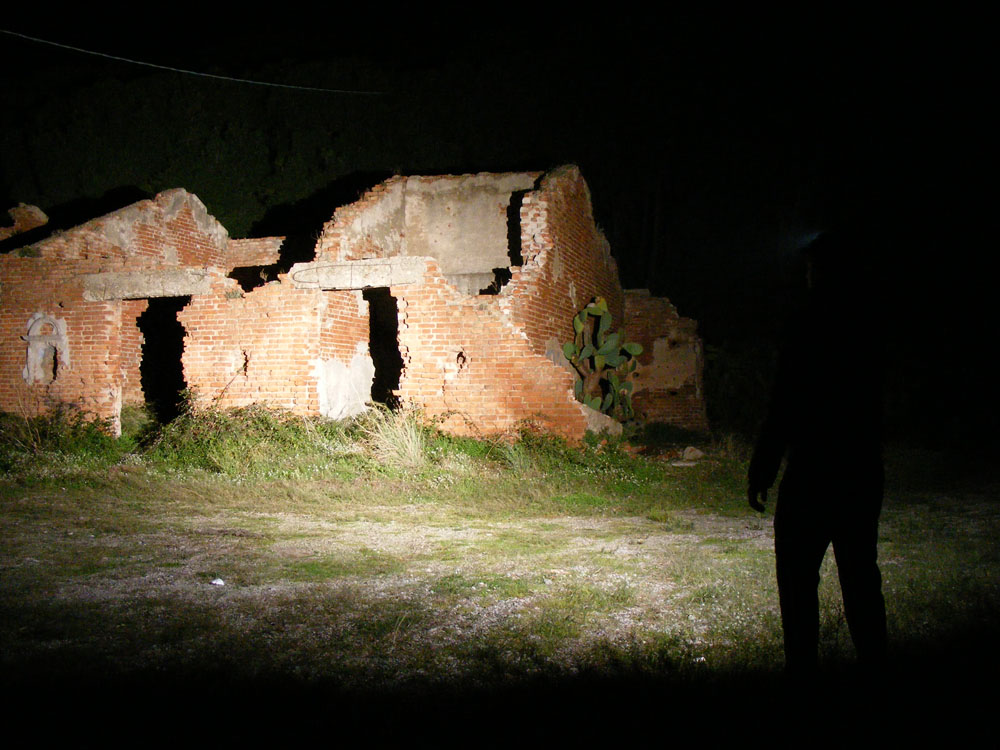
Beamshot #8
Beamshot #9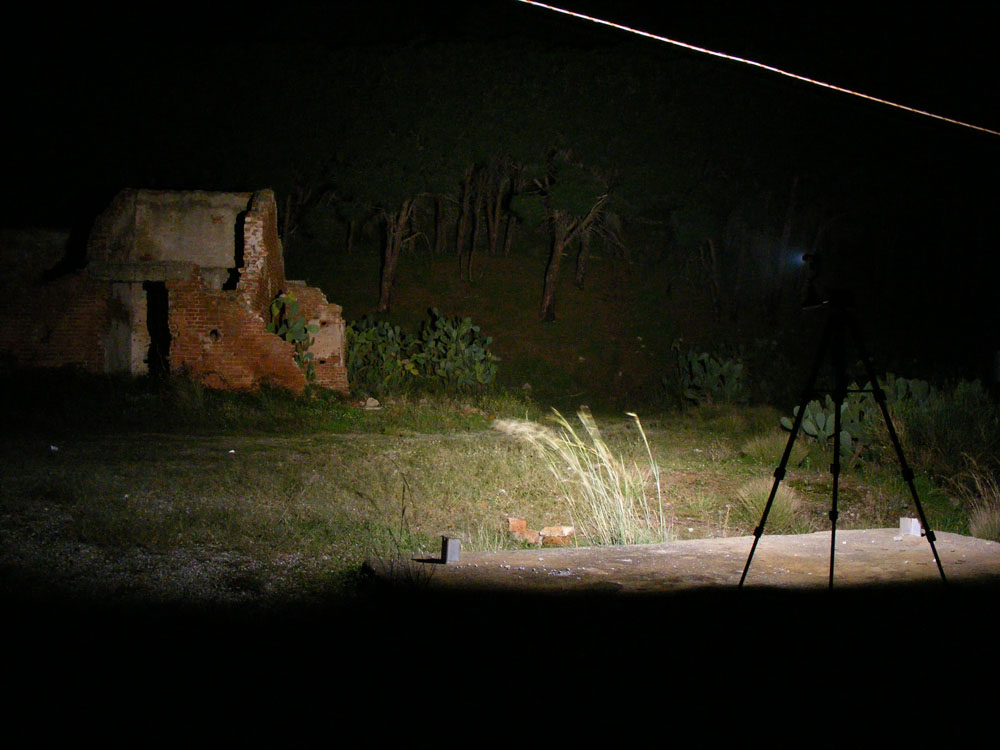
Final considerations
The Astrolux S43 is a beautiful and powerful EDC with interesting features. One of the things that struck me most was the super configurable user interface, the same one that uses the Lumintop GT Mini. In fact, it is possible to choose between the two modes of use "Ramping UI" and "Mode set UI".
Personally I found the first very convenient as it allows you to select the level according to your needs. Aesthetically it is very beautiful, especially in the 18350 version, and is very similar to the S42 sister, although, as we have seen, there are many differences.
The materials are of quality, the abundant thicknesses and the details taken care of.
Useful the presence of the thread in the tail that allows you to install the flashlight, for example, on a tripod. It would have been nice to have a tailcap magnet too. The packaging is quite complete, even if no battery is supplied. But there is a nice belt clip, a glass breaker in addition to the laynard and spare O-rings
Thanks for reading!