Have you measured the max current that the Folomov 18650S pulls on High mode and on Max Turbo mode?
Not so easy since the driver is in the tail, so no.
2nd piece came in and bezel was easy to unscrew - no glue:
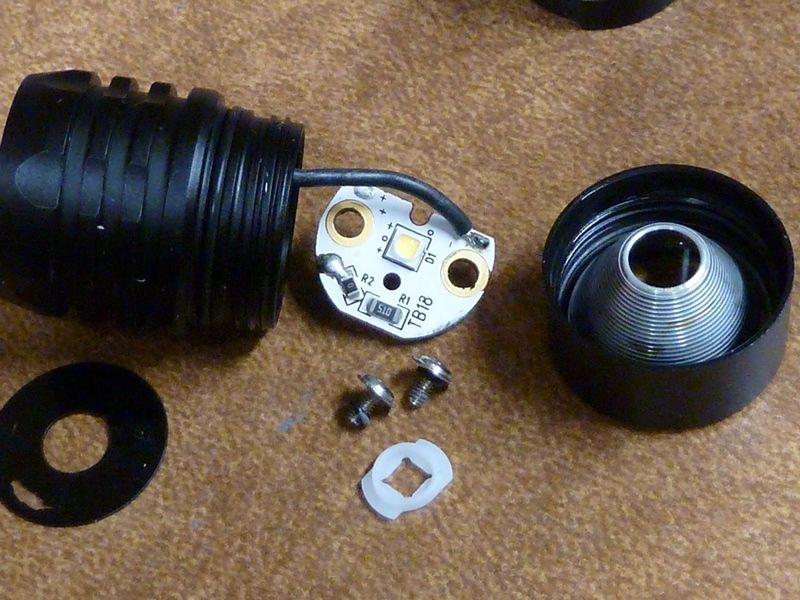
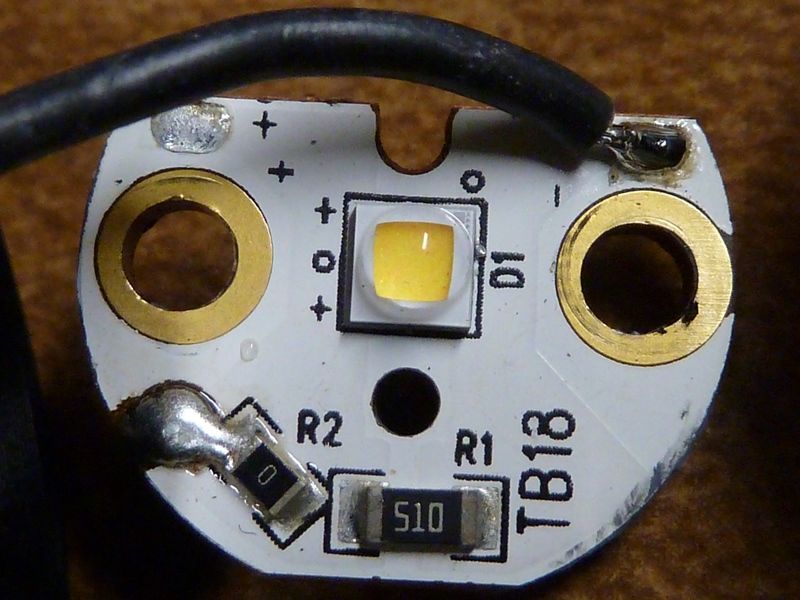
Well, the 51 ohm resistor is there - exactly what I measured, so that's how the tail driver gets it's batt+ power. Looks easy to swap the LED, maybe a 351D 4000K 90 CRI.
nice
I swapped the LED on mine. First to an XPL and then again to an XPL HI.
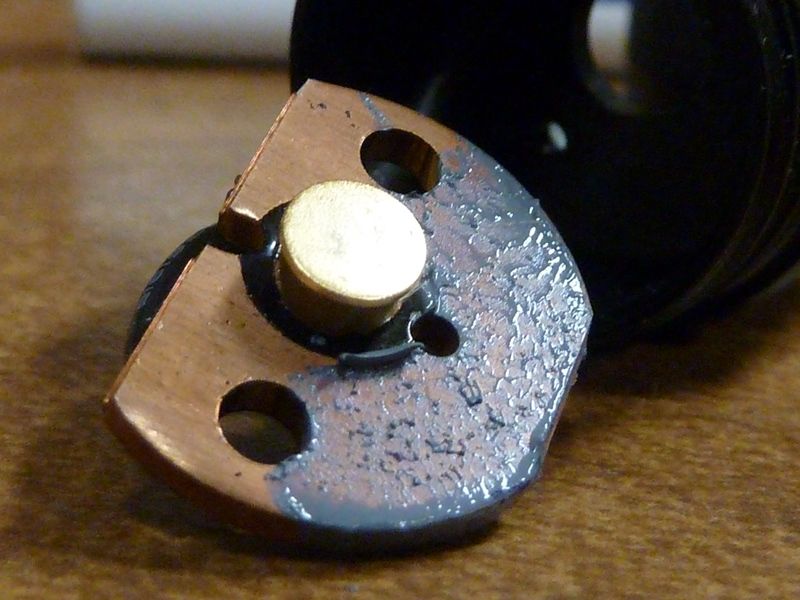
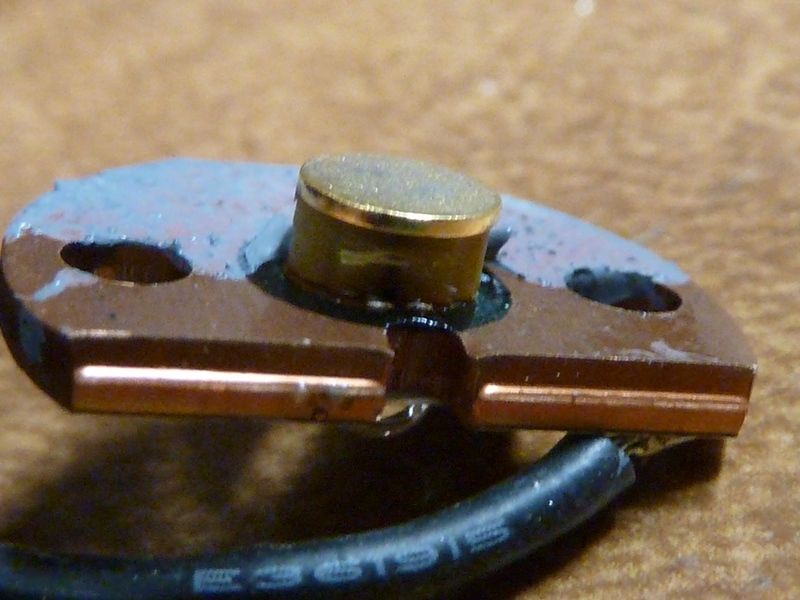
The hardest part is the cylinder on the bottom of the star is soldered directly on. Heating the star up enough to reflow the LED also causes that cylinder to fall off.
This problem is easily solved, but you might need to adjust your standard reflow technique a bit.
Thanks! I swapped in a 219C 4000K hi CRI LED - now does about 600 lumens at turn on and gets warm pretty quick. On my reflow, the brass cylinder thing didn't fall off because I used a hot air gun from above. Went pretty quick. The MCPCB is pretty strange. The batt+/LED+ flows through the MCPCB itself, while the LED- comes through the light's body, so, the MCPCB must be isolated electrically. The anodizing on the shelf isolates it, so don't attempt to sand it down.
I'm amazed at the good reviews and claims of the 900 lumens. What happened to honest, technical reviews where #'s are measured, not quoted from manufacturer specs?
Boy, everyone wants in on the action to make $$$. Shame the most popular reviewers are the least technical - they don't even know what they are saying is fabrication. This light has a serious design flaw, way overstated specs, and it's an "Amazon's Choice".
So if the shelf ano is damaged, the led is bypassed (but not a direct battery short because the battery-minus goes via the driver to the body).
Weird design! I will have some thought about what to do with this light once it comes in. Is the reflector any good? I could swap in one of these new Osram thrower leds.
It does give a nice hot spot with the 219C, SMO - looks ok to me.
I might have missed a post concerning the current on turbo. Does anyone know what the actual max current for the flashlight is? I think the specs for absolute max current for the 219D led is 1.8 amps. Anyone know ?
What the mx current for the 219D is, is not measured yet by anyone. Usually (if you ignore the 50,000 hours lifetime) it is more than what the datasheet says.
Yes, typically like 50% at least I'd think, and the current isn't listed intentionally - it's not so easy to do with a driver in the tail. It's doable I'm sure, not sure how though, and seems like a big effort, least for me.
maybe that helps (i was bored ;) )
www.youtube.com/embed/oRWaxY6HFXk
That helps a lot Martin. Thank you. The 219D led is driven at twice the recommended current by your test. I’ll just use turbo in rare instances then. :+1:
Thanks Martin! Nice setup there, thick cables all around, good use of the clips and tie straps (boy, didn't think of that) and of course our standard BLF UNI-T clamp meter. Good to know it hit 3.6A, probably does lower on a higher Vf LED. I got two 18650S's - one the bezel came off easy so I replaced the LED with a 219C, but the other is stuck tight still - I need more time I suppose to get it off.
I have a few of those 18650S’s on the way. One should be here Friday I think. I had already planned on swapping the emitter on one, most likely both. I see how hot air is used to reflow the LED. I guess a question would be is it possible and what would be the best method of reflowing with just a soldering iron? I mean I guess I could order a hot air station as I may be able to put it to good use in the future. I just don’t have one right now. All the other reflow’s I have done in the past I have used either a soldering iron or a cast iron skillet on the stove.
If you swap out emitters please take some photos of they event. I need all the help I can get if I give it a try.
Will do for sure. I got some info and pics from another thread on this light. I think I got a good handle on it in my head. Now I just have to see if my hands and eyes will cooperate. I think the main concern was that there are two resistors and a post that makes contact with the battery also on the MCPCB. Other than making sure those don’t fall off as you are reflowing, everything else should go as normal. I was going to use a few different sized alligator clips to hold all the parts in place as I heat the board to remove and replace the emitter. As soon as the solder solidifies again I should be able to remove my little clips and everything should stay in place. If my eyes hold up on me I should be okay. Getting older with already bad eyesight in general really sucks. ![]()
What about applying a little super glue on the components to hold them?
Can easily dissolve it later if need be.
Just a thought.
I used a hot air station so can't give you much advice. I took the pics below. From what someone else said, the bottom post seems to be soldered on, but I don't know myself because on mine, it stayed in place from the reflow. I dunno what that black stuff is around the post though - looks strange to me. If you use an iron, or a torch (I've used a torch before for reflowing, just have to be careful and keep your distance with it), even if the solder for the resistors melt, as along as you are near level, they will stay in place fine.
Only way I can think of using an iron would be to first remove the post, then heat up the MCPCB below the LED - may take a while and probably need to wet the iron tip, but dunno, you may have a mess there to get the post re-connected. There's some risks for sure, which is why I saw the hot air station as the best option. I'm doing all my reflows with hot air now, but I have to really crank up the temp to like 480 F to get the heat through a decent MCPCB if done from below, but even from the top it's tough because the copper MCPCB's are so efficient in conducting that heat away.

I reflowed with generic iron with flat tip and didn’t remove the post. Nothing felt off. I’ll share pictures later.