I don’t understand why they cheap out on stuff like this. I’d rather pay $5 more and not have all these problems.
The reason they continue to cheap out on this is because people are still buying it.
Stop buying these lights, and complain to Banggood, and maybe they’ll fix the issues with a more sustainable price.
Then you probably weren’t a good candidate for a pre-order and I’m not being facetious. Most of the customers of this light will pay $10 more and likely avoid these problems.
I don’t think this is a question of cost. Mateminco/Astrolux have been producing lights for years now and should be well past ordeals like the early BLF A6. Any manufacturing house that’s been around for more than a year should have reasonable quality control in place to avoid the warranty replacement and reputation costs that come with bad lights.
An unknown minority of buyers have seen DOA’s, bad tail threads, a bad emitter shelf, low-quality MCPCB’s, odd driver behavior, the usual off-center emitters, and even a broken lens. These issues range from milling to assembly, though the MCPCB’s could be a cost issue as Mateminco might have bought a discount batch of 2nds.
However, that’s that nature of pre-orders; you save $10 and take some chances on getting a light manufactured and assembled at first-run quality. As has been often said in this thread, pre-orders aren’t for the faint of heart.
The “production” light is on AliExpress for $38, though perhaps one might wait a month or two to ensure production-level quality. June sounds about right ![]() .
.
Have anyone recently received the FT03 checked the MCPCB wood texture and the shelf flatness issue? What is the best way to make the aluminium shelf smooth and flat?
The shelf on my Flashlight was not that bad, the MCPCB as you saw in my previous pics was horrible, I can’t recommend enough to polish it and change the thermal compound, the heat transfer after polishing is amazing.
I use hand stones for benching surfaces in, removing machining marks, high spots ect. I’m a Die Maker by trade, so back in the day I did alot of hand grinding and finish hand benching on small to large dies, prog dies, line dies, draw dies, body panel trim/pierce/ restrike dies and molds. I found this it may help explain about the technique a bit…
PROPER HAND STONING TECHNIQUES
Once you’ve arrived at the point where all the metal has been ground to satisfaction, the surface should be examined to determine if it’s ready for hand stoning. Check milled surfaces to see if the cutter marks are fine enough to make further hand grinding unnecessary. Surface ground finishes should be free of tears. Hand-ground finishes must be fine and shouldn’t have chatter marks or irregularities. Be sure that file marks are free of tears and waves. If all finishes are the best possible, it’s time to begin stoning.
Choosing the initial grit of stone depends upon the degree of finish left by the machining, grinding or filing operation. Machining usually results in a coarser finish than grinding; therefore, a coarser grit stone should usually be used. For a ground finish, stoning can begin with a finer grit stone.
Preliminary stoning may be done with a 240 grit stone to remove final dips, depressions, waves or other imperfections and achieve a flat or properly contoured surface. If defects are not too great, a 320 grit stone will be sufficient. The stone should be moved back and forth, with medium pressure applied, over the surface in a direction 45 deg or 90 deg from the direction made by the last tool marks.
CLEAN AND LUBRICATE STONES
Before using the stones, soak them in a contaminant-free, oil-based lubricant. Continue to clean the stones frequently by dipping them in the oil lubricant. Constant stone cleaning is necessary to clear away the fine metal chips that tend to clog or load up the stone. Should the stone fill with such metal chips, they could cause the cutting of deep scratches on the surface being polished. This is known as “picking up.” Stoning oil or other lubricants, in addition to keeping the stone clean, improve the cutting action.
A number of ridges and high spots may appear at the start of the stoning process. All of these irregularities must be removed to obtain a truly flat and smooth surface. This is especially true if the ultimate goal is a high-luster diamond polish. Surfaces that have been ground will often have areas where the metal has been burnt by the action of the grinding wheel. These burnt areas must be removed in order to maintain a constant surface hardness.
OVERLAP ALL SCRATCHES
Polishing, from a purely physical point of view, is the process of producing a series of overlapping “scratches” that get finer and finer. To accomplish this, it’s important that for each finer grade of stone used, the angle (direction) be changed relative to the marks made by the preceding coarser stone. In this way, the marks of one grit size are “erased” by the subsequent finer-grit stone. It is critical that each finer grit stone completely removes the marks of the last grit. Neglecting to do so will result in a shiny, but nonetheless, scratched surface.
After each grit finish is completed, thoroughly wash the entire work area with unused stoning oil and wipe with a clean tissue to remove all particles of the grit remaining on the surface. This is necessary to ensure that none of the particles of the coarser grit will be picked up later by a finer grit stone, causing deeper scratches. To further ensure that coarser grits don’t contaminate the finer stones, lubricate the stones in a fresh can of stoning oil; not the same oil used for the coarser grit. It’s best to keep each grit of stone in a separate can.
HAND STONING TIPS
(1) Do not use too coarse a stone;
(2) Always dress (form) the polishing stone with a grinding wheel or coarse paper to provide the maximum contact with the work surface;
(3) Use care when dressing the polishing stone;
(4) Use sufficient stoning oil to prevent the stone from loading;
(5) Hold the polishing stone firmly for directional control, but press only hard enough to make the stone cut;
(6) Make sure the stone marks from the previous grit size are removed;
(7) Change stoning direction with each successive grit;
(8) Clean the work area thoroughly between each change of grit;
(9) Keep each grit of polishing stone in a separate stoning oil can; and
(10) Exercise utmost care when stoning at an edge (parting line).
Copied this from here…https://www.xing.com/communities/posts/surface-finishing-tools-techniques-and-tips-1002790166
. I also have accsess to a Vertical Mill with a Rotory Table with special Zero ground finishing end mills to remove material or open up the diameter for larger MCPCB’s, but they still have to be hand benched in and polished to be truly finished. Hope this helps…some…
I have yet to see a bad MCPCB on the 10 or so I had apart, maybe they had a bad batch with heavy burrs from the die, and just ran them on a heavy/coarse grit belt sander, that is what it looked like to me? I have yet to come across any like Tom E had.
Because the shelf is round, small and in a tight space, it’s very hard to work with. I afraid that hand sanding will make the surface uneven. Also, how do you test the flatness of the sheft and mcpcb?
You can cut the time in half by using a Philosopher’s stone.
Ah, my kingdom for a CNC machine ![]()
Thanks for the heads up. I have reported your findings to Banggood yesterday. I will get them to contact the factory asap on Monday.
I've never heard of stoning, or hand stoning. Reading it, I have no idea what stones are ?? I've sanded down the shelf, and sand down the shelf of almost every light I mod though. For small shelves I wrap a piece of sandpaper over a flat end tool, usually the blunt end of a metal chisel.
I've encountered many that are not flat. I typically use the end of a straight edge metal ruler to test for flatness. The sanding seems to work well since the non-flatness is usually because it's higher in the middle.
I’ve been looking for a 26650 battery in Australia and good ones are hard to come by. What do you guys think about this? https://vapestreet.com.au/products/efest-26650-battery-4200mah
that will work just fine, i use myself efest in convoy l6 and this light wont draw that much amps anyways so u should be good.
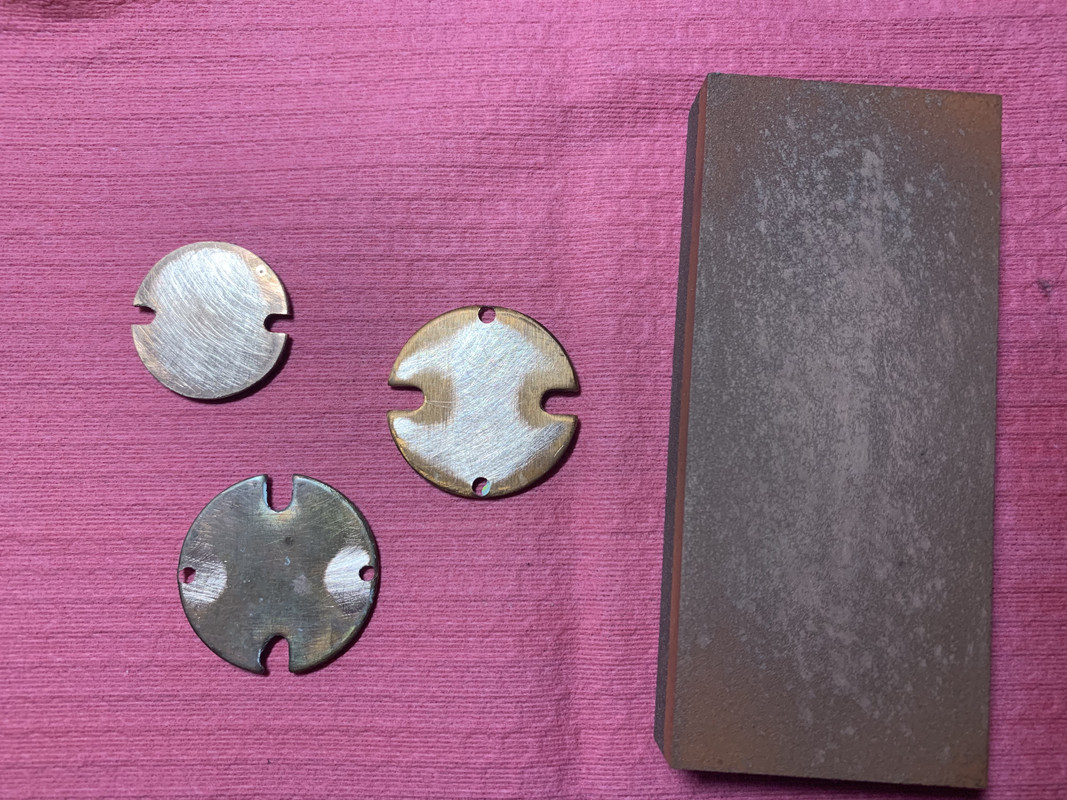
Same idea Tom, but with hand finishing/sharpening stones, they come in different sizes, and shapes, hardness, abrassive grades. for wear and desired finish.
. Rule of thumb: The harder the metal the softer the stone, so for copper, aluminum a harder stone should be used.
. Here are just a few I keep on hand at my work table… I have many more in the garage and at work.
. 
That's interesting. Can these be bought at like Home Depot or Lowes? What's the advantage over sand paper? I guess they would last longer for sure...
Do yours heat up the outer surfaces fast?
They cut faster and truer, meaning flater, I can get closer to edges and radiuos’s. Use them wet or clean when loaded up, less wear, they last for along time depending on hardness of the stone.
Here are a few MCPCB’s that were done on a flat surface and sand paper, then I hit them on a fine flat stone. Not enough to make a big difference when using AS5 or any other thermal goop, but when 2 surfaces a really flat, you use alot less, almost none. Better heat ransfer…. debatable … It can’t hurt.
The bottom MCPCB was screwed down at those shiny spots, the surface it was bolted down to, couldn’t have been that flat. Would it make a big difference using thermal paste?
Well the de-domed SST-40 in Turbo heats up steadily from the get go, what I would normally expect since it is being driven at 9amps on a Basin 26650.
. The Sliced and Diced 3v 50.2 Heats up very fast, the stock driver and spring set-up will only drive the 3v 50,2 to almost 13amps, something like 12.85amps is what I seen using a Liitokala Black and Gold.
. 
. I have not run any of the out of the box stock lights till they got warm or hot, just turned them on to see if they worked.
How many KCD you got for sst40 dedomed ,how the tint change ?