Nice effort so far!
Gidday Hoop.
For once I have to agree with you. ![]()
Its all black magic to me.
Run 1, 7 Dec. Enough tests
Yesterday i received a few tansistors so i was able to do some (well ... a lot !) more tests in the evening/night.
The driver is not totally perfect but considering the very simple schematic i am pretty happy with the result and consider that i am done with that part !
More on the driver later but today i wanted to work on the "case".
Hand tools :
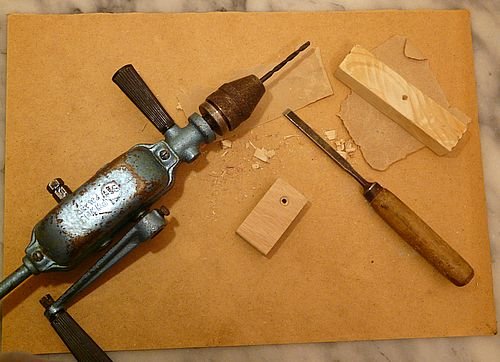
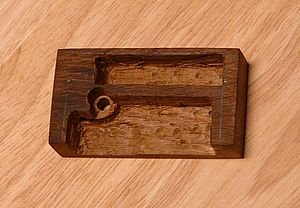
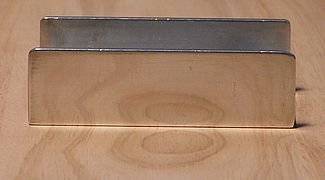
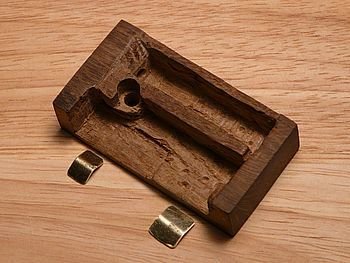
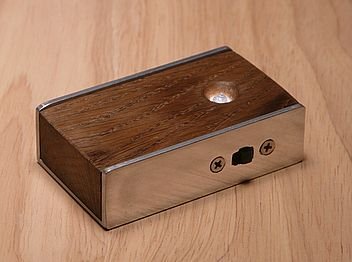
I cleaned and sanded the aluminum profile and wood block, drilled the led hole and carved the battery holder then assembled the whole thing.

Everything is fitting nicely
No screw required because the wood fits tightly in the aluminum profile
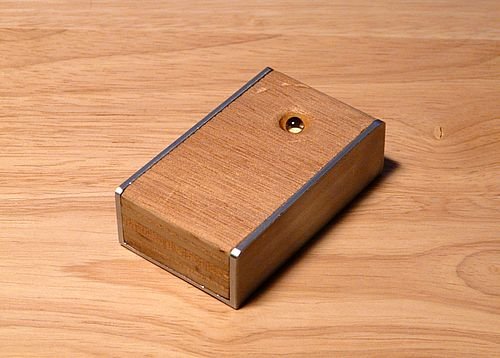
To do list :
- find a sliding switch and mount it on the side of the aluminum profile as the one on the picture is a small pcb switch with no mounting holes
- find some thin spring brass plates for the battery holder (for now the wires are soldered directly on the battery)
- find a good looking piece of hard wood as this one is too soft an easily scratched as can be seen of the last picture
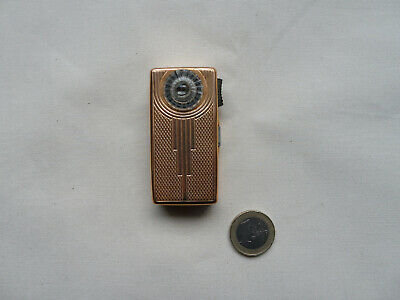
Random picture from internet of the Wonder mini that inspired this small build :
Wow! I haven’t seen a drill like that for a very long time, let alone use one to drill a hole. I am so spoiled by power tools, especially cordless ones.
Cool, love the use of manual tools for the hand made category ![]()
Purple heart is a tough and beautiful wood, I got two 3/4”x4”x12” pieces on Amazon for less than $15. It’d look fantastic in your light!
Excellent work there, very neat idea!
Run 1, 8 Dec. Driver update
As i promised yesterday here are some details about the joule thief driver.
The schematic is still the same with an added X7R 10uF decoupling capacitor at the input. I am not sure if it's really required here but i am used to always have at least some decoupling and it might help when the cell internal resistance increase.
My goal for this driver was :
- output at least 5 lm at 1.5V
- still about 3 lm at 1.0V
- at least 1 lm down to 0.7V
- overall efficiency better than 65 lm/W at maximum output, going higher for lower output
These goals were copied from the Sofirn C01 3200K which was my reference while designing this little light. The C01 driver use an integrated circuit with output regulation and the single transistor JT can't really compete with that but i tried my best and here are the results :
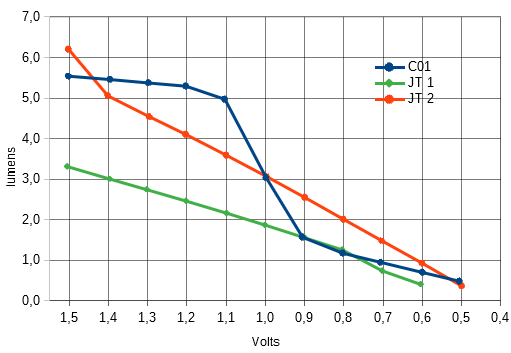
Light output (lm) vs input voltage (V) curve :
Efficiency (lm/W) vs light output (lm) curve :
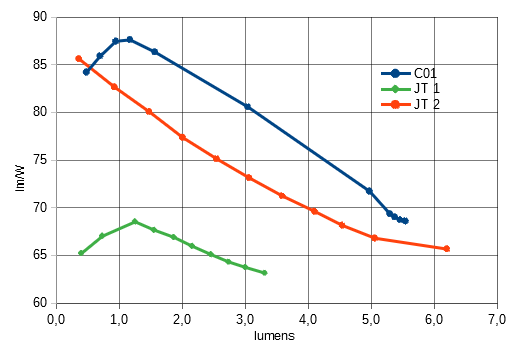
The green curves (JT 1) are from the first JT prorotype.
The orange curves (JT 2) are from the final JT prorotype.
The blue curves (C01) is from the Sofirn C01 3200K which was my reference while designing this little light.
As you can see, working on the JT allowed me to increase both of the light output and efficiency compared to the first prototype but there is a limit after which i wasn't able to increase efficiency without decreasing light output or vice-versa so i choose to keep the output.
Conclusion :
As can be seen on the curves the ouptut light goals are totally met and while i would have liked the efficiency to be a bit more on par with the C01 i am still very happy with the (about) 10% difference considering the very simple schematic !
I like to be able to work without electrical power when possible and the hand tools seemed like adequate for the hand made category ;)
This drill works well for small/medium holes in wood.
Thank you i had never heard about this wood before !
And thank you to everyone for the kind words ! :)
Nice improvement. ![]()
Could you describe how did you achieve it?
Thank you !
While the informations that could be found online about the joule thief are often contradictory and for the less inaccurate it was difficult to do any realistic calculation or simulation and that was mainly a matter of doing a lot of tests (measuring curent consumed at the input and light output vs input voltage) while varying tore type, winding configuration, base resistor and transistor type, one parameter after the other and see how it affects the results.
An other thing was that i had several small tores laying around but no information about what they are so i had to test them all.
Of course i have tested a limited number of components that i already had at hand or that were easiliy available so it might be possible to increase efficiency with other tore or transistor types … and more time spent
Run 1.1, 8 Dec.Old Wood
Back to the "case" (i hope i haven't lost you all while working on the driver) !
As i said at the begining, the case was just a quick and durty prototype, so now that i know where i want to go i'll try to do something nicer !
I am not sure if i told you already but i like to "do with what i have at hand" ;) as much as possible so i went rummaging through some "may be usefull" boxes (my daughter call them "garbage"  ) and i found a piece of old wood.
Doesn't look very good at first :
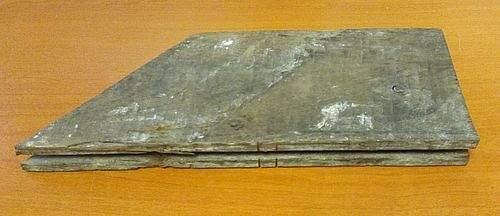
But i know this is a piece of an old floorboard and it must be oak or maybe chesnut so it can't be that bad !
The other side looks better so after some cleaning i start to saw it with my hand saw :
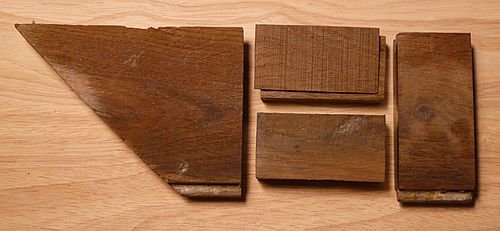
The piece on the right was supposed to be the one, but as some may have noticed already, there's a knot in the midle that will prevent me to carve it as i want to (the other side shows a void around the knot).
Then i had to saw an other piece but the wood is VERY hard and difficult to saw with the hand saw i have at home so today i took it at work and used and old bandsaw we have in the workshop.
While i was there i sanded it with the belt grinder and drilled a lot of holes with the bench drill :
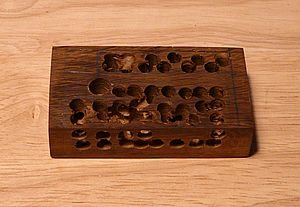
Finaly i took it back home and this evening i removed the holes (or added some bigger ones as you prefer) with my chisel :
Note : I am far from beeing a wood expert but this wood seems too hard ! I don't know how to explain it exactly but sometimes it feels more like it is chipping like hard stone than beeing cut. Could it be because the floor it comes from was just in front of a fire place (i remember that) and it was slowly backed day after day for many years ?
Well ... i asked for hard wood and that's what i got ! ;) At least, seeing the results of my first tests, it can be sanded down to a very smooth surface !
I had similar issues with drilling & shaping indian rosewood, it seemed to chip out in bits, quite hard wood but sands up to a nice finish.
That was my first experience with careful woodworking really.
I imagine ebony & such other hardwoods would be worse to work with.
Best to tool it slow and avoid undue pressures as cracking is a problem too, especially on dried out older wood.
With hard woods sharp tools are the key. If you plan on doing much hand cutting of hard woods the Japanese style of handsaws are excellent. Good ones are not cheap but they can make wonderful precise cuts. They cut on the pull stroke which allows the use of thinner blades. Takes some getting used to if one is used to using western cut-on-the-push-stroke saws.
Good to know. I usually cut copper or more delicate tubing on the pull stroke as it’s too grippy on the push.
Run 1.1, 19 Dec. I saw the light !
I hate to be ill and even more when that happens just a few days before vacations with my daughter but after not beeing able to work on this as much as i wanted because of the lack of time, the least i can do now that i am stuck at home with too much free time is to work on something essential like building a bed reading torch ! ;)
First i sanded and polished the aluminum profile (work in progress) :
Then i drilled and filed some holes for the switch.
Yes doing the opposite would have avoided me to re-sand and re-polish but with only a half brain left i thought it was fair enough ! (Sorry no pictures as my half brain was on full time job preventing me to do more mistake !)
More wood carving and drilling, preparing the battery holder :
Assembling :
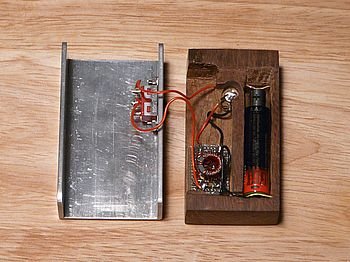
The wires are (intentionally) too long and the driver is still a durty prototype but everything fits well !
Light :
It is difficult to have a picture rendering at the same time the dark woork and the shiny alum, i'll try again later if i can get my full brain back.
That’s looking great
Indeed. ![]()
Looking good KS. Looks like a real neat package. ![]()
Cool looking light Kame Sennin ![]()
Looks really really nice Kame Sennin! Your wood carving is impressive. ![]()