What is top row #5 and when are your old ones getting new higher output drivers? ![]()
I may try one of the 2020 drivers, although Im perfectly happy with longer runtimes and less horsepower… I seldom use more than half the available lumens
top #5 is a Nitecore EX10 Ti from Russtang, similar to the Legendary D10 with piston drive with a ramping UI that works on primaries, unlike all the presently available Anduril lights.
Today, hodor’s Olight S15 Ti and Jetbeam E3S arrived. Also today, Quadrupel’s Boruit D10 driver arrived.
I disassembled hodor’s lights. They were exactly as described.
Jetbeam E3S: I consulted with CRX (he’s done one before ) and found an old “”other forum”:Help modding Jetbeam E3S | Candle Power Flashlight Forum thread. CRX recommended that the driver be pressed out from above. (He also found a horrifying disassembly video on youtube .) It was at this point that I decided I wasn’t going to save the old driver. I pressed it out from above with a straightened paperclip and needlenose pliers. A replacement driver is in the works, but will be straightforward.
Olight S15 Ti: Indeed, the switch itself is busted. It’s one of those tiny surface-mount tactile button switches. Also, I suspect the rubber/plastic physical button itself is damaged. Most likely, it should have been removed before the pill was removed, and the pill caught some of it. Also, it’s possible that’s not the case at all - I can’t tell. I was debating ordering some replacements and indeed thought I had placed the order, despite the estimated arrival time of September 30 - October 22.
I moved on to my Boruit D10. The Quadrupel driver was almost a perfect fit for the plastic part of the charger-driver sandwich, but I did end up having to file it slightly. I also only has 22 gauge high strand count silicone insulated wire, where I would highly recommend 24 gauge for this mod. For this reason, getting fitment of the wires through the sandwich, as well as into the grooves inside the body tube, was rather difficult. (I was unable to reuse the original leads as they were severed in the process of removing the MCPCB.) I’m currently debating throwing a Luxeon V2 in, or the original emitter back in, or waiting for my optics to arrive from Fasttech (probably next year). A provisional low-power test with test-leads works, and the on-board charging is functional. The lit tailcap is cool!
So I was sitting here, about to put my tools away, and I noticed the old D10 driver sitting, button facing up, on my workbench. Inspiration smacked me in the face and I took some quick measurements: it was a match for the broken switch on the Olight. I grabbed my solder wick and swapped them - it was a lot faster than I expected. I then tested the Olight pill partially assembled (MCPCB was loose but attached) with test leads connecting the battery. It functioned great. So I went to assemble the light and the switch did not actuate. With a lot of fiddling I decided that either the new switch was not as tall as the old one had been - impossible to tell, since the old one was in pieces - or the exterior physical button piece had been damaged. I eventually devised a method using UV glue on the inside of Kapton tape, wrapped around the pill partially and holding the hardened blob of UV glue over the microswitch on the pill. With even more fiddling I got everything back together and assembled - although not without almost ruining the entire driver with sloppy soldering on the MCPCB (I noticed because the reflector did not tighten fully - it actually screws into the pill!!).
So - if I ever feel stupid/crazy enough to pull that pill back out of the Olight, I would swap the emitter, clean the reflector, and clean the lens as well - I’ve muddied them a bit with all my fiddling. But for now, the switch and its silly adaptation are aligned perfectly and the switch actually has a really great feel.

Quick review of the S15: The emitter is almost the equal to the NW XP-L in my T10T V2, but it’s a bit yellow-green-er… the most noticeable “above BBL” tint of any emitter I’ve yet tried. (To guess - if the Thrunite were a 3D tint, the Olight is probably a bad 3C.) The output with 14500 is about equal to the Thrunite’s turbo on NiMh. The hotspot is very slightly tighter than the Thrunite. The body tube diameter and overall length are also basically identical to the Thrunite T10T V2, but the Olight S15’s head is decidedly chunkier. The switch is way easier to find than the Thrunite, and the pocket clip is slightly better (though it carries head-up). The UI is different than on my Olight S1: The S15 mode memory remembers moonlight (the S1 does not), and the S15 has a lockout (continuing to hold the button for another second after the 1 second hold for moonlight). Also, the S15 has 3 modes on NiMh/alkaline (four modes if two cells are used), but four modes on 14500. The threads are on the nicer end of Titanium threads I’ve dealt with.
Swapped emitters between my Eagtac DX3B and my Thrunite T1. Both had neutral white XHP 50 emitters.
- The DX3B had a great beam pattern with beautiful creamy tint. Unfortunately, mine is flawed with horrendous parasitic drain which can drain a full 18350 cell in less than 3 days with the light off the entire time.
- The Thrunite T1 is a nice compact 18350 light, but comes with horrible green tint.
Since the Eagtac is too flawed to EDC and the T1 had such a greenish tint, I figured a good solution was to swap the emitters.
The swap went without a hitch. The Eagtac has a tiny ultra-thin square copper star press-fit into position by the reflector. The Thrunite had a much larger and thicker standard size 16mm copper star that was screwed down.
Unfortunately, when I turned them on…
- The Eagtac’s beam seems a little whiter. It no longer has the great creamy tint of before.
- The T1’s tint is STILL green even with the other emitter.

I tried the T1 with the lens off, and then even replaced the lens with a UCL one I had laying around. Didn’t help… still seems greenish.
There’s only 3 remaining possible causes of the green in the T1 and they aren’t fixable:
- The T1 is a lower powered light… approximately 1500 lumens compared to 2300 for the DX3B. Cree emitters are known to sometimes get more greenish as the current goes down.
- The T1 has a much shallower reflector leading to a dimmer hotspot. Perhaps the lack of intensity makes the hotspot look greener.
- Perhaps something about the coating on the T1’s reflector is making things greenish. This seems unlikely to me though.
Oh well.
I joined this forum to buy some of these 219B’s not available anywhere else and today I installed my first one in a light!
- FW1A w/SS bezel
- 219B R9080 SW45K
- firmware controlled Aux LED’s in red / blue as a show of support for first responders
Low
———
High


Neither camera settings nor lighting conditions are the same from shot to shot, sorry about that.
Nice, StihlMad! I’ve been thinking about adding aux LEDs similarly. Looks good.
What a great light, StihlMad! And welcome to BLF ![]()
Be careful with the 219B on a FET driver. The FW1A can overdrive the 219B and destroy it.
There are likely firmware revisions that could fix it…
Grabbed a very inexpensive Maglite Mini Incandescent 2-Cell AA flashlight online to play with. Swapped over the 395nm UV emitter from an Olight i3UV EOS and wired it to the original switch to keep the twist-on action.
https://imgur.com/a/CjhtJvp
would it make a difference if each optics holder was (inner side) wraped with reflective tape
No I dont think so, all of the light should be reflected inside the optic. (TIR = total internal reflection)
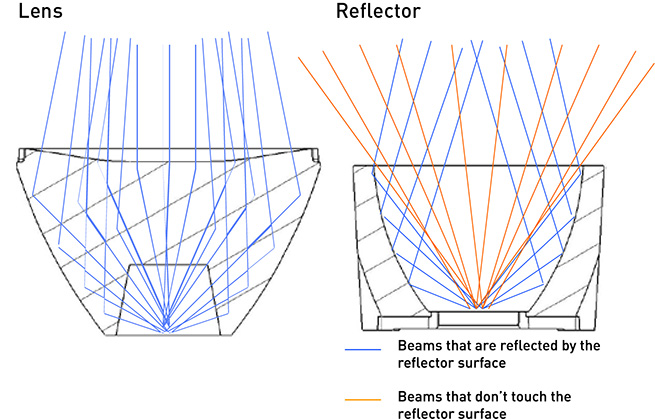
Here’s a good diagram from LEDiL:
Did you just sand down a normal 17mm convoy driver?
Emitter swaped two Thrunite Ti3’s. These are very easy to mod, nothing is glued.
First one is a shaved LH351D 3500k 90cri from digikey.
Second one is a XP-G3 photo red.
.

.
Factory NW Ti3 on the left and LH351D on the right, set at 5000k white balance.
The NW has noticeable green around the cornea that the pic doesn’t show that much.
.

.
White balance set at 4500k.
.

.
Ti3 with the XP-G3 photo red.
.

.
Drver uses resistors for modes that can be changed to acheive different outputs.
.

.
More info in this post ~~ENDED~~ [US Only] Free Thrunite Ti3 v2 on Thrunite.com (with $5.95 shipping fee) - #112 by moderator007
yes and the pill too
modded SK98 clone with nichia 219c 4000k
2mm spacer for tailstand

GITD tape hand cut


beam shots with fixed focus&exposure
zoom

high

medium

low

auto focus&exposure

artifacts i believe are due to bad cut of GITD tape and the small footprint of LED and big hole of the brown spacer (KDlight text is projected on zoom)
soldered the tail spring to the brass cap/cup
I was looking more closely at your photos. Are the aux LEDs mounted to a separate board?
Likely using this or something similar: [SALE] lighted aux boards, D1 and D1S multicolored
To be honest, I’m surprised we don’t see more of this mod. It’s pretty sweet. Come to think of it, I need to try that myself!
Nice one moderator007 ![]()
The 3500K led seems quite nice !
And certainly better than the original one ![]()