I hope that means you bought it to dive it. If so, I strongly suggest reading my mods BEFORE diving it to prevent any damage to the housing and the driver that will result from seawater grounding and anode corrosion.
Best of luck!
I hope that means you bought it to dive it. If so, I strongly suggest reading my mods BEFORE diving it to prevent any damage to the housing and the driver that will result from seawater grounding and anode corrosion.
Best of luck!
You bet I did and thanks AGAIN. I will definitely be modding this thing!!! Oh how many hours on the light down under? And how deep are you going?
The light has been on 11 dives for a total of 370 minutes per log. As I’ve mentioned, it was only trouble-free for the last two dives. The rest were dives testing changes I had made along the way.
I pulled the tail spring almost immediately after one dive. I then played with battery contact heights but I was still noticing my light was cutting out at depth and only after its 8th dive did I discover the need for my head-shave mod since the forward threads become worse and worse over time as a ground contact between the head and the handle. As soon as I fixed that it was golden since all other mods were already done.
Most of my Puget Sound dives are no more than 100 FSW for 35 minutes to an hour. I don’t see all that many species worth taking a picture of beyond 100 Feet but I did follow a Six Gill down to 120 once before deciding he wasn’t worth a deco stop. I just dive air using either a PST 130 or PST 119 and I don’t own a re-breather.
With the tail screwed tight and good o-rings, I would rate this light for a depth equivalent of at least my UK Light Cannon.
Hey Deepdawg, thank you for all the time you’ve put into posting about this. I’m going to start modding mine thanks to all this great information. I’ll repost when complete.
Can either of you post a few pics detailing what you did? I just cleaned all the corrosion off the threads and it looks pretty good. Gotta find something to get the anodising off the inside of the head.
Quick question, prior to performing the head-shave mod and forward handle mode, my tail-cap current on 2 x 26650 was 2a on HIGH. After modding, the tail cap current remained the same at 2a, was this supposed to increase? Also, I did notice it’s much easier to get a tail cap reading now and prior to this mod was a bit tedious.
I finally got my pics into my post. I hope this helps rescue your lights and anyone else who may have bought these calamities.
Thanks for taking readings since I have not. I suspect that by the time I did the head shave, my forward threads were so bad that it was brighter but was only back to as bright as it was out of the box. But since you’re already getting a more steady reading with the mod, you may already have had an intermittent connection from handle to head. At depth, this aluminum thread contact becomes even worse prior to doing the head-shave contact improvement and probably greatly reduces output while also giving intermittent function.
I’ve edited my mod post to stay conservative on my output estimates since I have never felt that this light comes even close to what most vendors are claiming.
Excellent job modding and solving that mode changing problem! I’m thinking that maybe I buy a second one for a brighter backup lamp and mod it your way, since I’m gonna make a canister light of this first one…
Just tested this lamp with my new driver yesterday with thermal padding inserted and it didn’t start dimming right away so I guess the heat is not a problem with that driver either. Also tested with three cells in series instead of two and it was a LOT brighter. If only three could be used…
One question, how did you stiff that front spring?
Thanks for the comment, I’m honored.
Technically I haven’t stiffened the head spring so much as I’ve limited its compression range by inserting stiff Styrofoam pads into the spring coils. It has always been intended as temporary until a better permanent solution strikes. My guess is that you’ve probably got stiffer springs on hand that you can use to simply replace or augment the original. I will probably just coil a second spring into the original to double its stiffness.
If you’re thinking of buying another one (like I did) I expect you will need it for diving. If NOT diving it, then this would be a much more economical water resistant light and it allows the third battery you mention. Unfortunately they would have to be 18650’s
Otherwise this is as cheap as I’m finding the TuRD.
Tonight I did the third successful test dive of my modified TR-DF003.
Man, it was cold out there; warmer under the water than above!
It seemed to perform better than the camera on this dive. :bigsmile:
I need to work on the auto-macro setting since you can clearly see it focusing on the particulates on the housing lens once it’s tucked in the Octopus den.

The video opens just after initial decent and the light is off. I needed both hands to turn it on by twisting the tail cap home so I had to let the camera dangle while I powered on the light.
The light came on in mode 5 (SOS strobe) so you can see me switch it to HIGH (mode 1) at the 0:20 second point before approaching the Giant Pacific Octopus den. From that point forward it performed well on this dive. I switched it by just giving it a firm shake.
At 0:29 seconds I briefly switch to my Light Cannon just for beam-shot comparison and then back to the TR-DF003 at 0:37 seconds. This thing is MUCH brighter than my Light Cannon!
I kept it on HIGH for the remainder of the 32 minute dive and battery voltage only had dropped to 3.89V using ultrafire 5000mAh 26650 batteries. A couple times I accidentally bumped it to a lower mode and had to cycle it back to high but it was easy to do.
Like Pokasaha, I too wish a third battery could be used to increase output without losing run-time.
This particular light now has over 400 minutes underwater.
Dawg
That would be funny if the Octo took off with the light ![]() Uh only if you had another one. BTW crazy cold water diver. You should check out Monterey CA for diving. That’s where I got certified. And then my Openwater II up north at Jenner CA Both beautiful, got to see it.
Uh only if you had another one. BTW crazy cold water diver. You should check out Monterey CA for diving. That’s where I got certified. And then my Openwater II up north at Jenner CA Both beautiful, got to see it.
That is too funny since a friend of mine actually had his dive light stolen by a Giant Pacific Octopus. Once they get the third arm on something, it’s theirs! They have about a three-year-old “MINE” mentality. He ran out of air before we could figure out a way to get it back. When we went back down, that light was nowhere to be found.
Even though I do have two of these modded lights now, I’m not ready to feed one to the Octos although I was pretty close after my 5th dive with the first one of these P.O.S. lights. |(
Hi Deepdawg,
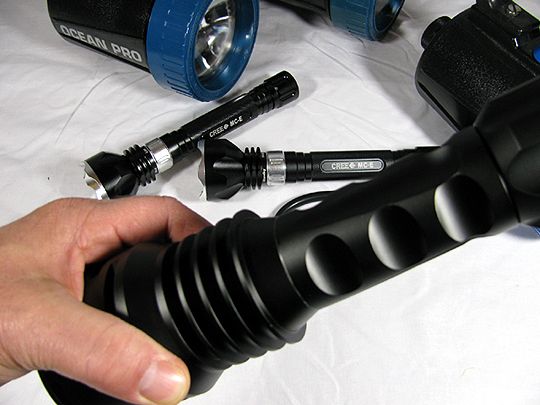
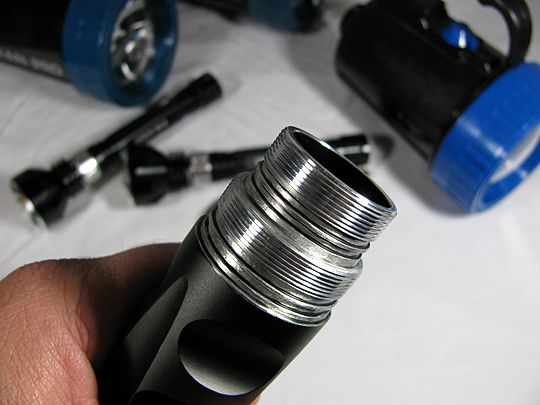
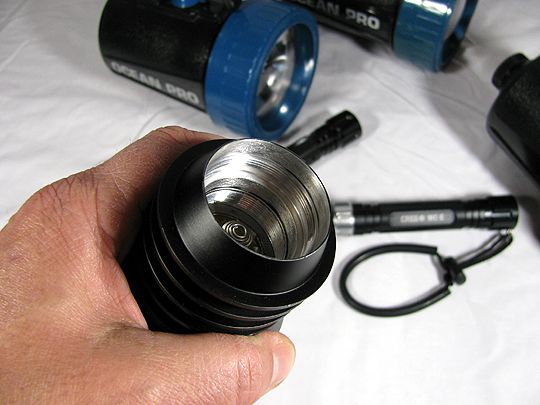
I had completed the mod prior to you posting the photos. I don’t know if this is bad or not, but in addition to performing the mod on the handle and head contact points, using my dremel with a mini wire wheel, I had also removed the anodizing in-between the threads on the handle too, in addition to removing the wide anodized strip below the heads contact point. Was this bad that I did this?
As I mentioned before, the light appears to work excellent and is as easy as any of my normal lights to get an amp reading at the tail. I only have to perform the tail spring mode at this point. Thanks.
I’m not sure I understand exactly all locations you’ve removed anodizing from so a pic would help.
The only risks of excessive removal of anodizing are increased risk of oxidation and seawater corrosion, possible reduction in o-ring seal-pressure.
If you also worked on the o-ring channels or the portion of the head that acts as the outer o-ring seal, then you just need to be sure you’ve left them very smooth and uniform so you don’t compromise your o-ring seals at depth.
This particular anodizing has a thickness so I didn’t want to mess with any of the o-ring surfaces thus changing the seal pressure but since I left the “too-fat” stock silicone o-rings up front, you could just do the same and they should compensate. I don’t unscrew the handle often and probably won’t again until deciding on a more permanent spring fix.
EDIT: If you look at my second photo, you can clearly see that some of the anodizing has worn off of the inside o-ring surface of the head of mine just from all the previous assembly and dis-assembly that I’ve done with mine trying to get it to work. I just try to keep that surface real smooth so the o-rings will seal well.
So really, as long as the light always gets a good post-dive rinse, the only real issue might be appearance. Heck, maybe now you could just strip the entire handle and polish it. It might be a nice aesthetic. jk
I made some minor edits to the mod post and I will leave them in bold for a while.
EDIT 1:
I had forgotten how the unmodified light would not even shut off on dry land without removing the tail spring. This is because the anodized coating on the tail thread wears off with normal use.
The effect WITH the tail spring in place is that you have to remove the tail cap completely to avoid the partial connection at the tail thread. You’ll begin noticing it as an intermittent blinking of the light at first even when the tail is backed off but eventually it just gets worse and you’ll risk current draw while the light is in standby.
The effect on the modified light is that, like when diving, you just have to retract the tail 2 rotations to uncouple the battery chain and that will cut power completely. I added this to the post as problem number 10 that is ultimately solved by the tail cap modification and I added a small paragraph in the TAIL CAP MOD section.
I forgot to mention this because I recognized the problem before it even happened so I removed the tail spring almost immediately after getting the light so I was used to it needing a 2 rotation retraction to shut off on dry land.
What took me a few more dives to discover was the need for the HEAD SHAVE MOD which had me puzzled for quite some time until I figured out why the light was working fine on dry land but not when at the pressures of depth.
EDIT 2:
In the HEAD SHAVE MOD section, I just emphasize the importance of keeping the mating surface between the head and handle as flat as possible for a good grounding mate between the two and I touch on how I addressed this with my limited shop.
Excellent write up, DeepDawg! I know you've helped a bunch of members with this light and given many more a good reason to finally get one. Your mods really don't sound difficult at all and are well worth the time spent doing. Bravo!
Hey JohnnyMac,
Thanks for the positive comment, I glad I’m helping out.
I would rather think I’m helping those who already have the light rather than encouraging others to buy it. My feeling is that so much was overlooked with the design that I am not comfortable causing additional sales of this beast.
As I mention in several places, I completely expect better options to show up on the market soon that will have magnetic switching like the XTAR D35 or the X-BEAM U2X3 both of which have magnetic switching. Price drops on these are inevitable as more designs and clone start hitting the market.
If you look at other CREE T6 dive lights like the truly wonderful YEZL Q2 which is the exact same product as the KEYGOS S3; they all are beginning to drop fast in price as more designs and their own clones invade the marketplace. Three years ago if I saw a KEYGOS S3 performing on a dive, I would have expected to pay $200+ for it easily. They can now be had with batteries and a charger for under 50 bucks. That’s friggen ridiculous! Sure I had to replace all the o-rings on my S3 but that was cheap and it’s now easily a 200FSW dive light with what truly feels like about a 1000 lumen output.
It’s true that I bought a second TR-DF003 since I’m comfortable with my mods and I was able to get a second one with big 26650’s and a decent 26650 charger at my door for $60. Part of the reason I did that was because I was already invested in one of them PLUS I knew there would be no other way in the future to get spare parts other than to cannibalize one so I could one day service the other if parts begin failing. I was just lucky some poor bloke was dumping a new one as a complete kit with batteries and charger probably because he saw the writing on the wall with these things.
But for now, mine are both modified and working fine and if readers want to take a chance buying these and following my improvements rather than waiting for better options, I think they will likely have the brightest hand-held dive light on the block . . for a while.
But as I mention in my post and as others have confirmed, the claimed output on this model is way off. I see 3800 and 4500 all the time in ads when we all know 1700 lumens is probably about it with the three CREE T6’s in parallel even with 26650 batteries. And if you rewire it for higher output, it gets too hot on land and it will have too short of a run-time to be a good dive light since you can’t add a third battery.
So once again, I personally encourage those who haven’t bought one yet to consider waiting for a better design to become affordable if you can. If not, mod away and you might be happy with the TR-DF003 aka “TuRD”.
I love your forum and thanks again for the comment!
Hey Dawg what was the screw length in the tail. And how did you secure it in detail please?
Hey DeepDawg,
Here are the photos of how I modded the light. I don’t know if I ruined it for salt water use removing the extra anodizing that I did. I had just assumed all of it needed to go on the threads and inside the head. I still have to order the upgraded O-rings that you suggested, but I still have all the originals plus all the spares they included in the box. Please let me know what you think of what I did. The last photo is simply a shot of what the beam profile looks like outside of the water in case anyone was curious. Thanks again for all the help.