I didn’t watch the video, but I found that my sinkpad boards took a fair bit longer to heat up to solder melt temps than my alu boards. I used a smidgeon of solder paste and heated the board and LED up together (no. 4 on the hob). Solder paste melted, sucked the LED down and then I put it on the hob next to it to cool down, no need to press the LED down (although I’ve had to do so before when using solder as it’s harder to gauge the right amount).
One’s already in service and doing a stellar job, although I found that screwing the star down didn’t do as good a job of getting the star flat as with the alu stars I’ve used. Still, there was excellent contact under the LED and screw points and the heat sink heats up fine.
I find it easier to tin the pads with the regular iron then remove nearly all of it with solder wick. It's 'bout impossible to put on just the right amount, adding too much then removing it is about a kajillion times easier.
if you use just a little bit of solder paste and put the LED on it before heating the whole thing up, the LED will be sucked in position, perfectly centered AND excess soldier will come out at the sides.
If you reflow use solder paste, that’s what it’s made for!
This is perhaps the right place to show my very own reflow video, it is actually the second led reflow I have ever done . I hardly dare to show this shaky performance (I'm is not always this bad) but I show it anyway because I like to demonstrate the set-up (and it will probably be fun to see someone else being clumsy ).
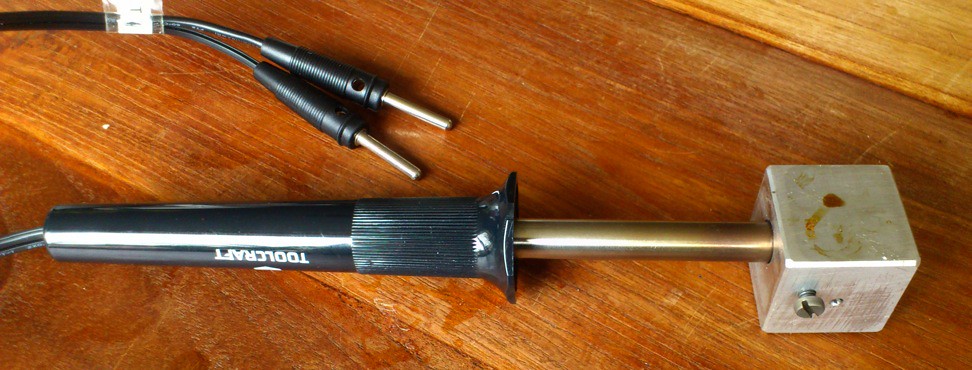
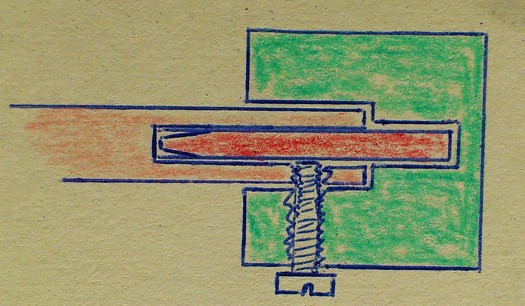
The 'hotplate' is made of a 12V/30W soldering iron that was originally fitted with a car-plug (brand name is Toolcraft, it is a house brand of electronics webshop Conrad, the germans among us will know the shop) . I replaced the plug with two banana-plugs so that the power can be regulated with a lab power supply, and I attached a block of aluminium to the iron (see drawing). I originally made it for heating small laboratory glassware, but never used it like that, and now it has a new life as a reflow-station :
It has no temperature feed-back or anything so I found out by trial and error that when I run it at 10V (let the temperature settle for half an hour) it is hot enough to melt solder, at 8V solder is not melting yet.
The video shows the removal of the XPG-led off the mcpcb (of my Maratac copper AAA), the removal of a Nichia219 of a Ill.Supply board (that is too thick for the Maratac) and reflowing it on the Maratac board. No solder needed adding because there was enough present on the led and the board. Please turn off the sound to avoid listening to the occasional swearing :
I was really too shaky to do it well, but after turning off the camera I managed to put the board back on the heater and center the led really well. The temperature shocks that the led experienced were of course nowhere near the recommended Cree (or Nichia) specs, but the led works perfect as far as I can see. And here it is in the flashlight, happy with it, it is nice with an alkaline, but on a 10400 IMR it draws 1.15A , the beam has even improved with the Nichia in it, with a super amount of beautiful light:
Dang, djozz, that was very difficult for you, huh? Working with parts so small, you need to be completely relaxed and calm I have seen you touching that hot “cube”, and that hurts for sure. Maybe less surface/smaller cube will help, about 15-20 mm, enough space to put those small parts and have more free space to do the job
Well, I'm learning, and my hands will be more stable when there's not a camera running. What I really like is that I'm able now to reflow leds, it solves a lot of modding issues to be able to use the original boards. Thanks to you all for the examples of how it can be done.
djozz, awesome video indeed. I sincerely mean no disrespect but it’s been a long time since I was crying with laughter awesome stuff and kudos for putting it up.
About everything that could go wrong just about did lol
Thanks, I'm still a bit embarrassed , I was happily surprised though that it ended with a great functioning led board for the Maratac. That made my day . The reflowing process is apparently not that critical, and led-domes can withstand the approx. 200 deg Celsius without any damage.
Thanks for all the inspiring vids and comments. Ive been using a cheap disposable butane lighter to heat the underside of the star (while holding it with a pair of long needle nosed pliers) to swap emitters. Swapping emitters doesnt require soldering since the original solder remains on the star and is reused. As soon as the solder flows the work is done, and the white top surface coating doesnt become overheated or discolored on the star. Couldnt be any easier!
Regardless of which method you chose, everyone should try mounting their own emitters and soldering their own boards.
1. Paint the contact points on the star with a solder flux pen.
2. Apply a very small amount of low temp solder paste using a toothpick. Then use the toothpick to spread it in a thin layer on the LED contact pads on the star. Use toothpick to remove most of the excess and to make sure there is a gap between each of the 3 contacts.
3. Carefully place the LED into the correct position on the solder paste.
4. put the star into a standard spring-loaded wooden clothespin then put the clothespin in a vise. This keeps the star steady and insulates it.
5. Apply my cheap 20-year-old Radio Shack 40w soldering iron to the underside of the star directly below the LED. Watch the LED. It’s obvious when the paste melts as the star will jump into place, and any excess solder paste will be pushed out to the side and turn shiny. Wait a few seconds to make sure the star has completely moved.
6. Remove heat and wait a minute or two for the star to cool.
Before the mod the hotspot was bigger than my ITP-A3(xp-g), after the mod it is exactly the same size. The die size of the Nichia and XP-G look the same, so I think the focus is better, and there can be two reasons that both work in the same direction: 1) the led base of the XP-G is thicker, so the led may have sticked more into the reflector, 2) it might have something to do with the curvature of the dome; the Nichia has a stronger curved dome, setting the virtual image of the led a bit backwards. Pictures are nice, so here's a picture I made, left the Nichia, right a XP-G:
Congrats on the successful swap! And yes indeed, very clever idea with the iron and aluminum cube…works like a charm!
I recommend 2 Black Russians before starting, with one standing ready in case things take a turn for the worse! (or to celebrate success, whichever)
Black Russian = 1.5 oz Kahlua + 1 oz Vodka vodka poured over ice then kahlua added, stir and enjoy. Be sure to save the 3rd for celebratory purposes AFTER success.
Thanks for the tip, I am more into Belgian beers, but I'm sure those Black Russians will do the job as well . (this video is going to haunt me , my reflows are going almost perfect now).
Hi Michael, for 10 dollars just go for it. I think 200 degC may be quite perfect, I’m more concerned about the lowbudget adjustment system and electrical safety than the temperature. I think that maybe adding the aluminium block to the heat-path may well lower the temperature as well.
I bought a very cheap chinese solder iron once that measured 40V on the hot parts, but even that may not be a problem in this case.
 . I hardly dare to show this shaky performance (I'm is not always this bad) but I show it anyway because I like to demonstrate the set-up (and it will probably be fun to see someone else being clumsy
  ).
).
 :
:
 , the beam has even improved with the Nichia in it, with a super amount of beautiful light:
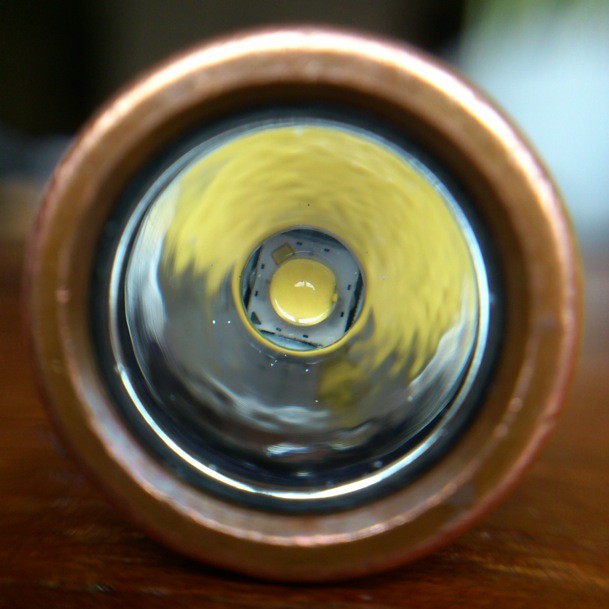

 , my reflows are going almost perfect now).