Note the tempering recommended at instructables is in Centigrade units.
175-350°C
and do read up on it a bit, it’s recommended to put the hot metal into ashes or sand (dry, preheated so there’s no moisture in it)
That limits the rate at which it cools down.
After that sanding and polishing to eliminate surface cracking.
It’s rocket science — doing it right. You’ll find a lot of failure analysis reports discussing how to do it wrong…
Or just turn the oven off while leaving the clip in…. It is insulated and cools slower than just pulling the clip out. This is not Rocket Science as we do not have a way TO do it right, yet… Some improvement however, is improvement in this case…
At times, too much information can be paralyzing… Thus the success of Nike’s “Just Do It” advertising campaign…
Yes, more mAh should mean longer runtime, at least on the low / med modes. The effective mAh value changes with higher current though, so a high-drain cell might last longer on high than a high-capacity cell.
Ok here we go. 20 minutes at 350f and another hour at 500f. Another hour to cool. Not much happened…. the other wing snapped off with about the same amount of pressure or maybe less! I’m not really going to try to understand the science of tempering as I feel my plate is full enough just trying to understand drivers! Feel free to chime in if you know what I could have done differently. But I’m still happy with the result after a little grinding and sanding.
My results won’t prove anything. With a fair amount of twisting pressure applied to one of the tabs, it bent a little and didn’t break. The reason I say it won’t prove anything is that I failed to try breaking it before re-tempering. I don’t know if it was ever brittle to begin with. :~ Thanks for trying with yours. By the way, if the Instructables article is to be believed, it is supposed to be at temp for 1.5 hours and then slowly cooled. It could be that you just didn’t get it hot enough for long enough. I set my oven to 500F when I did mine. I put the clip in at the start so it would heat with the oven, and set the timer for two hours. If yours is still brittle, you may want to bake it again, hotter and longer. You don’t have any tabs left to break off for testing, but getting it done a little better may keep your clip from self-testing (breaking) in the future.
My references are stored elsewhere and it’s been a long time ago, but IIRC the rate of heating is rather unimportant; the rate of cooling (quenching) can be critical, and the shock of cooling to quickly crystallizes the metal structure which is what causes brittleness. Some alloys will do OK cooling slowly, some need a more rapid but controlled initial quenching to avoid softening. It’s not as simple as the instructables thing would have you believe, but you might succeed with dumb luck and the worst that can happen is that you end up with a brittle or too-soft clip so go for it.
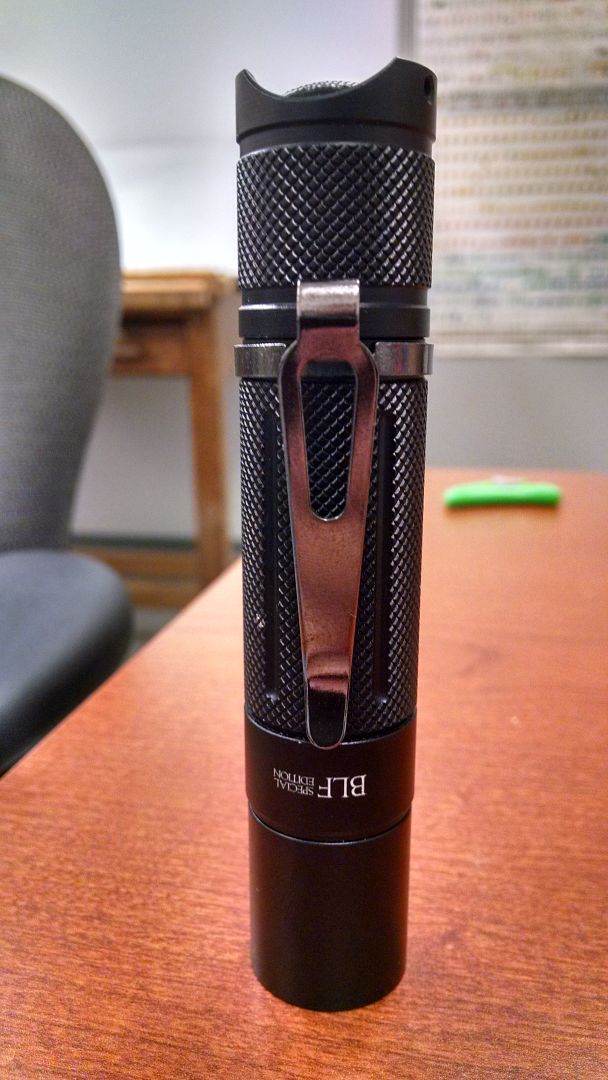
IMHO this is not a well designed spring; there are too many sharp radii and that is where stresses concentrate. That doesn’t mean it can’t work well but it does make perfect tempering a lot more critical and tougher to achieve. Good luck!
Quote DavidEF: "With a fair amount of twisting pressure applied to one of the tabs, it bent a little and didn't break"
This ^
I broke both of my tabs off while holding firmly in tabletop vice. The snap wasn't immediate had to wiggle each couple times. So at least the two little wings seemed to not be that brittle.
Thanks. The Instructables article does talk about quenching first for hardness then doing the tempering to keep it from being too brittle. And they are talking about a knife, not a clip which is bent in several places and is going to be under daily stress. So yeah, it may not be the best application of that Instructables article.
I’m kind of pissed, I haven’t received an answer to both my PM and email in a week now.
My BLF A6 is an useless piece of aluminium and malfunctioning electronics as of now.
I tested my order: one of each tint. The 3D didn’t light up. The others did.
I pulled the 3D tailcap and did the screwdriver bypass and it lit fine.
The 3D tailcap on the 5A didn’t light. On the 1A it will only if I really crank down.
Putting a paperclip spacer in the 3D tailcap causes it to work on any light.
So, the 1A lights on any tailcap. The 5A and 3D light only on the 1A or 5A tailcaps.
The 3D and 5A tubes are visibly shorter to the naked eye. I can easily pick them out (1A is longer, 3D is way off center).
So as I understand it, I have two short battery tubes (from 3D and 5A), and one short tailcap (from 3D). And I need to email that to heyanqing1@banggood.com
These things happen. I still have three functional lights at the moment. And if BG/Manker makes good, I’ll have a trio of perfect interchangeability.
I love the UI, the moon and turbo modes, the bike flasher, the batt check… Overall really love the design. I can’t wait to torture test these as a bike light on the terrible roads here.