I did propose to Neal to see if manufacturer is able to corporate with us to improve on the little parts like retaining rings, screw threads, etc. Communication has been slow... Kind of stuck in the 56K modem era. Probably we have not achieved the number a decent number to expedite this project.
If you guys feel that current quality is acceptable, he should be able to get it up within a week. What you guys think?
I’m running low on cash at the moment (other flashlight purchases) so I can wait, but I’ll let the other list members decide what they want to do. I’m fine with how it is now.
I can’t really add either as I have the ability to make whatever changes I deem fit and appropriate. I’ll machine a new copper emitter shelf and give it more depth with some flared shoulders on top for total mass, not a problem to get it ready to run hard. Might even thread the area where it sits so the new copper piece threads in snug without screws to hold it down. Would have to have it in hand to figure all that out though.
Obviously, I’ll do things not easily accomplished without a lathe, so I’m just riding on the back of the wagon waiting for it all to shake loose.
Boy, those are the only two issues I have some concerns about - the body-head threads and the driver retaining ring. I'd say give it a little more time to see if improvements in those two areas could be worked out. If they can't, don't think all is lost. I'd order another one. So far, the threads and retaining ring are holding up fine for me. I'm more concerned about the body threads than the retainer ring, because if I resell these modded, the buyer has to deal with the body tube threads every time they change/charge cells, while I'm the only one who should be dealing with the retaining ring. Plus there's other reasonable options with the retaining ring (glue like an SRK for example), and much more involved in fixing up or improving the body threads.
Thinking if I can sand down those brass bumps with a rotary tool, it would help. Also might help using shorter springs, or cutting them down. Right now to get the threading to start, it can be a little struggle. Certainly a ring like SRK's or the COURUI (or Crelant 7G9) would be better, but my machining abilities are limited.
Tom, I could cut you some rings from copper or brass, no big deal on the lathe. Just shout out some dims and we’ll go from there. Mine’s a manual set-up, so I can’t just dial up a number and let it run, but I can turn a few ya know?
Hhmm... Just wondering if the brass knobs are better pts of contact than a ring for these flat top EFEST 26650's... The spring, specially with the bypass wires, is probably just too much force
They're my major concern from the pics. Very few and very sharp From the looks of it. They can be a pain in the butt, based on other soupcan lights I've come across with similar threads.
For me, dunno - didn't do any of that yet . Mostly it's the springs I'm fighting, I believe, but the bumps don't make it any easier. Hhmm - think I only lightly lubes them, mainly the o-rings. It's also so awkward because it's so darn big and heavy - SRK's are sooo much easier handling.
Ohhh - I had it in a bag, mil style, with a pull string around the top. Fumbled with my hands full loading it and couple of other things into the back seat of my car, 1st day of wearing gloves - 12F outside that morn, and I freak'n dropped it in the seat, then it rolled out the door on the blacktop. Only a slight ding at the tail - it might have slipped out of the bag on the tail end. The o-ring around the lens popped out about half around, and was easy to get back in. From that I believe the reflector isn't tight in there - some play at the front end of the bezel. Gotta check, but think the UCLp is a little thicker, so may make it tighter, or may have to add a copper shim under the Noctigon MCPCB.
Hmm, not really sure what to do now! Kinda low on cash but that is not a biggest issue.
There are just to many things that need to be addressed so this light could be “wow light”,
making a new LED shelf and a brass ring to replace battery contacts (I predicted they will be a problem) on a driver, this require tools that I do not have or have access to, machining shop would strip me for at least 30€ just to make this 2 things, + XHP35Hi (yes I would like to go that route) + new driver … additional 60$ on top of the light’s price to make something out of it.
Now, making a proper LED shelf and battery contacts by manufacturer would mean tremendous help for guys without the lathe.
And not to forget that awful handle, that needs to be dealt with also…
I like the looks and huge reflector but I am not sure that buying it would be right thing to do…
Yikes, you really don't have to do any of that stuff to get 700+ kcd from this light, but totally understand if you want to go the XHP35 HI route - 6v required I think, so you'd either have to use 18350's for short high output, low runtime or do the battery flip-over mod, which is beyond me too at this point.
Practically a stock Shocker can do lots of lumens and throw, modded Shockers I did went over 5K lumens and close to 600 kcd, so the XHP35's or 50's don't interest me much. Modding a J18 or other 7 to 12 LED shower heads can also do much more lumens and good throw, depending on using HI LED's or dedoming, or favor lumens over throw like Dale did with the 3 XHP70 Shocker mod.
The BOSS1 is nicely setup for a simpler DD max thrower with lots of power and runtime - cheapest and simplest way to get there, compared to a TM36 or TK61.
What's the thrill/advantage to something like a XHP35 HI? Clearly it would have more lumens, take more power than a XPL HI or dedomed XPL, dedomed XM-L2, but would it throw any further in a big reflector compared to a dedomed XM-L2/XPL or dedomed XP-G2? I didn't think so because of the bog surface area, but dunno.
I remember one person in the homebuilt contest was not happy with how the 35 performed, so much so that he turned a brand new head on his lathe to use the XHP70 instead. Search ‘Arc of Josiah’
how about replacing the whole original contact board ? I mean making a new contact board from a PCB and then just glueing a thin copper (or any other) washer to it. That should provide plenty of connection with minimal resistance and soldering wires (either to direct drive a led or for a driver) to the negative (the rim) and positive (the ceinter) part of the board would be easy.
Just topped off the cells to about 4.22v, and did an outdoor 10 meter measurement and got 645 kcd (1606 meters, 5269 feet), 11 feet short of a mile . After the test I measured amps across the switch and got 6.25A. Previously I measured 5.95A and 635 kcd measured at 5m indoors, but since then I applied NO-OX-ID to the soldered up banana connectors, and freshened up the DMM lead ends, so probably got a bump in the readings. Got a UNI-T 210E clamp meter on the way, and also looking at building up a 0.01 ohm 50 watt resistor in a test fixture.
When the UCLp arrives, should be about 700 kcd then.
Kinda missed the part that XHP35 is 12V only, doh, thought it was a 6V like rest of the XHP family.
Also, can’t find that thread atm, but new single cell boost XHP driver is on the way, for 6V leds of course.
Idea behind the XHP35HI was to get more lumens than you would get with XML2, a bit wider beam, but not to lose on throw.
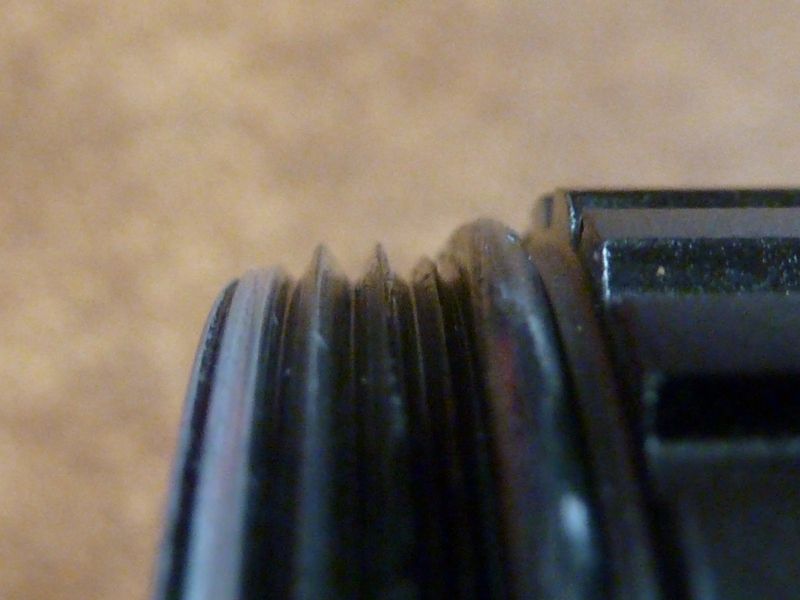
The threads have been a concern of mine, but maybe I'm over worried. I just threaded/unthreaded the tube with cells in it about 4 times this evening, and took a picture afterwards. What I thought was new wear and rubbed off anodizing turned out to be wrong - it was there when I first got the light. Didn't realize it's been like that from day 1, til I looked at the picture.
Also, think I'm getting used to it now. It's important to go CCW first to get it set right, then start tightening.
Mouse-over: latest pic from tonight (better focused), mouse-out: original pic from 1st day
Sorry for the pics, they don't line up well in positioning, lighting or focus. But think you can see they look pretty much the same. I tried to find the exact position showing the first flattened or square thread, then the 3 more pointy ones. You'd think it's from wear but it's how the light came.
I think the first flattened thread is done that way intentionally - it's even got an angle to it.

 . Mostly it's the springs I'm fighting, I believe, but the bumps don't make it any easier. Hhmm - think I only lightly lubes them, mainly the o-rings. It's also so awkward because it's so darn big and heavy - SRK's are sooo much easier handling.
 . After the test I measured amps across the switch and got 6.25A. Previously I measured 5.95A and 635 kcd measured at 5m indoors, but since then I applied NO-OX-ID to the soldered up banana connectors, and freshened up the DMM lead ends, so probably got a bump in the readings. Got a UNI-T 210E clamp meter on the way, and also looking at building up a 0.01 ohm 50 watt resistor in a test fixture.