WARNING: Cometa – read/fix BEFORE inserting battery

Any suggestions on places to buy spare lens got this light. This is my first zoomie and I haven’t looked at this style of lens before at sites.

The installed lens was perfect upon delivery. My breakdown for checks led to a slight misalignment and crushing on the edge when I put it back together. Slowly tightening the bezel and I hear a slight crunching sound; immediately knew what I had just done.

PS, what current is safe to use with this gauge wire — intermittently? Sustained?
And what happens if the current is too much (where is the first point of failure)?
l

(that’s the table from the original post)

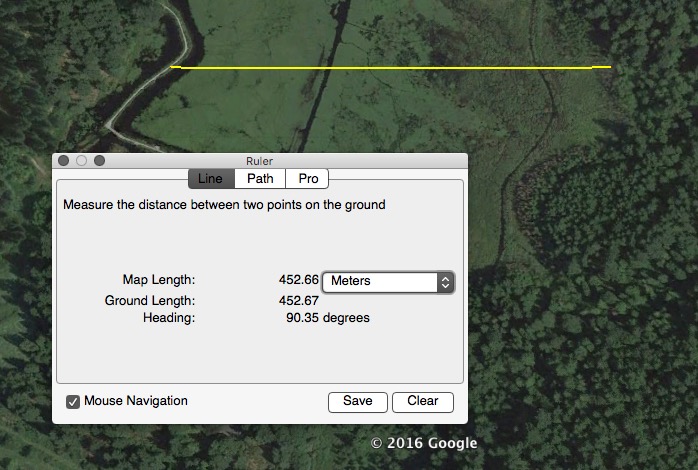
So, I managed to get out and do some beamshots on Saturday night. Location was Minnekhada Regional Park, east of Coquitlam, Lower Mainland, BC, Canada. I shot due east and had roughly a 450 meter run to a tree-line according to Google Earth…

There was some intermittent mist coming through, so there will be some slight variation in the visibility of the beams and the spill. I was experimenting with several different angles and camera positions, and at the suggestion of a friend who was helping me out, I positioned the camera so the spill was visible in the air against a dark hillside. This gave the beam profile the best visibility. Below is a GIF animation, 800 pixels wide. There are links to larger animations you can download too.

If anyone would like me to post the individual frames as JPEGs, to avoid the GIF dithering artifacts, I can do so? I have numerous additional beamshots from lights not in the animation and eventually, in the next few days sometime, I plan on posting everything to my blog. I just wanted to get something out quickly, for you all here to see… :slight_smile: First, some notes about the lights…

I mostly went in order of my brightest throwers, but the first light in the animation is a crazy Vinh modded (V54) SupBeam K40Mvn. While the MT-G2 LED does not make an ideal thrower, it is an absolute beast of light, putting out about 4000 lumens on Sony VTC5 cells, and it nearly keeps up with my dedicated throwers. That said, when you are actually holding the light, you cannot see as much at a distance since any dust or mist in the air will backscatter so much light, that your hot-spot visibility is reduced. However off-axis, from the camera position, it is certainly impressive.

The next light is my stock TN32, with a very heavily driven but regular (dome-on) XM-L2. It is a fairly bluish beam, and the backscatter is also rather distracting.

Then comes my Olight SR52UT. It has a more neutral tint with less blue than the TN32, and it has a concentrated beam. The core brightness is very close to the TN32 but with less spill brightness, it is actually more useable in less than perfectly clear air.

Next the Cometa. So, at 450 meters I would say its hotspot is definitely less intense than the TN32 or SR52UT, as I had anticipated with my indoor comparisons. However, the warmer tint is noticeable and it is essentially just as effective a thrower as the other two, since there is virtually zero spill to reflect back at you, so the hotspot is more visible. In perfectly clear air, the other two would be superior but last night the Cometa held its own. After some ceiling bounce brightness comparisons with some of my other lights, I would peg it at approximately 950-1000 lumens, give or take. If I had a CW version, and if that were truly 1300 lumens, then it would have certainly been even more impressive. I do love walking around with it at night and enjoyed the ability to change its focus, however I wish the threads were “faster” and required less turning to go from zoomed to defocused. I would also prefer it to have an even warmer tint, maybe 4500K, and I’d be willing to sacrifice some throw for that.

Lastly, I threw in the tiny little EagleTac GX30A3D, with a CW XP-L HI, running on three AA cells. Impressive throw for its size and power source! So, without further ado, here is the animation…

Here are links to some larger versions…

Cometa Comparison Animation - 1600 pixels wide - 6.3MB
Cometa Comparison Animation - 2400 pixels wide - 13.8MB

Note the brightness of these beamshots in the animations were a little above what one saw visually, but I adjusted the camera’s exposure to clearly show the beams and the spill, enabling easier comparison I felt.

The lights not in the above animations, that I also took beamshots of last night: BLF A6 (NW), EagleTac G25C2 Mark II with XP-L HI (but I messed up the aim a little on that one :stuck_out_tongue: ), EagleTac MX25L3C (Nichia 219), Noctigon Meteor M43 (Nichia 219), Nitecore EA41 and EC4SW, Armytek Predator Pro 2.5 (XP-G2 CW), MTE M2 Aspheric (Vinh modded with a warmer XP-G2 and a slight current boost) and even an Olight S1 (brass), although that one was a little outclassed…

Hope someone finds this post helpful. :slight_smile:

EDIT: Here is a zoomed in version of the beamshot animation. Now that I am looking at them more closely, the Cometa is actually doing better than I first thought. It appears a little less bright due to its more neutral beam colour, but throw is actually pretty close to the SR52UT I think… :sunglasses:

Nice beamshots ‘mmander’! Thanks for posting………. :slight_smile:

Time to get some kapton tape in case i need it

Yes mmander those look great and show the reason I prefer the NW, and where are you posting the other beamshots?

Sharpie,

I am not going to go and get all educated now about anodizing and insulative values… I love your knowledge and experience with things electrical here, but the point is, I have an almost year old Thorfire TG06 that I swap batteries in almost daily. It had good anodizing, but not as good as the Cometa/Jax, and it still locks out after umpteen tailcap removals and driver swaps and other such things. Anodizing on this light is good, and worse anodizing has held up for me before. This is perhaps ignorant to someone like you, but works for me…

The point I was simply trying to make was not that the one member here did not have a short, but that the bigger hazard is the pill/spring/26650 interface. The red herring is the short up front, the dead driver in another…. These are distractions from the major issue, the light/battery melt down that shorting a 26650 directly can cause. What I see is if you are going to get into the light to remove the pill, insulate the front of the leads under the “centering ring” while you are there, but if all you want to do is drop a gasket from a cottage cheese container lid into the back and throw in a 26650, you have a high chance of this being the only issue on the light. I am not minimizing those other defects by any means, I would be ticked and report the issues here for others to know. I just am mainly worried about someone having a bad time from a directly shorted battery. By bad time, I mean a vented light, or fire or other hazard that LiIon can create with a dead short…

You will know the DD light from a short from the negative lead to the light, it will only have one mode, but the LED will keep the voltage from runaway. If there was a + lead to ground fault, and you had a gasket in the front, the immediate action of unscrewing the tail, even a 1/4 turn will deactivate that fault (NO LIGHT EMITTED, same as pill fault). Thus we are relying on the anodizing being insulating on both ends of the light.

Trouble shooting/proofing this light is as follows for me:

1. Cut non conductive gasket from cardboard (my use initially), plastic or other non conductive material. Center hole about 10mm (3/8”) is the most important part, this needs for just the spring to protrude, and does not have to go all the way down (spring will compress with insulator gasket on it). The outside should be just smaller than the battery tube. Insert gasket before battery.

2. Screw on tail cap, watch for tail button to light up when tail cap is fully screwed down. If tail cap is screwed down and NO light is from either tail button or front of light (may be on moon mode, so have a way to see this quickly like a mirror) IMMEDIATELY unscrew tail cap and check springs for heat/melting.

3. If tail cap button lights up, press button while preparing to unscrew tail cap. If no light is seen from front of the Cometa, IMMEDIATELY unscrew tail cap and check for hot springs and any signs of trouble (smell, hot battery, etc). If light is seen roaring from the front of the Cometa (or not, could just be a trickle in moon mode), check to see if you can change modes by bumping the tail button. If no mode change, unscrew tail cap and try again. If modes change, go enjoy a kick butt light… marvel in the zoominess….

4. If light is DD and only one mode (kick butt lumen output, or stupid bright for those non flashaholics), remove battery and then remove bezel, lens and centering ring after removing battery to check for short on MCPCB the LED is mounted on. If no short found, insulate leads and try again. If this single high brightness mode occurs again, remove pill and driver ring, check driver and carefully center driver before reinstalling driver ring. Try again… If failure at this step occurs again, request a new driver…

5. Any issues, report them here and to Banggood via opening a ticket. They are the sellers and shippers, but need to be dead in their suppliers fifth point of contact when stuff like this happens…

Anything I may have missed, lets add to this to help the less technically inclined in making sure they do not harm the light, or worse yet, themselves. Regardless of the shoulda-woulda-coulda situation, what this is, is what it is, safety should be first from here on out…

I did put 18ga silicon leads on one of mine today, barely got the centering ring back on…. I will get some amp readings tomorrow at work. It looks brighter, but that may be the V3 2B XPL HI I had left over from a purchasing frenzy at mountain electronics a while ago…

Those are great beamshots, mmander! Here's what I did to the JAX Z1 about 11 months ago. I squeezed down the solder joints so they are lower than the clearance from the LED center piece, so no chance of touching the threaded in piece, and I think these are 20 AWG wires I upgraded to. The LED is a de-domed U4 1C and looks great in this light.

question please. Shouldn’t the gasket be covering up that sort of orange colored ring at the base of the spring? No? Appreciate a reply, thanks.

Yes, we have a report of a short, not denying that at all… I hope it is a one off event and that is the only one. I do insulate my connections up there and will advocate for anyone with the skill to do so as well.

For the why not do it to the front end, I would say to see the posts about lenses being put back in and cracking the edges, stuff like that. Firstly, not everyone buying this light will ever take it apart. Most will, and can do what “should” be done on the front end. I am simply trying to provide a map for those not up to taking their lights apart unless they have to. Not denying the short the one member had, or the fact it may happen again. Once that centering ring is in place, there should be almost no movement or abrasion.

The tail cap removal stopped the process for Kawiboy1428 during his short, and he is an experienced user. The moments that it took him to realize there was a problem, and work through the cognitive dissonance that a factory light was having an issue would be circumvented by having a procedure and a plan in place when firing this light for those concerned. Realizing there is a problem and having an immediate action to correct it is a good thing. Should the anodizing fail to insulate the tail cap after the first 1/2 turn or so, the fact is you will still be ahead of where KB was during his process, which resulted in no major injuries to himself or others, and only a damaged light… Not a good thing, but in the circumstance, the best outcome. If you beat his time in unscrewing a tail cap to stop a short, your odds are better for safety. The better outcome is to take steps to minimize the risk and I think you and Hank have done that here with the fore/aft insulation on the pill. I am just throwing my $.02 in the ring…

The hoverboards are a prime example of LiIon danger… As for flashlights, it is a caution and a decent caution for what could happen if a battery were to short inside a sealed tube and then vent. Watching those videos will give you an idea of what a group of 18650’s will do, but the interesting thing is the single ones that were ejected, they burned pretty well once lit…

We wear seat belts not in anticipation of having an accident, but to be prepared should one happen. Thus my caution on the LiIon and the list above…

Agreed. I think anyone purchasing this light or possibly any GB light should take some time to read the posts of others who have received their lights. I received my two lights on 4/29 and thanks to mmander’s post with pics, I was able to inspect my light without any problem at all. I recommend post #1077 as the first thing you do when you get your light (I believe someone else posted similar info after #1077). I found that the solder joints were pretty low and there were no spots of missing anodizing on the hold-down disc, so I could conclude there should not be an issue of the solder joint shorting against the disc. I checked the springs in each battery tube and they were fairly stiff, so based on the posts here I felt safe that the cell would not short out against the pill. I checked the aspheric lens for any damage after seeing another post regarding damage.

I am still a newb. I have never built of modded a light and have no expertise regarding flashlights. Just read some valuable info passed on by fellow BLFers that could easily save your light. None of this required any soldering or even a DMM (Digital Multimeter) just some simple checks to safeguard against possible damage. The info was all right here in this thread. Both of these lights currently work great with a King Kong 26650 4000 mah cell from Mountain Electronics (a cell that doesn’t have a raised top. something else learned from this thread.)

Obviously, this does not apply to those who have received lights with much more serious issues. Simply saying that members here are extremely generous and helpful and a little precautionary reading will go a long ways.

I am interested in taking precautions to prevent future damage. How would you suggest insulating the solder joints. I would prefer a more professional method over the quick-fix method.

Kapton tape is good, as is making an insulating disk out of plastic. I have also been using THIS stuff more. The one bottle goes a long way, can be found in many types of stores, the link was just where I got mine locally….

Well dang, I had been wondering about using that type stuff up front in lights…… :question: :slight_smile:
I’m glad you mentioned that ‘ReManG’… you answered the question before I asked it. :slight_smile:
I use this all the time on marine wiring connections. I even use it over shrink wrap, because salt water is a beast.
It comes in a variety of colors too… not that it matters. :wink:
How long do you let your dry before assembly, 24 hours or so

I let it set up for at least 6 hours if I know it is not going to touch anything during reassembly. 24 is better of course…

I have even potted drivers with it, and if you go slow, or fill in the voids with duct seal, you can peel it off should you need to get another emitter wire on or something…

Seems to be good stuff… I painted the back of the Cometa pill with it and it worked fine, peeled off later when I put some sticky back foam on there….

Yeah, that sounds about what I figured.
It “skins over” in about 30 minutes so if it is not gonna touch anything 6 hrs. should be plenty.
It is totally dry in 24 hr. so even if it does slightly touch in assembly it won’t rub off.

Thanks for the tip………… :slight_smile:

So, my light is working now. A rather odd thing was wrong with it. I took mine apart entirely and the wires had been cut by the mcpcb twisting. I think it happened during the initial assembly, since the mcpcb board isn’t fastened down and in fact moves when the ring is tightened completely, just a rare accident I think. I resoldered the wire, but my solder beads were too high. My boss has better soldering skills than I and soldered the connection again, with much smaller beads than came from the factory. The light works great now!

In sum, I’m happy with it for the price.
When I took it fully apart I noticed that a bit of solder from one side of the led was touching the retaining ring, I don’t know if this was causing any problems since my light didn’t work in the first place because of the severed wires, but I scrapped it down a bit anyway.
The threads need some lube, but that’s no big deal.
My springs get slightly warm, but not hot.
I put some electrical tape around the ring on the pill spring like a poster above did, although the light worked fine without the tape and with a flat top.
The switch is way more sensitive than I am used to, but I’m starting to like and and get used to the UI.
I’d be somewhat upset if I didn’t have access to materials/people to solder things for free, but for $40 I’m happy with the Cometa.
I had forgotten the thread said 20 gauge wire, is there much to be gained by replacing the 24 gauge wire with 20 gauge?
I haven’t left my light on for an extended amount of time yet, the longest was about 10 minutes so far, but it seems to me that most of the spring failure happened pretty much right away.

See the table posted in the original post (and that I linked to in this thread again Sun, 05/01/2016 - 14:45)

24 gauge will handle about 5 amps, according to that.
I have no idea if that’s enough.

It’s possible switching to 24 from 20 was done to keep other components of the light (springs?) from overheating — or maybe they just picked up the wrong spool of wire, or couldn’t fit the 20 gauge through the holes they drilled, or couldn’t screw the black parabolic thing down over the thicker wire. Or something else.

No clue until someone knowledgeable reports.

Wait, I said I’d said enough. Well, too much.

Well you really got lucky that the wire was cut!! If it would have been still connected to the red lead, just cut, it would have been a ground short, black wire the light would not have worked. So what wire was sheared?

Both wires were sheared clean, I was rather surprised to find that that was the problem. The back of the mcpcb was reasonably sharp, like cut/stamped metal is without much sanding, and when I screw the ring on I can see the led twist some as the last few threads go thru. I assume when the ring got put on in the first place it happened, since it the ring was on pretty tight originally.

Very Lucky Indeed!