See the outer circle and the inner circle on the board, well basically the whole outer circle is the live and the inner one is the negative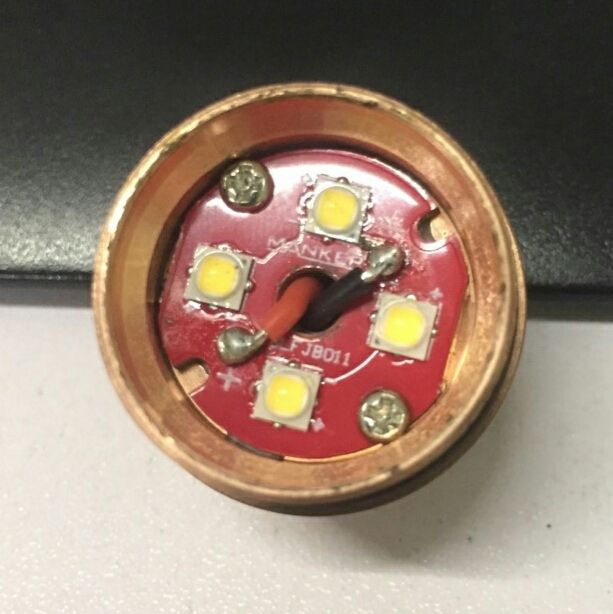
Would swapping the positive and negative on the board solve the safety issue with the screws? (reflow all LEDs and rotate them 180 degrees. Reverse the driver wires)
Yeah like Th8tredude said.
appreciate trying to educate me but I don’t see an outer and an inner circle? I don’t see this board as being any different than any other board I’ve seen. Dos most boards have na outer and inner circle? And are most boards opposite of this one? Some one has a keen eye (sharpie) to notice this. I believe I read in this thread that an ERROR was made on this in the planning stage. Lots of other boards have screws on them, I think my OLight M3XS-UT has them. Why use them if they have the possibility of scratching the board? Bizarro!
I should not worry myself, I’m just an end user ![]() but thanks for the education.
but thanks for the education.
Basically, the product has a copper board inside. The board is painted red and held down by screws. If the screws scratch the paint, it shorts the battery to itself, BAT+ to BAT-. So, next time you turn it on, it’ll either melt something or explode, depending on how lucky you are. Do you feel lucky?
If they reverse the polarity, scratched paint would have much smaller consequences. It would short BAT- to LED- and make the light always run on turbo instead of having other modes. Not great, but not fatal either.
Or if they had used wider keep-outs around the screws, scratched paint simply wouldn’t matter.
So, the short version is… scratched paint could make it self-destruct the same way as the Cometa did for some people.
With a protected battery, the worst that will happen is just that the light won’t work, right? Or can something bad still happen with a protected battery?
they can’t put a plastic washer under the screw to stop it from scratching the paint? Wider cut outs, yes!
thank you
If your protection circuit works, it should detect overload and shut itself off before much damage happens.
If your protection circuit doesn’t work or doesn’t work correctly, bad stuff can still happen.
Have you tested the cell’s protection circuit?
(BTW, I do not recommend testing that by holding a wire on both ends of the cell with your fingers. I accidentally shorted a cell once and, in the ~0.2 seconds it took to let go, I got a second-degree burn which took a couple months to heal.)

The thing with protection circuit is that all the good 18350s comes unprotected, because they’re designed for high-drain applications such as this light. However there is nothing to worry about, if you receive a working light, chances are it will keep working. Even though the design is flawed there is nothing that could move the mcpcb or screws enough that it will short itself under normal use.
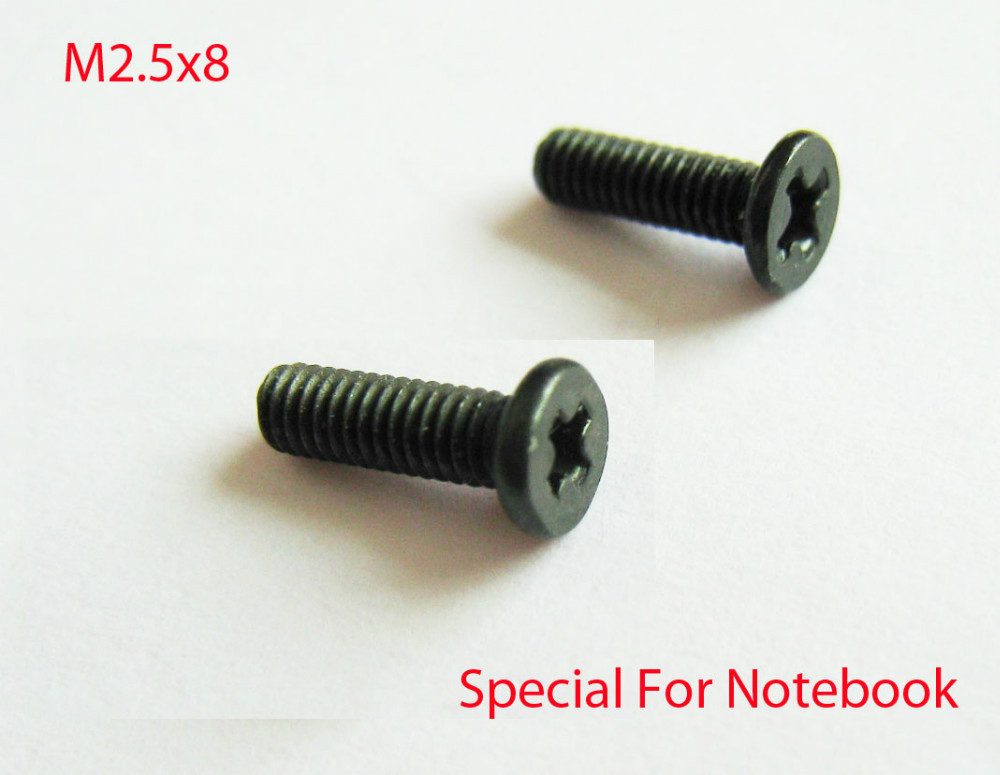
If banggood/manker wishes to fix this without changing anything in the production I suggest they use anodized black M2.5 or M3 screws… depending on the existing threading they probably don’t even need to swap the tap…
If the product is like what Kenjii’s received, I think still prone if get bumped (in case optic is not fit enough to hold the mcpcb).
Another option may be they can use plastic screw
Edit… oops Sharpie already mentioned this. :shy:
Think I might do the following on mine:
1. Reflow and rewire all LEDs backwards. That way, the light won’t blow up if there’s a short.
2. Use a dremel, drill or file… scrape the mask and conductive layer from around the screw. Moving the conductive layer back from the holes should eliminate any risk the screw threads will cause a short.
3. Put a layer of arctic alumina epoxy around the holes to cover the newly cleared area.
There are a lot of ideas here…but can you give one, most simple and pretty reliable solution for this problem that anyone could apply at home? I mean:
- Simple enough to be applied by a total noob (so no reflowing, soldering, etc).
- Not need to be “elegant” or bombproof - just safe enough.
- No special screws needed or any other equipment like dremel.
Step 1: Try the light with a protected cell.
Step 2: If step 1 worked, don’t open the light except to change the battery.
That’s all. If it’s not broken, don’t fix it.
Thank you very much for quick answers!
Manker will add insulating discs from now on
Good!
But how will they handle us who have already bought it?
I am glad I waited to buy mine.
Me too, more unsafe Manker rubbish
Exactly.
If you are not a modder and prone to fiddling around with the innards of things, and just want a flashlight for illumination, don’t do anything. You’ll be just fine.