We start off with a little this.... 
Add some of of these...

Bore it, bring it down in the rear, and end up with this...


Please note thse shots were taken fresh off the lathe, and still show many machine marks/burrs... Pure copper is still a bugger to machine.
So what's it for? How about quad xpg2's in NW 3D tint? Gotta mill the brass head first....

And a shot from the front giving my poor D25A an inferiority complex...


So, what the heck are you looking at? If all goes well, the brightest small form factor light to date (the term pocket rocket has been horribly overused). I've been asked by a member here to make for him a very small, but extremely bright flashlight that would have a little more throw than a pure flooder, along with more than one mode.
The plan thus far is the afformentioned quad xpg2's driven at 2.5a each and should yeild over 2,000L OTF. For it's size, I know of nothing brighter. This is a work in progress, hence the rough finish / lack of polish so far. Also ignore the body and tailcap in the above picture. That was just something I threw together quick to get an idea of how it's going to look. It's not worth making if it doesn't look sharp... besides, I needed the test body for the control ring mock-up. Infinately variable is the plan, and powering it will be an IMR 18650. Again, time will tell.
I usually don't post work in progress stuff because a lot of my attempts never even make it to a workable prototype, much less a true functioning torch. I'm hoping that public pressure will keep me focused on this.
The finished product may/will look a bit different, and I'm just as curious to see how it turns out as you!
Expect more updates,
-Match
Update 11-20-2012
This project now has a name. The Mechanical. Mainly based on the fact that it's infinitely variable with nary a chip, diode, or resistor to be found (and partially based on the number of hours put into this already exceeds my last engine rebuild).
This is been by far the most time consuming project I've worked in in quite awhile. When looking at the project as a whole, it doesn't seem like there's much to it...but considering all the testing and nuances that go along with setting up a "workable" qtc, I just have to say the devil is in the details...
On with the progress...

Here is the back of the pill. I realized after parting it from the barstock that I was going to have to bore the tail a bit. This was challenging in the fact that pure copper is so stinking soft. There's a fine line between too much lathe jaw pressure and a loose part ready be destroyed by the tooling.
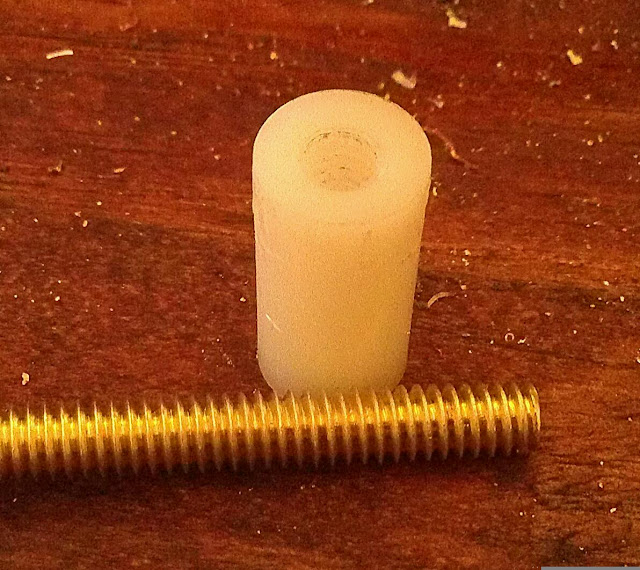
Up next we have the workings of the guts. A nylon bushing and brass allthread. The bushing was tapped to match the allthread and the two opposing parts where cut, along with the trimming of the bushing to fit the rear of the pill.

Here you can see what will be the base where the qtc will reside. There is actually a hole bored (not all the way through though - fun) where the wires are sitting. This cap was filled with solder and the wires inserted. I chose to bore the hole to add another level of integrity to the joint vs. a flat solder.

Starting to come together. There's a lot going on in this picture. First, the nylon bushing was fitted and placed. The brass part with the wires (above picture) actually resides on the bottom of the threaded nylon, with the flat part pointing up and the wires going to the emitters. Next you'll see a matching slotted version of the allthread sticking out of the nylon. This is the part that will actually be turning, with the addition of a side pin. The last part in brown is the matching exterior bushing machined out of delrin - due to needing to insulate the center post, and the stress it will be seeing. Delrin is extremely tough stuff and lasts for just short of forever.

Delrin bushing in place. The idea here is the head will be fixed, and the exterior ring will be pinned via a pass-through slot on the body to the bushing. Here's where I'm running into a pickle... The degree of travel needed from full off to full on is roughly 210 degrees, meaning the end of the body will be slotted over half it's diameter. Thankfully the aluminum will be thick, and the delrin is more than up to the challenge of being pinned in only one spot. I tried going with a steeper pitch to lessen the travel, but the force required was then a bit too high.
Not pictured here is the head, which I soldered up last night and started to test. The pcb was screwed down to the heatsink and I used IC Diamond thermal paste (great stuff, but spendy!). OH MY! I have to give a shout-out to KumaBear for having available to order the unprotected panasonic CGR18650CH hybrids for order. These are listed as being safer than li-ions and able to supply 10 amps. I can verify they'll do a bit more than that, for it maxed out my poor Fluke during testing. Also, despite the weight of the head/pill, it will get hot extremely fast due in no small part of dumping just under 40w of power into it. Did I mention bright? Yea Gods, this is rediculous... Think along the lines of the output of a SkyRayKing in a package smaller than a UF 501b.
What's left is milling the body, tailcap, fitting the ring, and tuning it so the hard stops at each end are off and full (possibly less due to full drawing >10amps).
I'm hoping to work on it more over Thanksgiving if I can fend off the inevidable triptophan induced coma. Stay tuned!
Update 12Dec2012
This past week saw this project get a little closer to completion. Please remember this is a prototype, and the reason for a prototype is for testing, which is what I've been doing (it's been my edc now). After using it more, I've noticed the rotating ring is starting to "break in", and become more usable. Not perfect, but a heck of a lot better than when it started. The light now sports a proper 18650 body along with a solid tailcap. I experimented with a McClicky switch (all I had on hand), and it did survive roughly 10 cycles. It did not burn up before I switched to the solid tailcap, but I'm not sure how long it would last at that current level.
Here's a shot of the light in it's current form:

Notice the addition of the knurled control ring in the front. There is a small SS pin that attaches it to the delrin ring inside which turns the qtc/screw setup (I'll post pictures of this during the next teardown). I still haven't done a final sanding/polishing yet, which is why it still looks a bit rough. More to come!
 )
)
