Good morning folks! Last night I was poking around my workbench trying to get a couple projects caught up on when I became distracted by the thought of converting my sweetie's minimag to a clicky switch mini. She hates twisty torches and the pink Mini I gave her last year has had a crappy Nite Ize switched tail piece on it. If you've ever owned any of the aftermarket MiniMag tail switches you know how completely cheap and crappy they all feel.
Anyway, to make a long story longer, I remembered that I had some 9.5mm tail switches that I got from Ric at FF/CNQG that should just about fit in the hollow section of a stock Minimag tail piece.
Here is a pic of what they look like. I didn't take any pics prior to the mod so this is taken from Ric's site:
They are still too wide to fit into the hollow of the tail piece but the length is perfect. The next thing I needed to do was open up the hollow but I wanted a nice square shoulder at the bottom of the hole so I grabbed my 3/8" Forstner bit that I got in a set of Forstner bits from Harbor Freight.
Drilling down 10mm gave me the perfect depth for the switch. THe body just slips in and the ground contact points hit but a firm press on the switch would just squeeze into the hole. Don't slide it in just yet though because we will need to shorten the tail cap first. The switch is the last piece you want to put it.
I used a hack saw to slice off all of the tail piece except for the area that is solid the whole way around the base of the tail cap. Leave a little of the lanyard notch on the tail so you can finish with a file to get a level surface and keep as much of the tail piece as possible. Here is a pic of the finished product that will give you an idea of what I mean.
Once you have that done you will find that the hole for the switch button is already there for you since the hollow of the tail piece goes most of the way into the tail piece. The problem is that with the switch in place the button is recesed just a hair too much to be pressed without using a pen tip or something. Pop the tail piece into a vice and use a drill bit with a round tip to open up the hole form the rear of the tail cap. This will create an indented area to expose the switch button and allow your finger to get deep enough to work the switch button properly. Not that you do NOT want to go too deep or you will remove the shoulder that keeps the switch at the proper depth. Leave yourself a small shoulder lip.
At this point you want to clean up the aluminum surfaces at the rear and take the edge off of the outer lip by sanding it to a nice satin finish. Feel free to polish if you like. Once satisfied, press in the switch and give yourself a pat on the back for a job well done. You now have a quality switched tail cap for your minimag!
This was just a quick test tail piece to make sure I could do it easily and it worked out great. Here is the finished prototype. Future ones will be done a little neater. I plan to use a round file to add some fluting around the edge to make it easier to grip when changing the batteries and to dress it up a little more. I'll update the pics once that is done (maybe tonight).
That's fantastic! It looks great too. I've always had issues with figuring out how to get minimag mods to work other than the twist methods. I have purchased tail clickies specifically for them, but was never really satisfied.
That's a good question. There are no specs listed on the site. I will have another closer look tonight when I get home to see if I can see anything stamped in them. It is absolutely no issue with a regular mag current. I will make another one for my Micro running @ 3A and let you know how it holds up. I'm pretty sure it will hold up just fine. If it should burn out in time it can easily be pressed out and replaced in under a minute.
I have used those switches before as a tail cap switch in a mini mag. From my experiments, they will take 1 amp fairly consistently. Some die slowly at 1.5 amps and all of them die quickly above 2 amps. I had ten of them and burned up every one within a day or two. Maybe I had a bad run of them, but after turning them on and letting the light run for a while (XM-L DD), they would click a few more times and then loose contact. I never really took any of them apart. I just tossed them as they died. None of them lasted past about 60 clicks. I hope you got a better run of them. From what I can find out, the mfg rates them at 1.5 amps intermittent. That was info from a vendor, so who really knows for sure.
Thanks for the update, O-L. I knew that Match had used a similar switch (10mm) and sent you at least one to use but I wasn't sure if you had used this exact switch before. That's a bummer about the 1.5A rating. I've used plenty of 1.5A switches before at 3+A and they always held up fine. These are a lot smaller though.
I will sacrifice one and pull it apart to see if it can be converted to copper internals for longer life and better service. I will also try a stock one in one of my Micro's to see how long it holds up. At least it is fine for a stock minimag and reasonable amperages.
Actually, now that I think about it (this is very hard sometimes, if I have slept), I did take the first one apart. It died because the spring relaxed and lost all "springyness". It wasn't the contacts, but the spring that got weak and wouldn't push the contacts together any more.
I had gotten a dozen of them when I did my big TaoBao buy. Same switch as Rick has (I had gotten two from him). I think I still have one or two somewhere. It would be good to see the guts of them. Memory is great, unless it goes farther south than the rest of the body and mine's somewhere in central america these days.
It is still a very nice mod. I never would have thought of cutting the tail cap down. I made mine, so the button came out the very end, which worked, but looked a little funny.
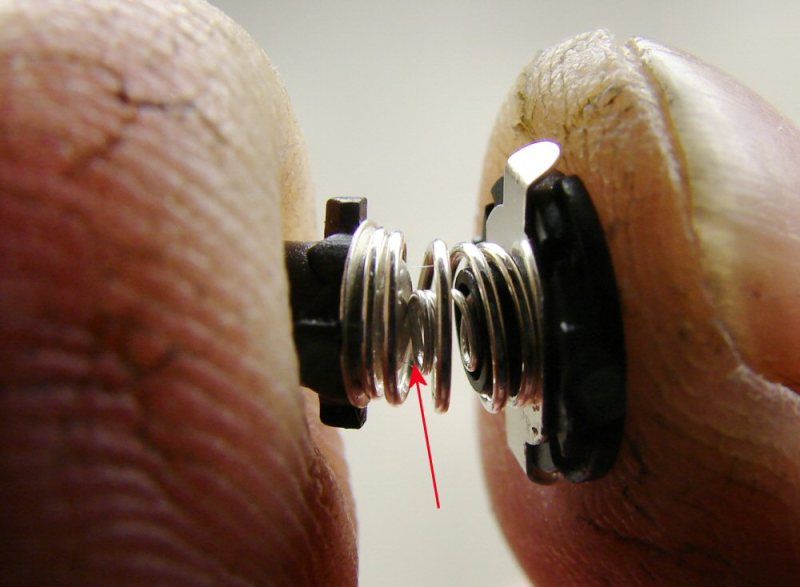
I hope I'm not mudding up the thread. If I do, I will remove the post, but here's a broken down switch and you can see the suspect spring.
There are three springs in this assembly. Starting from the button, there is a spring in between the two sections of the "clicker". Then there is a large spring in between the two contact points. That spring always makes contact between the center stud on the right and the ring on the left. It is always in contact and that is not the spring that makes contact to the battery. It is the return spring for the clicker mechanism. The tiny spring on the Left is the spring that is suspect here. It touches the center stud when the switch is activated and it touches the outer battery spring via a rivet that holds the outer spring. That small spring is the weak part. It is probably less than 30ga and it is fairly soft. The one I had taken apart was completely soft and I believe it was from the heat of 2+ amps. Put it this way, I was able to stretch and compress this new spring with my fingers and it stayed in place whichever way I formed it. In other words it is too weak and probably of the wrong steel for this purpose.
Here's the sub assembly and you can see how the small spring is not touching the center stud in the open position.
Here you can see it in the closed position (it's not supposed to be cocked, but my fingers didn't understand that). This is where complete contact happens and the switch is a completed circuit from the outside tab back to the battery spring.
I would think it might be possible to replace the spring with one from a pen, just to see if it was any better, but maybe not. I really don't have a good answer for it. If you stretch that spring, then the switch is made all the time.
Anyhow, that is how the switch works. Hope the photos help.
For a stock mini it is still a great switch. Even with an XP-G Match Mod driven at 1.5A it should hold up fine. If I can beef it up for 2-3A duty it will just be icing on the cake. ;)
Very nice and clean mod, Johnny! I really like how that turned out.
As for the switches... if they're anything like the ones I've messed with, here's the deal:
- The higher amps kill the spring because the spring is actually carrying all the current. It's part of the circuit and not just there to push the button back up. Bad design is bad. Works well enough for low draw, but like O-L said...start pushing the amps and it'll temper all the springiness out of that little bugger in a hurry.
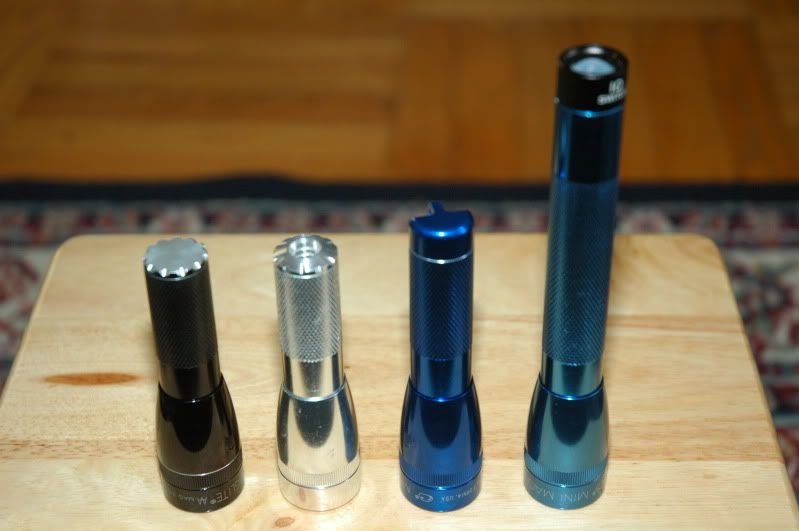
With regards to fluting, check out the tail cap on the left:
It was done on the mill with a rotary table to allow me to index it evenly and I set the angle at 30 and 60 degrees every other notch. Works great for grip. It started off as a Mini-MagLED tail cap so there’s no hole for the spare lamp.
Maybe it would be possible to find a Sub-mini pushbutton switch at 3 amps, like this, or this, or one in this list., that could be used or adapted. I haven't checked them out, but it did look like one in the last link might be a possibility. All are 3 amp.
what if a piece of wire were soldered from end to end inside that spring to be the load bearer of the current? Would enough current still run through the spring to soften it? Just a thought. Day late and a dollar short, as usual.
Hey OL, if your memory sees mine down there in CA could you have it ask mine to check in with me?
From playing with a few of these, I think a very thin wire "might" work, but I also think when you get to 3 amps, the spring will still give too much and weaken. I haven't done anything else with these. I tried ordering some different small switches and after coming from China, I find they are all Momentary, where the website stated they were on/off. Guess they don't know what latching means.