Mod: Fandyfire/Solarstorm Warrior (+ My impressions)

I did not see a mod thread. So...

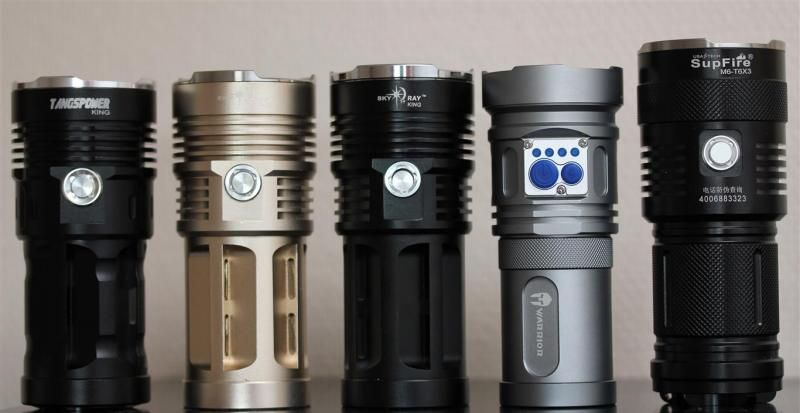
Compared to some siblings. (Warrior is second from the right)

My light came from recent WB sale. Its a Fandyfire Warrior. Mine had a issue with the left switch. (not always working properly) So I replaced it. Problem solved.

Pushed out the driver through the switch hole. Its not as wide as a SRK driver.

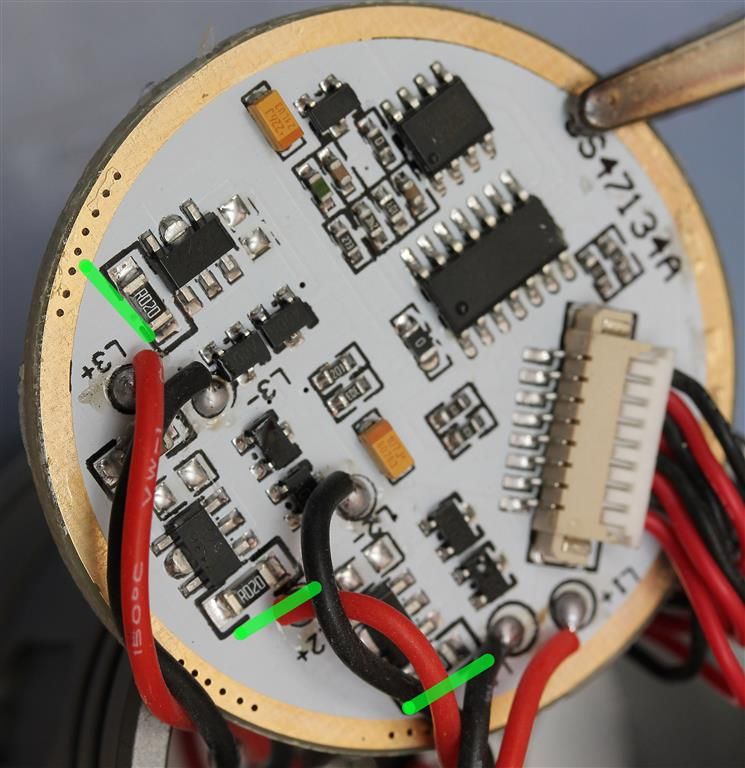
Took off the three R020 resistors. (Pictured above the green lines) They can come in handy for other mods. Replaced with solder bridge (you can use wire).

Amps went up to to 9,5+. So more than double. Cant remember the batteries used. Its probably higher with the good high current cells. I was just holding a wire inside the driver when doing the measurement.

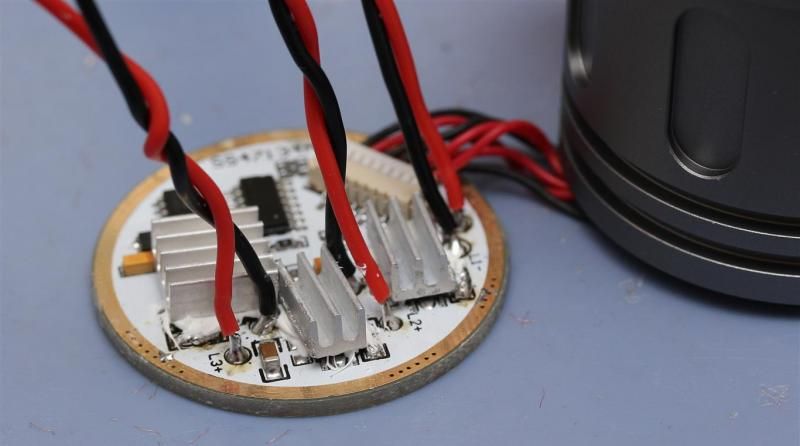
Did a runtime test with NCR18650B. One emitter failed. hmmh... Glad it was the emitter and not the driver. Decided to replace the emitters. When taking out the XM-Ls and replacing with XM-L2s (2x T6 3B and 1x T6 4D) on Noctigons. Two of the emitter wires came loose from the driver circuit. These were fragile. So I replaced the wires. And added some heatsinking just to be safe. Not sure if that was needed..

I copper braided the tailcap springs too.

With 3x20R @ 4,1v output was about 3700 lumen at start and 3500 after 30 sec. That is with NW tint mixed goodness! I consider these numbers to be fairly accurate or a bit conservative to some others. I can mention that the emitter shelf (I assume press fit) was only about 2mm thick.

Head heated up very quickly. After around 5-6 minutes (?) the light turned down to low when I measured 58-59,5 degree Celsius on the hottest part of the head. Not sure if that is inbuilt overheating protection, or just something not working properly. But I made it happen several times around that temperature. Seemed like some overheat protection to me. Once it lowers output it gets locked in "low". Let it cool a little, turn it off and on, then you can go back to high or do whatever you want.

I tried some torturing, but I was not able to break it in the tests I did.

Seems reliable after the mod and output is great! :)

If you want to do this driver mod, do it at your own risk.

Other impressions (not mod related)

Most things about this light have probably been said before, but Ill mention some stuff and my impression anyway based on the short time I have owned this light.

I really like the light. Not sure why I have not bought it before. Ok, main reasons were the cheap blue looking buttons sticking out and no special sales price. If the UI was not moddable, the host would require some work to be rebuilt with a nice single switch. (I don't like having buttons and such not working) There was no need to worry about these things.

The light is nicely built with nice anodizing and nice threads. Its got lockout. Nice mod host as seen above.

Stable tailstand, and lanyard hole in the side of the body. Thinner and more comfortable body than a SRK (at the expensive of less runtime due to "only" having 3 batteries.

Ive heard others have said its got a nice UI. Im usually very picky, and assumed it was quite rubbish. :p But no...

What I like about the UI

- Its a basic 2 mode UI (low and high), with extra features and hidden blinky modes.

- From off you have instant accesses to the following modes. Low (left button). Momentary high (right button), and strobe (double click right button).

- You can avoid blinky modes. You always start in low, if you go to high, and want to get back to low again, you can just double click. You will not see SOS.

- Low mode can be adjusted with a ramping feature (holding down right button)

- 4 lights for indicating battery voltage.

- You can turn the light off from any mode

- Overheating protection. Not sure if that is an official feature, but seems like it on my modded light.

Not that great about the UI

- Takes about a second (or 1,5s?) to turn it on or off. (Momentary high or strobe are instant)

- Low is not low enough (If you need moonlight or quite low low mode, this light is not for you.)

- Ramping just goes up and down without stopping. That makes it a bit hard to set low to the absolute lowest. Which is where I want it.

- Momentary is not suitable for quick signaling (morse code). Its got a slight delay when letting go of the button (making it feel a bit unresponsive) and if you do two fast clicks you get to strobe. You can do slow signalling.


Overall its a nice and quite simple two button UI with a nice battery indicator. The UI is not perfect. But due to having more than just one switch, I would say that in several ways it exceeds several of the typical custom UIs using one switch. IMO, its the best stock UI I have seen in any of these soupcan lights. I assume I have found all features, if not let me know.

Stock its a pretty decent light, and a very nice mod host that can be made into a really bright light. Not sure why its not recommended more. These days I usually hear, "avoid SRK clones and buy M6". I wonder which I will like best out of this and the Solarstorm T3 and T4. With a two switch layout and 4 led battery indicator the Warrior surely adds desirable features that the other lights with this form factor does not have. I would certainly put this light high on the list of lights to consider if you are looking for a SRK type light.

Very nice. I like the shape of the light, and I like your mod, thanks for sharing, it feels like I can easily do it. I am still in the hesitating phase of buying my first soupcan light, but...

My problem with this light (and I admit it is silly) is that I totally dislike grey coloured lights.

I’m silly too.
I can’t get over the blue buttons…

Also, but off topic, i wonder how that Tangspower is.
It’s very cheap at T-mart, so…

What’s the absolute lowest like? Also is there any visible PWM on the assignable or default low?

Thanks Djozz. Mod is quite simple and straight forward. Pretty much basic stuff. Stock emitters had thermal paste under them, so easy to remove. Tailcap was easy to unscrew too (I might have read that was not the case for someone else or everyone).

As for you guys not liking the colors. You all have bad taste! :P I like grey. I also like variety when I have lights that are somewhat similar (all with different UI or emitter setups though). I was skeptical about the blue buttons. But they are ok. I approve of the looks after looking at it in real life :p (You may not)

Ive owned one more SRK (sold). So Ive bought 6 of these soupcans + a fair amount of lights with handle. The T-Mart SRK clone was the worst of them all.

The lowest mode is now probably around 225 lumen, roughly. PWM, not audible, im usually sensitive to that. Im not much sensitive to visible PWM, so nothing annoying for me. I did not measure it like I would in a review. This was just supposed to be a basic mod thread, not a review or anything. Then I got a bit carried away writing about the light.. 0:)

Here is a little report on PWM in the "Warrior thread" saying its "fairly good".. Another saying its not good, unless on high. One saying its horrid. There are also others who do not notice it. I have not read much in that thread, just searched for it...

Ok thanks!

Thanks for answering my question anyway.
I’ll leave it at T-mart then. :slight_smile:

And i do like the grey!
I like the light as a whole!
…only the blue of the buttons is just… unjust? :stuck_out_tongue:
Personal opinion of course…

Thanks for the mod and pictorial R86. I’ve yet to look inside my warrior, so you’ve done all the work for me.
Do you have any idea why the one LED died? At first I thought all three LEDs might be mounted on a single board, but reading on I find they are three seperate MCPCBs. Whenever I mod a light with a single aluminum board, one of the traces always burns up, even without high current levels.

….if you’re using a flashlight, it must be dark, so who cares what colour it is.

May you be blinded by multiple high CRI-beams! For me, and certainly for RaceR, that is a provocation of the worst possible kind !!!!

I don't really understand why one of the stock emitters died after the mod considering the batteries. Maybe the thermal paste or whatever was under the emitters was bad? I don't know. Dont care for it. Ive got enough of those emitters If wanted to replace one. Noctigon + good thermal paste and pressure towards the "pill" takes care of most things. But, as mentioned and somewhat seen by the 30sec drop, this light have a "fair amount" of output sag (like most SRK lights with a not so great pill/shelf). A TK75 (I know, different animal) barely have any sag in comparison. Ill keep the heatsinking stock. Will mostly be using NCR18650B based cells. I just wanted to test it with some more "hardcore cells". It handled that, so.. Im good.

Im fairly sure Ouchyfoot was talking about the grey color and the blue bottons. Not the beam..

LOL, I even did not consider that

So how did you remove the tailcap? wanted to braidmod the spings in mine, but tailcap looks like guled.

Nice mod/review. Thank you.

That middle sized resistor that is towards the center of the driver, next the biggest component (the MCU?) looks like it could be a jumper for optional modes or something.

Exactly. :wink:

What are these empty pads? Are these connected to the R020 resistors? Could the R020 resistors be bypassed by bridging these pads?

Don`t know. They are covered in fujick and heatsinks on my driver now. As long as Im happy with mine, I don't plan to open up mine for any more modding or experimenting with it.

On my light the tailcap was easy to unscrew.

thanks for the mod idea. I also received a fandyfire warrior from wallbuys. I wired over 3 resistors, moved emitters onto 16mm sinkpads, and for heatsinking put in about 6mm copper plate under the aluminium shelf. This gets held in place by the screw for the reflector (copper reduced to 1mm at screw, so I could use the original screw that is not very long). It worked as expected afterwards - and it is certainly a fair bit brighter, and heats up more and faster. i’m pleased with the outcome.

No glue present on any threads in my light.

tacky smelly clear paste used to hold down driver.

very liquid white paste used to hold down emitters - once the reflector is removed they come off with a slight touch. the clean up just needed a wipe with a tissue.

I can’t notice any PWM - but never noticed it on other lights either.

The noted empty pads on the driver (above) are not directly connected to the resistor. I couldn’t visually follow the board, so used a multimeter.

:beer:

Welcome to the forum! :)

I did the resistor mod on my original release FF Warrior with XM-L but everything else is bone stock. Running Sony VTC5 cells I read 2600-2700 lumens in the IS. I'm sure it would increase more with tail spring mods as well as upgraded wiring and XM-L2 on Noctigons.

Nice JM!

Yupp, on top of the resistor mod I roughly say the mods I did might give around:

15-20% increase for XM-L2s

Maybe another 5-10% for the resistance mods.

About 10% for copper mcpcbs at that current.

Should make your number come really close to mine. Only marginally higher or lower depending on the values you would assume for each mod. Seems like we are quite close.

I still don't have a 100% exact method for doing lumen measurements. Still tweaking. My setup is not suitable for the low lumen numbers, and I don't have an integrating sphere. So it is what it is.

For me the important thing is the tint and CRI improvement along with the increased output.