Introduction:
Thanks for everyone who voted for me when I did my (cat) campaign. I wont let you down, so I invited Grumpy Cat for the review as well.
For some reason, my driver arrived late, a week ago. Most of the others seemed to have done most of their reviews or finished them. I was not too happy since I had good time to test it earlier but not when it arrived. As seen in the picture below, grumpy cat was very happy about the late arrival. Less stuff to cover about the driver since more was done by others. More time to be grumpy.

Useful links:
Led4power`s own thread about the driver (all basic info is covered here)
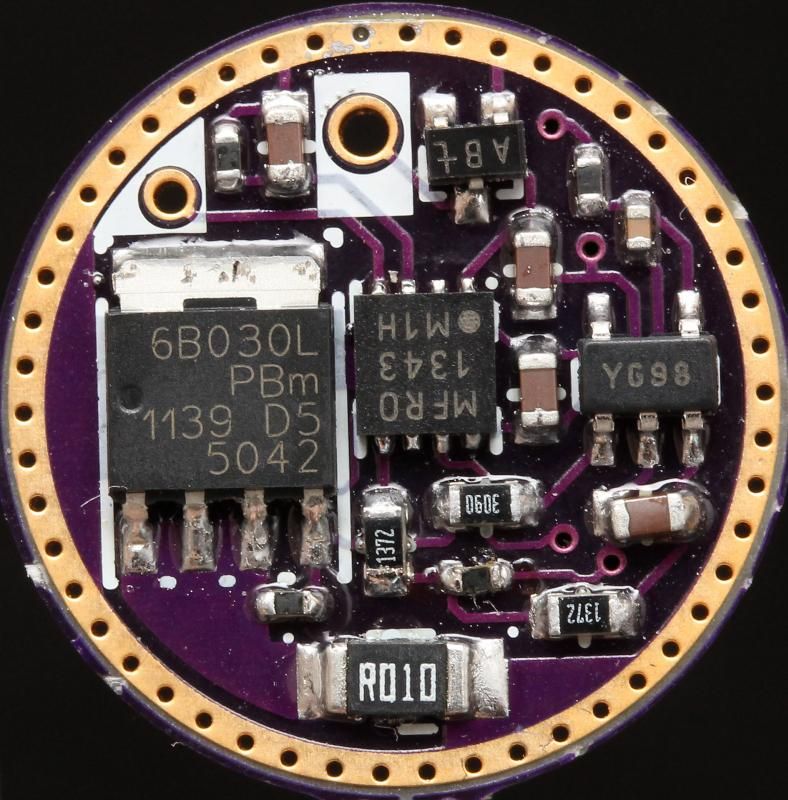
The pictures:
Click here if you need larger resolution picture
Connect the two half moons on "1" in order to disable moon. Connect half moons on "2" in order to activate turbo. These are very close. Easy to connect. Maybe not so easy to undo?
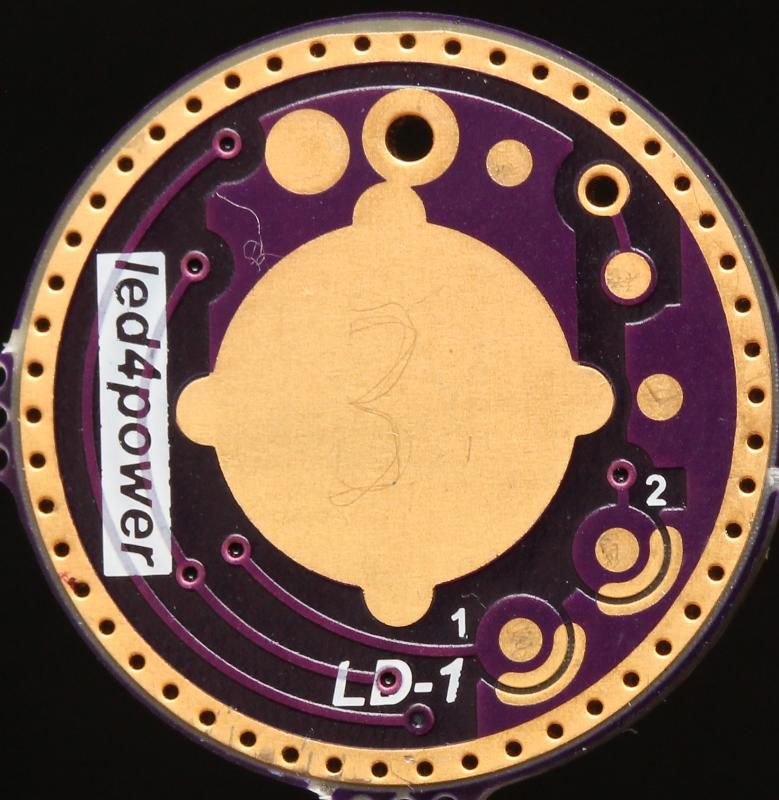
Mouseover with mirrored backside
E-switch UI1, UI2 and UI3 walkthrough.
One take video. Sorry about the bad language skills (rusty English, I barely speak it.), errors, strange hand gestures, some bad explanations, some issue that I did not understand, etc, etc, etc...
Hope the video is useful and understandable and that I did not do anything wrong. Oh and don't run the driver in open air like me.. 0:)

This is what Grumpy Cat thinks of this video:

RaceR86`s thoughts on the various user interfaces
UI - Mechanical switch only
Mode spacing is pretty much like a Qlite. I like Qlite and I naturally like this. Not sure if the moonlight lovers will like it. Not a massive difference between low and moonlight. I disabled moon. Seemed fairly similar to low for me, but I have not tried in it any real life use.
I measured:
5,02 (100%)
1,09 (21,8%)
0,07 (1,4%)
0,02 (0,004%)
That is pretty much the same as HKJ measured.
E-switch UI_1 - E-switch + mechanical switch
I like it. You can get it to start up in the mode you like with a switch on the tail, and you can easily change modes. Its quite similar to Star firmware for momentary switch. But with the added goodness this drivers hardware bring.
E-switch UI_1 - E-switch only
I prefer to use lockout in lights with E-switch only. With this UI the light will always light up when the driver gets power. I would prefer that it did not do that, but its not a big deal as long as I make it start in low. I approve.
E-switch UI_2
I really like good ramping UI`s. I don't like the ramping UI in this driver..
-Needs to be turned off and on again every time you want to change brightness. I prefer to be able to change brightness without having to turn if off.
-I often use lights on highest setting. This means I have to always ramp all the way from lowest to highest if the light have been off without power (no short cut to high)
-If the driver is in sleep and I have stored the highest setting. It will always do the bright blinks (telling its on highest setting) every time I start up. (Same if its started up at about 2,5A, but only one blink, which is less annoying). I do understand that some might like getting an idea of how much power the light consumes, and I agree that having some blinks to say when its at 2,5A and 5A can be useful. But I would prefer to not see those blinks every time I start up. I would prefer that the blinks were more subtle too. I would also prefer that the 2,5A blink were at lower amps (say 1A). Although, I personally don't need that extra blink.
-Linear ramping is not good. Going from 2,5A to 5A takes the same amount of time as going from 0,02A to 2,5A. Lots of visible difference the first halfway, not much difference the second half. Visually, the ramping should have a nice even increase in brightness all the way from lowest to highest. It can be improved
-Its jinxed. Several times when I go to this UI_2 I mess up the temperature sensor setting. Maybe its not the driver and just me, but its only happened when I switch to UI_2. As seen in the video, some strange behavior I did not understand happened too.
E-switch UI_3
Its simple like description says. Its nice to have optional UI`s, but Im not sure when I would use this over UI_1. I would prefer to see something more different compared to UI_1. Maybe a tactical UI or something just to make the driver more versatile. Its nice having a third UI option though.
LD-1 vs 5A Qlite out of regulation test
Made a 5A Qlite. Made sure it was out of regulation on highest setting due to "low" input voltage. It gave about 3,75A to the emitter. Changed driver to LD-1 with same setup. 3,73A to the emitter. Id say performance is similar in that test (0,02A difference could be power supply, soldering, crocodile clips) Just wanted to check out of regulation performance/resistance compared to something we all know. And its just as good.
Turbo + multiple emitters
3 XM-Ls in parallel. X voltage, no driver
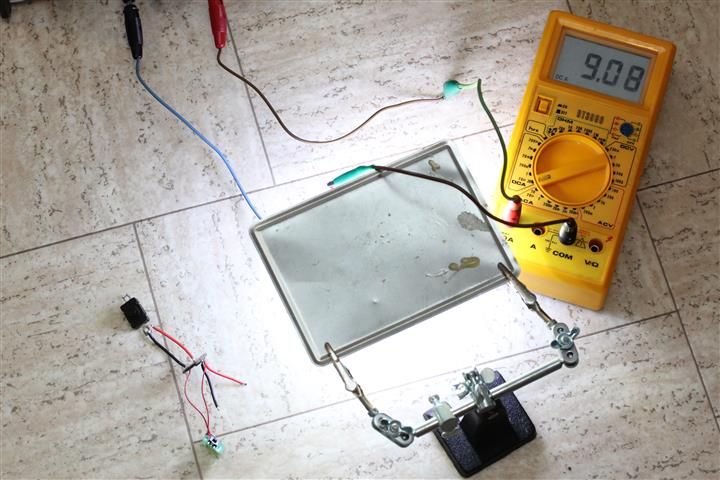
3 XM-Ls in parallel. X voltage. LD-1 with turbo.
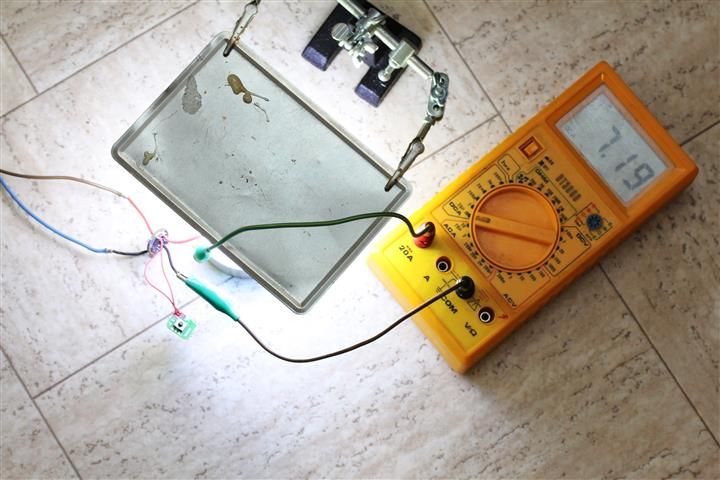
Almost 2A lower. The only thing added was the driver and a few centimeters of wiring. With a FET driver I would expect closer to 9A. Lower modes are naturally regulated at the usual amps. Temperature monitoring seems to work, although I would need to test it in a flashlight in order to better see how it works.
Mode spacing could be a bit strange with normal 1,1A medium and quite high turbo. (unless you use ramping mode, which I dont like on the prototype driver)
Testing overheat protection
I put the driver in a Convoy S-series light. Soldered to the pill in normal way. Ill go a bit by memory now, since its a long time since I did this testing.
If I used it with temperature monitoring disabled, it will still kick in when the drivers becomes too hot (85C?). That is good, grumpy cat disagree. With a freshly charged high discharge battery the driver will cut down on power and keep the light within reasonable (very high) temperature once its becomes too hot. But with a low voltage cell, the light will become too hot (beyond 60C). This means if the light is turned on accidentally in a bag or something, the light will become stupid hot at one point.
I tried a lot to set the tempereture threshold based on external tempereture, but it just doesn't work that way since the heat generated in the driver varies a lot depending on output and battery voltage. Basically, if I want the light to avoid overheating with a low voltage cell, overheat protection will kick in way too early when using fully charged cell.
Temperature monitoring works to some extend. It works to protect the driver, and not from an exterior heat point of view. In my light the overheating protection gave little extra safety.
LD-1 vs some other drivers
The "Bocian" driver, have a more sophisticated firmware for a mechanical switch only. Its also got tempereture monitoring in the version that uses Attiny25V. But based on my very limited testing, that did not work ideally either. Still, its IMO one of the better UI`s for a mechanical switch only. It can not go much past 4A for some reason.
DrJones have a lot of different drivers. In terms of UI his drivers are way more sophisticated. Especially when it comes to electronic switches.
Various other custom programmed 7135 based drivers. There are many options based on 7135/attiny13a. As an example, RMM sells some variations (if you don't program yourself) These are normally cheaper compared to the above. These have a decent UI`s which can also me customized to the user. Price is much lower.
FET based drivers, im talking about the ones that does pretty much 100% direct drive on highest setting. If you want max output, these are the way to go.
Qlite, if you are on a budget and just need the driver in a light that have a normal switch. A Qlite driver does pretty much the same (with extra 7135), just with lower efficiency.
Conclusion
Overheating protection does not really work from an external point of view. Its not really a driver fault, I just had some unrealistic expectations of what it could do.
Id like to see some improvement to the ramping UI.
"Moonlight" is not very low moonlight IMO.
Driver is best suited for single emitter/single cell lights.
I would like to see that it came with a lower output option directly from the seller (3A, 4A, 5A). For some lights/batteries 5A can be too much.
Efficiency, size, UI flexibility, off time memory, no pwm are some areas where this driver excels compared to many of its more common rivals.
Overall I think the LD-1 is a very good driver! Ive got several Convoy S-series lights. And the one with this driver is currently my favorite. Which have much to do with the driver. I also think this is a great driver for lights with both E-switch (momentary) and a mechanical switch due to the way the memory works.
Id recommend it!
 .
.

 driver reached 85C when you were at ~2.2Amps.One short blink was sign(I know I'll change this to something more annoying).That's why you weren't able to increase current.When you turned driver off,and on again,driver was still hot,and protection was active immediately. Driver burns most heat in 2-3Amps range(with typical set:xm-l2 and fresh battery).That's why you saw this only in ramping UI.

 Always easy to change brightness (start ramping) even when it has been on for some time. Can always startup in lowest, highest and last used ramping setting. Easy to quickly go to highest or lowest output.