Hi fellas, here is a review for UY-Q8 Portable LED Lamp Torch Light Stick 5500K 2600mAh 5 Modes with Magnet (o yeah, try to say that 3 times fast at loud :D ) that Agui from Pandawill sent me about a month ago. Here is a link to this product... I've been using this lantern almost every day and here are my impressions.
First spacs from manufacturer presumably:
(click to zoom)

Product arrived pretty well packed, lots of bubble wrap, padded envelope, sturdy tube-like "box", very good job on packing
(maybe they made an effort just for me):


Content of the package: lantern itself (not shown because I already disassembled it, ups), two lanyards so you could hang it in horizontal position, USB cable with micro USB connector for charging the lantern and some instructions flyer. Also sticker where you can find manufacturers url, they do have interesting product over there.


Basic specs on the product itself:

And here are the all components disassembled. I can tell you that this product is not meant for easy disassembling, I was sweating bullets for full hour trying to open this thing without causing to much of damage, those plastic end caps have "teeths" molded in them on all 4 sides, when they snap together it's absolute pain to separate them again. Black longer and shorter things near the battery are just foam inserts to stop battery from sliding too much. + lead between the LED and PCB is disconnected so I could measure current draw.


Let's take a look at individual parts, funky looking battery is first on the list, looks to be quite fresh (July 2015):


When I saw pink wrapper I kinda thought it's Samsung ICR18650-26f cell, obviously it was not but tests proved that claims about capacity were true, actually I measured slightly higher number: 2790mAh (first I charged the cell in my Opus BT-C3100 charger and then discharged it at 700mA rate):
Several images of the driver & charging circuit if you like to see components used:


Driver and charging circuit are on the same pcb, it looks kinda complicated. Driver offers 4 models + slow blinking (it's not strobe or SOS, just slow blinking in equal intervals). There is no mode memory, when you click the power button it will start from lowest mode, each click will progres it to higher output mode, then blinking and power off or you can hold power button pressed for several seconds and it will power off from any mode, you don't have to circle through all of them to turn it off.
There is a red indicating LED used to signal that battery is low and charging is needed, it also doubles as charging indicator, it blinks while battery is charging and shines constantly when charging is done.
Couple images of housing profile, as you can see there is no much of a meat under the led strip but that is not a problem since this lantern hardly gets even mildly warm after prolonged time in highest mode. I should also mention that milky diffuser plastic on top of the led compartment does a good job in scattering the light in 180+ degrees.


Here are some close up images of the leds, meticulously numerated, this will make OCD guys happy :D


Obviously it is very hard to make some lumens estimation with this type of lights, unfamiliar led-s (unknown manufacturer / specification) do not help. I did current draw measurements, will post preliminary numbers but numbers that I got and light output that this lantern gives, don't look to be in correlation and I am having hard time believing in readings that I got, maybe my multimeter is broken or something...
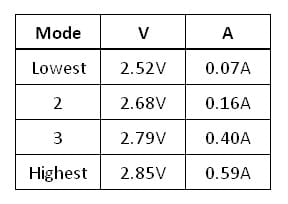
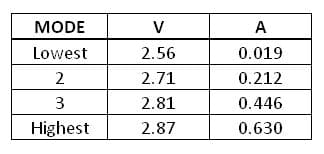
Ok, so after fully charging the battery in external charger I measured curent draw again and got slightly higher numbers but it's still consistent with my first measurements, considering so low current consumption no wonders this lantern has excellent runtime, those leds must be highly efficient,
Here is my subjective opinion on this product:
Good things
I dragged this thing with me almost every evening, whenever I could I used it instead general home lighting, runtime is excellent, kept expecting it will dye on me but it just continued working. And when you look at the current draw table this runtime results do make a sense but what doesn't make sense is light output.
Maybe I just had low expectations but this thing puts out some serious light, they say ~200 lumens on max but I would say its more than that, I don't really have a way of measuring how much more but I wasn't expecting it will light up open tearin up to 20-25 meters of distance (in max mode). Modes are very nicely spaced out, there is significant gain of light in each progressing mode, lowest mode is claimed to be 4 lumens but I think its more than that, something like 10 or 15 lumens, it's perfect when you want to see where are you going or what you are doing without disturbing other (for example in the tent), it can easily be used for reading (I should mention here that I am not a fan of 1 lumen or sub-lumen modes). Magnets are OK strong, if you stick the lantern to larger iron surface they will hold without any problems, you can even hang something smaller like pocket knife and magnets will still hold but if you have a nail and you try to stick the lantern with just one magnet, it will not hold but two nails, one for each magnet, that might just work.
Other things
Well, this are not exactly negative things but they are points that could be improved.
Battery indicator led is hard to see, its located under the e-switch and you can only see it between the switch stem and opening in the housing for the switch, not that obvious and easy to notice. I think that battery monitoring circuit is not that precise, it will start blinking red just several minutes before you end up in darkness, it will caught you unprepared. Switch button is recessed and not that easy to press. I know that this is done intentionally (because most lanterns of this type/shape also have recessed button) to prevent accidental activation but still, do not like to particularly, it's just a personal preference and nothing that couldn't be fixed with 2 minutes DIY super glue project :)
But the biggest objection from my side is that manufacturer did not pay attention to overall design because if they extended the aluminium profile for only about 5mm they could fit two 18650 cells inside and increase runtime significantly. Even redesigning the circuit board, making it wider but shorter or using 2 board design would free up just enough space to cram in the second cell. I was thinking to just cut the PCB in 2 pieces, connect them with wires and make some more room but that PCB is complicated, to many traces and would not be easy to reconnect them. Manufacturer does have some waterproof models but this is not one of them, there are places where moisture/water would enter easily and that would not do good, also this is not super rugged model, it can brake.
Overall I think this product deserves fair chance, I think it can deliver performances and with small improvements it would really be great product. One thing I can not comment is the price, currently it is $25.99 which doesn't sound cheap enough to me. Without knowing about performances that this thing have I probably wouldn't buy it,
so it's up to you to decide, is it worth or not.
Hope you like the review and that images are displayed correctly (I am using new image host).
Thanks for reading.