
I had a Sunwayman C10R laying around that I'd purchased a few weeks ago from Illumn on clearance. Sunwayman used a single head for many different lights including the 1x18650 C20C, a couple of which I had modded a few years ago. The C10R is the 1xCR123 version. Nice shape, but crappy output due to its low power driver and old cool white XML1 LED.
I wanted to turn this light into a small triple-XPL HI light. However .... 1x16340 just isn't enough power for me. I wanted more! I removed the guts of the light and examined the available internal space. I ended up performing the following mods:
- Mounted a new internal momentary switch in the button well. One side of the switch is connected to the head with conductive epoxy. The other side is soldered to a small brass strip that passes through the LED platform to a small wire and then to the driver.
- Added a 17mm BLF17DD FET driver with moppydrv momentary firmware from MtnElectronics.
- Mounted the driver on top of the LED platform where the LED star used to sit. The driver is not glued in place, but is instead held down via tension fit with a surrounding spring-loaded copper strip. A piece of a spring is soldered to the outside of this strip and presses into a small spot in the head where I ground off the anodizing. The strip then presses the side of the driver for negative connection.
- Added a 20mm triple Noctigon with 3xtriple XPL HI (2x5000K and 1x4000K). The star sits on top of the spring loaded copper strip.
- Added a Carclo 10507 optic.
- I soldered a small copper disk to a short piece of wire passed through a small hole in the center of the emitter platform. This wire is then soldered to the positive battery terminal on the driver. When the light is assembled this wire is folded up under the driver.
- I used arctic alumina to pot the LED positive and negative connections on the driver.
Essentially the driver, emitters and optic all sit where the original star and reflector used to sit. The space where the original driver sat is completely empty. The new switch is very flat so a longer battery slides below it. The light now fits an Efest IMR 18500 cell.
Powered it up and it works! Took a couple tries to figure out the best way to get positive and negative connections. Output is VERY high. At a guess maybe 2500 lumens with a beautiful neutral tint. Not bad for a light that in its stock configuration was rated by the manufacturer at 190 lumens.
However, this light has pretty limited heatsinking. The LED star is not mounted on a shelf or solid heatsink and I didn't use thermal grease where the sides of the star meet the head. I figure if it becomes a problem I'll notice when the star desolders itself. If that happens I'll add the thermal grease and learn to live with the hotter head. As-is the head does become hot relatively quickly, so hopefully that means there is sufficient heat conduction.
Here are some more pictures:
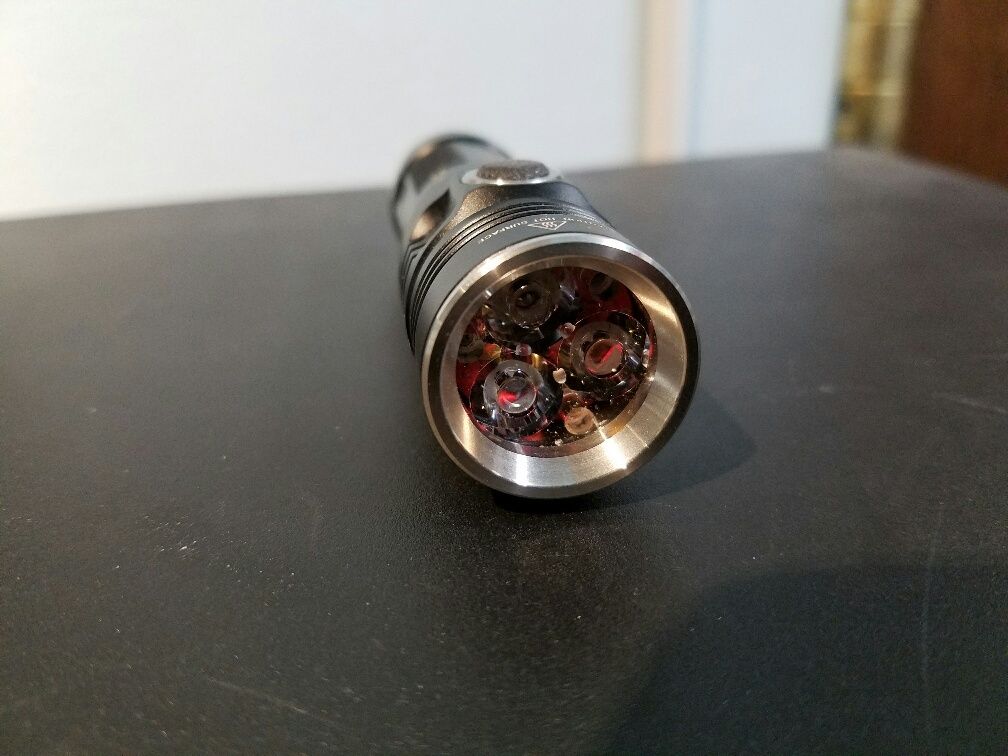
Business end of the light.

On "moonlight" mode (it's not really dim enough to be moonlight)

Battery in the tube. The battery sticks out of the tube when the light is assembled. However, I used the stock tailcap spring so it will compress down more than this.

A look at the inside of the head from the battery compartment side. The copper disk in the center is the positive terminal from the driver to the battery. A wire is soldered to the other side of the disk. This wire passes through a small hole in the aluminum LED platform and where it is soldered to the positive terminal on the driver. I tilted the driver on its side to solder the wire, then folded the wire and tilted the driver flat afterwards. The area around the hole is insulated with arctic alumina to prevent a short. The positive terminal is pressed flat in the fully assembled light and no longer sticks up at an angle. The messy area in the upper left is arctic alumina covering the switch mechanism and its electrical connection.

View of the driver taken from the front of the light before the triple star was installed. The little red wire at the 12:00 o-clock position is the switch wire. The switch only needs one wire as the other switch contact connects to ground.
- Note the strip of copper around the driver with the small spring attached. The spring (part of a Nanjg 105c spring) presses into a divot in the inside of the head where I removed the anodizing with a drill. I soldered a couple pieces of solder braid onto the side of the driver right next to the spring. The spring presses into the divot while simultaneously pressing the strip into this solder braid giving a solid ground connection.
- The copper strip also serves as the stand for the triple Noctigon, keeping it at the right height for the optic and lens retaining ring.
- The fully assembled light with battery installed is 78mm long. The battery compartment doesn't quite close enough to hide all of the tube o-ring, but it's close enough for me.
This was an intermediate difficulty mod given my equipment:
- Hardest part was trying to bore out a battery tube using nothing except a power hand-drill and a rotary file drill bit. The tube works, but the inside isn't pretty.
- Getting a good ground connection to the driver took some creativity. My first thought was to have small pieces of solder braid extending below the driver into holes in the LED platform. With the anodizing removed a tension fit should provide a ground connection. This did not work as I was unable to get a sufficiently tight tension fit.