Has anyone else encountered a problem with the “springs” they use for the negative battery contacts? I noticed with mine that a couple of the cells were sitting slightly lower in the carrier and there was basically no spring action behind those cells.
After doing a few tests I found that one battery was not being discharged at all so must not have been making proper contact. It was not very easy, but I was able to bend the negative contacts a bit to get them to actually act like springs and was able to get all 4 batteries discharging evenly.
The springs in general seem pretty weak in this light considering the high currents involved, so I don’t have much hope that my rehabilitation will last long. Unfortunately the negative battery plate looks to be glued in so fixing this properly with better quality springs would be very difficult I think.
Because the negative contacts are on a plate that appears to have been installed from the top and glued in place its extremely hard to get in there with tools to affect a solution. If they had used a screw on back cover like the Meteor then this would be trivial to fix.
I registered with this forum so I could share my experience with the DT70 and possible battery contact problems. My DT70 arrived and appeared to be DOA. I tried 2 different USB wallwarts, and no luck. I read up on what others are saying about the negative contacts on the bottom of hte battery holder. So I thought that maybe my batteries were not high enough to make all the needed contacts. I dropped pennies down the battery holders, and they are just the right size to sit on top of the negative contacts.
BUT, this morning I took the pennies back out and I tried one more wallwart … a Samsung. And it worked. Finally I was getting the proper charging indication on the OLED.
So, for me, the moral of the story is, try all kinds of different chargers if your DT70 does not seem to charge. All I was getting was a flashing “IMALENT” on the OLED, meaning it was not charging. But with the charger for a Samsung S5, all was well and I was getting the proper charging progress indication on the OLED.
And, if you really really think that your negative contacts have flattened out too much, drop pennies in there, they are just hte right size.
I am thinking that there is bound to be problems with the springs in this light.
2 reasons, massive current draws from each cell and the fact that each cell is in parallel. If any one spring has a contact issue, the other 3 will have to take up the slack leading to a domino effect, until all 4 over heat etc.
Yes, totally agree with your assessment. This is why I think it is really important to occasionally check the voltage of each cell after some use to make sure the load is being carried evenly by all 4 cells.
The DT70 and DT35 don’t use tall coil springs that can compress 8mm or so like other lights use. In order to get more current (and maybe force users to use only their batteries) Imalent used flat disc springs. I think they only compress 1mm or 2mm. This means any non stock batteries have to be just the right length in order to make sure all 4 make good contact.
If shorter than stock batteries are to be used, maybe the stock springs can be swapped with clover dome type springs. You could take 2 per battery and stack big end to big end to get more compression legnth.
Has anyone pulled out one of the disc springs? How are they held in place?
From pictures, the bottom of the battery tubes look anodized and the outer edges are bare metal. If so, then maybe swapping to a single clover dome is the best option. 3 would also work if you use shorter batteries, but not an even number. Only odd numbers so you get good contact.
Has anyone ever checked their battery heights? It’s possible the 4 imalent batteries are not perfectly matched. If one is a tiny bit shorter it may not make good contact.
I would measure the batteries and if need be, do a solder blob on the shorter ones and then file it down so you have perfect height on all 4 batteries.
I don’t own an Imalent but would it be possible to solder a normal coil spring to the disc spring? Don’t know if the included cells will still fit but unprotected batteries should work this way I think.
Solder? No. If your using short enough batteries you could drop the springs in place, big end on bottom. The problem you might get with coil springs is they might deform due to the resistance in them.
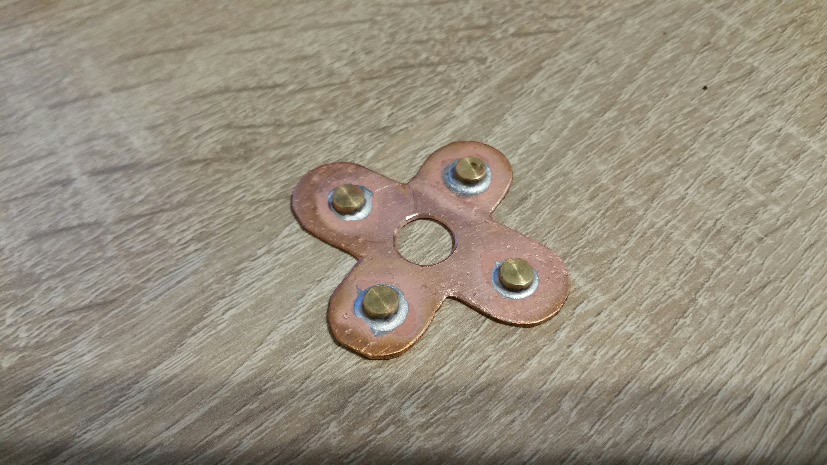
They are welded/soldered (I do not know the differences… sorry,“gooelg” translator, in Spanish: soldados) with tin in the same way as an SMD component.
I think the tank of the batteries is separated into two parts and the plate comes out from behind.
Later… fotos, but I do not know if they will be good.
Thanks for the pictures. Maybe the tailcap is glued and screwed in. Somehow the disc springs have to come into this position during production.
Did someone who has this light tried to unscrew the tailcap with a little more force?!
Wow, what a mess. It’s hard to tell, but they must be soldered in place. They don’t look very strong, but I guess they are more durable than coil springs.
To keep using the stock batteries, it looks like you would need to number the battery holes and then use a metal tool (like dental scraper) to pull up on the 2 ears that touch the battery until they are all the same height. Then after using the light, check the battery voltage and battery heights to see if the ears are staying in place or bending down too far.
As long as all 4 discharge at the same rate, then your good, but if one battery has higher voltage, then it might not be getting good contact. Keep notes because it may be the same disc spring getting flat and not springing back up.
If you have a heat gun you can heat the rear tail cap around the threads then turn it with a rubber strap wrench. That might get it loose.
If the tail cap can be unscrewed then you could solder in a set of double springs or one set with wire bypasses. You may be forced to buy new, shorter batteries though.
Has anyone told Imalent that the little spring ears are bending down and not springing back up and it’s causing uneven battery drain? I’d be curious to hear what they say.
It’s also possible that due to the higher spring pressure of the disc springs and the design in general, that you need to tighten the battery tube tighter than the average light to get all 4 batteries making good contact.
Do the instructions say how tight to turn the battery tube?