Help: Stacking 7135 chips in Biscotti drivers (using XML2 LEDs)

Hi BLF!
I need help and some “enlightenment” in this issue!
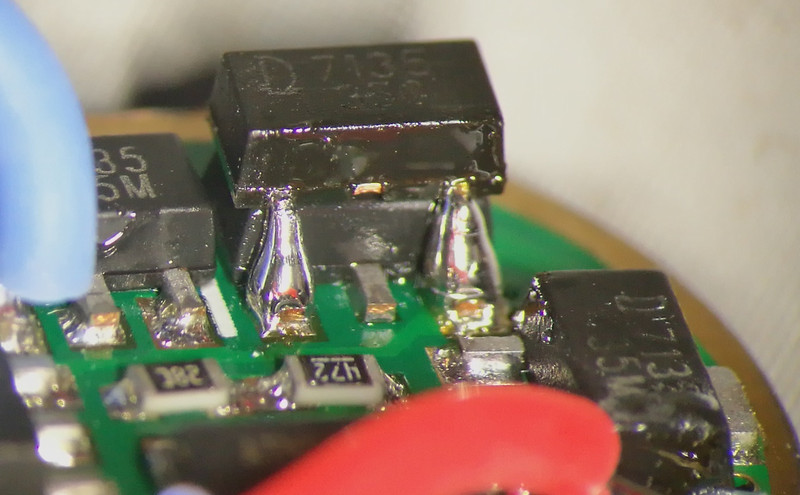
Hum, let’s say that have some damaged biscotti drivers that are plenty of 7135 chips, and that I would want to stack them in some drivers in use.

The targets are also biscotti drivers (7135*8) that I use in my Convoys S2+ and in 2 modded lights.
The LEDs used in those lights are XML2 U2-1A.

Besides the technical aspects of un/soldering that I need to exercise to retrieve them in good conditions, I need help on this:

1 – How many chips can a driver /LED like this hold to make it functional without burning?

2 – To install the chips, they need to be installed in the part “inside” the pill or in the part of the spring?

3 – Depending on the answer to the 1st question, stacking 4 chips would increase considerably the amount of lumens?

4 – The amount of heat produced due to stacking would be too much to hold the light in the hand for some minutes?

5 – Would I need to change the driver’s stock wires?

6 – Last but not least…would it be worthy to make all this, considering the possible amount of light gained in the process?

Thanks for your answers in advance!

I inform that I’m not aware of technical aspects like these, so I would appreciate explanatory answers to understand the stacking process as a whole, but also to be able to modify these specific drivers / LEDs I have!!

I also inform that I have no measuring tools to accompany this process, so this will be like a blind experience, guided by you people here :wink:

Best regards and thanks!

Here is a pic of my first stack of the 7135.

Here is a vid from Mtn E on doing it.

Here is a nice test on that same XML2 U2 1A emitter by Texas_Ace

How far you can go with increasing amps will depend greately on the ability of the host to shed heat or become too hot to hold too fast.
Really 3A is a good target to retain brightness. You may seen and read some of the D4 tests and reviews in TK’s thread. Some tests, I think was CRX, showed how a small 18350 had more output for the time the battery depleted. The LED will dim pretty quickly as it almost immediately heats up. May not be visible as you eyes are still in shock from the initial turn on.

Heat is the enemy and it need to transfer away fast. DTP or direct thermal path copper MCPCB are Key.
I always take apart a light to see the quality of the work. It is amazing the dumb stuff you will find. Contact to the MCPCB to the SOLID shelf in a light may be bad. You want full contact. I have seen the center of a machined shelf have a Peak in it that was poor machining finish. This raises the MCPCB off the shelf you loose contact and heat transfer suffers. I am pretty anal and check the contact pattern using a black marker. I color one surface usually the MCPCB, lay it in the head or pill. Twist it while applying pressure and you will see where the black marker is removed. Ideally all the marker is gone but that NEVER happens. I also hand LAP the two parts together to get the best possible contact.
Here you see the marker on the back of the MCPCB and where it rubbed off, also the 800 Grit lapping compound on the copper spacer.

After some lapping… getting better.

And the final result of both surfaces. When I solder the MCPCB into a pill or spacer I also immediately apply pressure to it as it cools. Removes as much solder or flux from between.

I love copper lights like the S41 and have soldered the copper MCPCB directly into the copper head of the light.
Here is a pic of an S41 head with solderpaste in it sitting directly in an electric burner, waiting for the Melt…

And here is a copper Tpad Quad soldered direbtly into the head. Hard to see but the is some solder oozing out the sides.

In an S2+ you can solder the copper MCPCB into the brass pill.
Sorry I didn’t really answer the questions directly.
But you have some things to consider.
Again I am Anal about a light I make or want to make a stock one better. Most guys will just scrape off the Point in the machining and apply a thermal paste they prefer to use.
I kinda posted this from your post in the “what did you mod today” thread… didn’t wanns go there in that thread. But helps you understand “Why?’ from the comments.
But still that light is Better than it started. Here in USA we have Copper one cent that were made before (I think) 1982. They are solid copper and I have sanded a few Flat and used them as spacers. I have also sripped the traces off a bare copper MCPCB, sanded it flat and clean to use as a spacer.

Hi vwpieces!
Thanks for your answer, images and links! They will help on this :wink:

I retrieved the chips from the damaged drivers, and unless heat has damaged them internally, on the outside they look fine! 16x7135 chips ready to be stacked :smiling_imp:

I still have some doubts but I’m still searching to understand the process as a whole! Yeah, I’m not savvy to read well all the charts or at least to interpret them without searching a bit on the basics first (V, W, lm, and that stuff…).

1 doubt I have is: the tab on the back of the stacked chip (top), does it have to be soldered to the bottom one? I read some things here (How-To: Add 7135 chips to a Driver Board (Stacking)) but as there are no pictures, it gets hard to see how it is concretized!

On yours, they seem to be, but on Richard’s video, I guess he didn’t solder the back tab…

The 2 lights I am willing to give more power have different pills and hosts, not like the S2+.
The S2+ would be my third option as I would try the others first, as an experience.

Stacking 4 chips per driver would be a reasonable amount of heat and luminosity gained, I suppose, right?

About soldering the plate to the pill, I never thought about that, but would that be a better way to dissipate the heat, then? So far I was going to rely on the pills and on thermal paste, as I’m not a soldering expert too!

And on the zoomie light I modded, there was no shelf, so I needed to improvise :stuck_out_tongue:
Maybe I can find some copper around, or I can order from anyplace!

I’m starting to learn some things so I appreciate the help you and others are giving ! Hope I can give in the same way :wink:

Next week I’ll start to try the stacking and post about the process!

Thanks again!
And good luck in the employment issues as well :+1:

the center tab on the 7135 is the same as the single wide tab on the other side. Only one, technically needs to be soldered. I do it just the opposite of that video. I solder the fat single tab first, and then just drag solder across the 3 tabs on the other side. I had a problem (not really a problem, just getting the solder right), the first time I tried, but it really is pretty easy with the right tip. Best advice is use a lot of flux, and a good bit of solder on the tip.

Thanks for the answer Dusty!!
Well, so soldering the tab has to be with the bottom tab, not the edge of the driver, right? Or doesn’t matter if it is soldered to the driver too?
On the post I linked above it was said:

So, seeing this I’m kind of confused…

Yeah, I have to buy some solder flux, I’ve seen that it is really important on this kind of work and I have none! Gonna check on that too :wink:
My solder iron is not extremely thin, but it is not thick too! I’ve been adapting to it and to retrieve the chips I hadn’t a lot of trouble.
Thanks again :+1:

Thanks Man,
I like to solder the MCPCB down when ever possible, if its a Brass pill or a copper spacer. Others may have different opinions. I don’t have a light meter so I never really compared to thermal paste after maybe 30sec. I guess another way would be to run both lights on high and check temperatures against time.

Hey, you’re welcome :wink:
Hum, I guess that may be a matter of preferences too :wink:
I may try that option! I have a free pill in which I can test soldering before passing to the already built lights. If I go wrong, I’m not damaging too much :smiley:

No problem with the measurings, I was only wandering about that! I guess I won’t have many problems with hear dissipation on these pills:

Also, the hosts can handle that, I hope :partying_face:
Thanks again for the help vw :+1:

Never seen those pills.
Second is brass so you could solder the board in. Looks like a C8 but the spring on the bottom? C12? For that pill I would solder the board and also use thermal paste lightly on the threads. I hope it has a full shelf under the emitter board.

The aluminium one is from my Brennestuhl, and I never seen any other like that. On the bottom is very thick, I had to drill and sand it to make a 17mm driver fit it!
The other one (brass?) seems a common pill for some lights with drop-in! Bought it in Kaidomain from AliExpress: 5.58€ 5% OFF|DIY 26mm(D) x 16mm(H) Kupfer Fahrer Säule Set für C12 LED Taschenlampen|pillar christmas|set up print screenpillar lamp - AliExpress

The outside bigger spring is to make contact with the host, and the inside spring is the driver’s one, that makes contact with the side switch of the flashlight!
The brass has shelf so I can solder the 20mm star plate in it! I think there’s enough space inside the pill to stack the chips.

For the aluminium one, I have to check as I struggled a bit to make it enter the pill, so I don’t know if they’ll fit…

Thanks again :+1:

Well, just tried the stacking… 4x7135 chips in a biscotti driver (8x7135)!

The good news are: the flashlight (still) works, even if I don’t feel it outputting more light (with freshly charged Sony VTC6)! :expressionless:

The bad news are: I just made a mess soldering and I think I damaged something because now it only turns ON on HIGH mode :person_facepalming:

(Well, not completely bad as this is supposed to be a outdoor light!)

So…I guess I’ll try again! I’ll order some new drivers and try again! That’s the only way: try, fail, learn, persevere, try again…hopefully don’t fail again, lesson learnt! :smiley:

I wanted to try this without solder flux , but that really may help a lot!
Also, I have to practice a lot soldering…a lot!!!

Thanks for the help so far :+1:

Nice try MascaratumB. It took me years to be able to sort of solder these chips on. I believe my biggest problem was a tip that was to big and not hot enough temperature when I went to a smaller tip.

Thanks MRsDNF! Hum, the tip may be a problem too, as I do not have a working station to regulate temperature! But I guess the flux will make the difference here! At least I hope so :smiley:

A month ago I didn’t knew how to solder and now I’m trying to stack 7135 chips! Maybe “baby steps” would have been better than the “go big or go home”… But…this was an experince! Next step: a pyramid of stacked 7135 chips :smiling_imp:

Thanks for your words :+1:

I have a hungarian flashlight modding blog and I made a post about 7135 stacking.
Try to read it with google website translate. Or I hope the pics help something too.

1 Thank

You good Zozz. :+1:

Thank you! I have done so many stacking that yesterday I have done 3 convoy C8 with extra two 7135’s stacking per light in a little more than half an hour from working lights to upgraded working lights :smiley:

:open_mouth: Wow, that’s perfection on stacking I would say! Thanks for the picture and for the link Zozz! Awesome!
For what I see you have a different method from the one used on Richard’s video linked by vwpieces: connecting juts the 2 tips from the extreme and connecting the middle by the tab on the back!! Maybe this can easy my work a bit!
That’s what people say “practice makes perfect” :smiley:
So…I’ll have to practice a lot… :person_facepalming:

But I guess I’ll need a thinner tip for the soldering iron and also the flux to make it flow better!!
Thanks again it’s very useful :+1:

I stacked two 7135 to my biscotti driver but it loses the moonlight mode. Why? 0.1% mode doesn’t work with more tan 8x7135

Hum, didn’t know that! Thanks for the info :+1:
Still, mine has lost the ability to change modes. It’s simply stuck on the Highest mode :person_facepalming:
A piece must be damaged for sure…

Thanks vw :wink: I’ll take that into account when soldering my tips :wink:
So many ways for the same thing is some times confusing, so I’m glad to have people here to help on this :+1:
I guess I’ll have to wait a bit to make my new attempt on stacking as I need new drivers! I may order some spare just in case I fail :smiley:
Thanks again !!