Ok, so I had this issue with my new Palight C8 R5 (see my original post in the Palight review thread) where it was showing 2.69A on high and from the rear the driver looked to be the same one used in the KD C8. So I decided to swap in a new driver to be safe. I got a 3 mode 1.4A Nang 101-AK from Illumination Supply. Problem now is that I am getting 4.22A on high and only high mode! As I would play around with the tailcap switch (switching on and off randomly) twice I was able to all of a sudden have lo-medium-high modes but it would go back to high mode only! I didn't bump the thing either to cause the lose of modes (ie. bump it after I got them working). So the second time I got the modes I quickly removed the tailcap to take a current measurement, but it had lost the modes by the time I touched the meter leads! What's going on? Backing up, here's my step-by-step of what I did:
First order of business, remove the old driver. I had a heck of a time with this! Finally had to grab a propane torch (plumbing torch) to melt the solder which attached the negative ring around the back of the driver to the heatsink. My soldering iron (25 watt, but a rough old tip) just would not melt that solder. I did have the leads removed off the emitter star by this point. Finally get the old driver out. I figured the old driver would have been damaged by the extreme heat from that torch so I don't plan to keep or reuse it. I then unsolder the old leads and solder them onto the new driver as shown in the photo at that link above. No problem there and I was careful not to heat up the contact points for too long. Next I fish the leads through the holes in the heatsink to the led star. Then I seat the driver into the cavity of the heatsink. Mistake at this point - I should have filed down the edges of the driver board because I had to press hard to get it to seat all the way. Now I don't think I can get the driver back out without destroying it. I figured it would just be a "permanent install" so I didn't think much of it (and I was in a rush to finish). So I then solder the driver's negative ring to the outer edge of the heatsink (and to a brass ring which runs around the inside of that driver cavity). I did use my 25 watt soldering iron and it was tough to get a good solder job. I soldered it in two places across from each other (sorry no photo at this point).
So I put the flashlight together (with thermal compound between heatsink threads & head) and test - no modes, but very very bright. Test tailcap current - 4.22A! WTH??? I take the flashlight out to my "test range" and yes the beam looks good by eye. I leave the flashlight on for about 2 - 3 minutes and I noticed the neck just starting to get warm (just enough to notice, not hot). Play around with the light some more, get modes to kick in twice, then back to single mode (high) only. That's where I am at now. By the way, the high during the 4.22A time and high when the modes kick in didn't really look that different. (I'm guessing because the XP-G R5 hits it's max output around the 1.4A, so the 4.22A won't really show much increase.)
So, what might I have done wrong? Any ideas why my modes would come and go and why I am showing 4.22A out of a 1.4A driver? I'm guessing that during the 4.22A time that it is running direct drive? Oh, and I am using a freshly charged Trustfire flame 2400mAh 18650 at 4.15v. Could it be an issue with my soldering that outer ring of the driver to the heatsink/brass ring? Could I just have a faulty driver? What would you do? The emitter has not turned blue, smoked, or "poofed" yet, but I expect it would after continued use. I should see roughly 1.4A at the tailcap with this driver, right?
Thanks,
Garry
If the reflector is (periodically) shorted to the negative side of the LED you can have those problems. I had a LED once that unsoldered itself because of the high current (directly connected to the battery).
The circuit board you mentioned is regulated up to 1.4A, I am guessing there is a short somewhere across the board or by-passing the board, leading to the light going into direct drive (hence the high current reading). It sounds like it is not always direct drive (when you are able to get modes) suggesting that the blob of solder (or whatever is causing the short) is not always in contact. Hope this helps.
So where would the reflector be causing the short? The mounting of the reflector hasn't changed, and the led/star has a black disk (isolator?) around it. Guess I could remove the reflector entirely and test the light. I have a feeling I am going to have to try and get that driver back out and/or order another and install again. Dang it! Why can't a light just work straight from the dealer! Guessing I lost the Chinese lottery on this one.
Garry
This has happened to me before on multiple occasions. The ground wire has a tiny blob of solder that is shorting the ground pad to the outer ring if the driver. Get an exacto knife and cut away the solder so that none grounds the pad to the outer ring and your modes should come back and your direct drive problem should go away. Good luck.
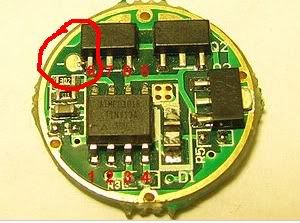
Yeah, I bet your right! When I soldered that ground wire on it did come fairly close to the outer ring, but I double, even triple-checked it and it was not making contact. Perhaps my eyes deceived me or possibly when seating the driver it caused a short somehow. Bad news is that I've gotta try and get this driver back out without destroying it! Guess I should have ordered a couple of these!
And you know what, I didn't expect these things to be so darn hard to solder! Man those connections are tiny!
Thanks,
Garry
See the hole at twelve o'clock position on the driver. Take the smallest finish nail you can find, grab it with a small vice grip and push it in the hole at twelve o'clock keep turning it round and round pushing gently take your time here be gentle. Keep pushing and turning until the nail enlarges the hole big enough to punch all the way through. Once you have the nail in about a quarter to a half inch pry the driver up an out being careful not to put pressure on the 7135 chips and the driver should pry off. I have done this many times. Key points small nail, don't force it, take your time and be gentle, good luck. Oh and next time test it thoroughly before you push the driver board in tight.
Thanks E1320 for that tip! I'd probably not figured that out on my own! You know I am surprised at how many times I post questions which I doubt I'll get a worthwhile answer to and I end up getting great advice! (My Maglite switch problem for instance.) I'm so glad to be a part of this forum! I do try to help out others in order to give back, although it's tough being a newbie.
Thanks!
Garry
I was a newb before and people walked me through some ridicules screw ups so I am just paying it forward. There really is a great group of guys here with vast amounts of knowledge.
+1. I do it all the time
Very nicely put.
Folks don't openly MOCK the newbies here, unlike at the Dark Side. We do it in PMs.
-Kidding. There is a great group of very helpful folks here. I've seen members go out of their way to help out.
Great tip on how to remove a tight driver - I'm sure it will come in handy for me as well!
Damn! It happened to me yesterday in fact. Got my Saik 3*AA torch yesterday and immediately modded it with a Nanjg 105 and only had one mode. For the life of me I couldn't finger out where I went wrong but ended up replacing it with another I had and that one worked fine.
I will have to check that driver when I get home and see if I had the solder short you describe. On the second one I had the positive just touching the outer ring and had no light but I saw that and corrected it nicely.
BTW...I finally used the warm XM-L I got from LCK-LED and MAN do I like it!!
Off topic, but since you brought it up, what kind of mod you doing with SAIK (it's the SAIK SA-305 which Old Lumens modded too, right?)? What battery cells? What emitter? Nanjg 1.4Amp? I'm considering a build with this one in the future.
(Edit) - Whoops! I'm guessing you popped in that warm XM-L.
Garry
LOL…You guessed correctly! ![]()
I will be posting some pics and a brief write up but nothing too out of the ordinary except for my pill modification. I used the warm white XM-L and a 2.8A 105C driver. Everything else at the moment is bone stock including reflector, lens, and battery holder (3xAA alkalines).
For the pill I took a 3/4" step drill and reamed out the center of the stock pill. Then, using a dremel and a small sanding drum, I bored the hole a little bigger a little at a time until I could just force a regular brass p60 pill into the hole. Once the hole was open enough for a pill to fit if forced in I popped it back out and took some copper soldering braid and wrapped the threads of the p60 pill tightly and worked it in well. Then I used a hammer to tap the p60 pill into the Saik pill like pressing a bearing into it's race. Once I had the depth where I wanted the emitter to end up I placed the whole thing into the vice and hit it with a propane torch. Once hot enough I applied a little flux which sucked into the braiding and threads of the p60. Next I applied some solder like I was soldering plumbing. The copper braid wicked up the solder and bonded it nicely with the larger Saik heatsink. Cooled it in some water then cleaned it with a small wire brush and then dremeled it clean and tidy.
I assembled the pill like any ordinary p60 pill at that point. Man does it suck away the heat! Soldering the driver to the brass pill the outer aluminum heat sink got instantly too hot to touch. I'm pretty proud of the new technique and as far as I know I'm the first to do it. Works great!!
The factory reflector works well with the XM-L and the alkalines provide enough juice to run it. Haven't DMM'd it yet but I will. Set the driver to L/M/H and am loving it. The Saik is actually a pretty nice host once upgraded. Stock it's TERRIBLE. One of my favorite lights now. I plan to replace the lens with a coated glass one and get myself a large Li-Ion cell for extra runtime.
If you have a Saik it's a nice little light. If you don't have one yet, get one and do what I did. You'll love it.
Johnny
Sounds good, choice of 3AA's or Li-Ion. But I didn't think you could get 2.8A out of 3AA's? Can you?
I am not familiar with p60's. I guess I've skipped over them in my LED light collection. I guess you can buy a cheap p60 drop-in / host in order to get that pill? Or can you buy the pill by itself by chance?
What can you tell me about the stock driver in that light. DX says 700mA on high with High-Lo-Fast Strobe. What diameter is it? 17mm? How low is lo? Would it be acceptable to just swap in an XM-L with that current driver?
Garry
Well, to start with, it’s a 20mm driver. To end with, it sucks. LOL. Running an XM-L off that driver would be a total waste of a good emitter. The other thing to remember is that the pill is a hollow one and the emitter PCB (20mm star) touches the pill only on the edges so you wouldn’t want to drive it any hotter than 1A anyway. That’s why I put in a standard p60 pill and used the stock pill as the heatsink.
THe p60 pill is the type of pill used in most of the drop-in lights such as the SolarForce torches and the 501/502/503/504 series of ****fire lights. I buy empty pills from KD for about $2.69 and install the emitter and driver myself. You could get one already assembled but then you'd have to remove the driver and emitter before installing the pill in the SAIK then put them back in. I always try to have a couple spare p60 pills in my bin.
Thanks for that link! Bookmarked (until KD changes their website again!). Well I was thinking of an under-driven XM-L for runtime / general use light. Or even XP-G instead of XM-L. Way I see it, 700mA to an XM-L should give about 275 Lumens (according to the test chart here). Guess there aren't many 20mm driver boards out there. The P60 uses 17mm drivers, right?
Garry
Well, that must have been the problem! (Neg. wire on the driver shorted to the outer ring.) Could probably only see the short with a magnifying glass though! Didn't have much problem getting the driver back out. I used an ice pick and poked it through from the emitter side through the hole where one of the wires was coming through and pushed on the driver as I heated up the solder around the outer ring. I then resoldered the negative wire, pushed driver in (after filing a little off the edges so it wasn't in as tight), seated pill in flashlight and tested - nothing! WTH??? Take it out figure I needed to solder that outer ring to heatsink for negative contact, put back in and test - nothing! Argh! Pull it all back out again and found the positive wire had broken off the driver! Fix that, put back in, wallah - light! AND modes! Finally a useable flashlight!
Tested tailcap currents at:
Hi-1.66A
Med-0.51A
Low-0.08A
This is an XP-G on a Nanjg 1.4A 3 mode driver with Trustfire flame 2400mAh at 4.05v. Am I right in figuring it's taking 1.66A at the tailcap to produce the 1.4A to the LED?
With a NANJG 101-AK the same current flows through the tailcap as through the LED (direct drive) besides the small current (1-2 mA) to the MCU. So you should measure 1.4 A if all is well.