
Hello everyone,
Andy Ho, digital marketing manager of PerfectPrime, has given me the opportunity to testing one of their latest products, the IR0280 thermal imaging camera. As flashlights have not known to be THE typical scenario for using thermal imaging cameras yet, I want to bring this a bit closer to you. As usual in all of my reviews, I will be unbiased and honest with my observations and try to give you a differentiated assessment of what is good and what is worth to be improved. I did not receive any kind of compensation except for the IR0280 camera by providing this review.
About PerfectPrime
PerfectPrime is a rather young retailer of consumer electronics and was at least to me a rather unknown distributor of thermal imaging cameras. Most of the popular brands are FLIR, Fluke or Bosch with premium prices that can go way beyond $ 8.000,00. Since demands for affordable thermal imaging cameras have increased significantly over the past years, PerfectPrime has developed and introduced some interesting devices and has successfully become one of the leading players.
What are thermal imaging cameras?
Thermal imaging cameras, also known as thermographic or infrared cameras, are devices that form a heat zone image by using infrared radiation, very similar to usual cameras that use visible light. While visible light is within a range of 400 – 700 nanometers, infrared cameras operate in wavelenghts of up to 14.000 nanometers.
Typical applications of thermal imaging cameras
- Home use (find heat spikes behind a wall due to overloaded electricity)
- Checking electrical elements for ceiling temperatures (e.g. on IT server banks) or faulty circuits
- Checking water leaks, missing insulation
- Checking window seals / thermal bridges and outlets
- Checking HVAC (heating, ventilation, air condition) leaks
- Industrial applications such as fire service, electrical maintenance
- Military and scientific areas
What good is a thermal imaging camera for flashlights?
Ever since I was interested into lighting technology in general and flashlights in particular, I always came across the challenges to manage and measure heat as a byproduct of high performance LEDs. Everyone who ever tried out an Emisar D4 knows very well how much heat can be generated within a blink of an eye. Being confronted with so much heat generated in a flashlight following crucial aspects need to be taken into consideration:
Thermal conductivity
With different materials you get different thermal conductivities. Copper has a great thermal conductivity but is known to be heavy and less sturdy while titanium has a poor thermal conductivity but is great in terms of weight and stability. That’s why it’s reasonable to use copper for the head section of flashlights (driver and LED MCPCB) whereas titanium and aluminum are a good choice for hosting the bezel, battery tube and tailcap as these are not subject to heat up this much.
Thermal dissipation
Once heat is generated it needs to be taken away as quickly as possible from its source. Aluminum is known to be a good trade off in terms of conductivity and weight. A good flashlight host will transfer the heat onto its entire host respectively its entire surface to achieve the best dissipation.
Monitor and control excess heat
With more and more high performance flashlights coming onto the market requirements for effective and efficient stepdown procedures become relevant. FET driven pocket rockets like Lumintop’s FW3A or Emisar’s D4 can heat up to way beyond 70°C within a few seconds making it necessary to trigger countermeasures within even less time. A good temperature regulation will ensure that both the driver and the flashlight host structure cannot heat up beyond its given threshold value, typically around 50° - 65°C.
So, with a thermal imaging camera in place I expect to visualize und understand:
- Effective thermal conductivity between the flashlight’s component.
- Heat being transferred and dissipated from the source
- Monitor and evaluate the actual surface temperature while operating the flashlight
Price/Performance classification of the IR280
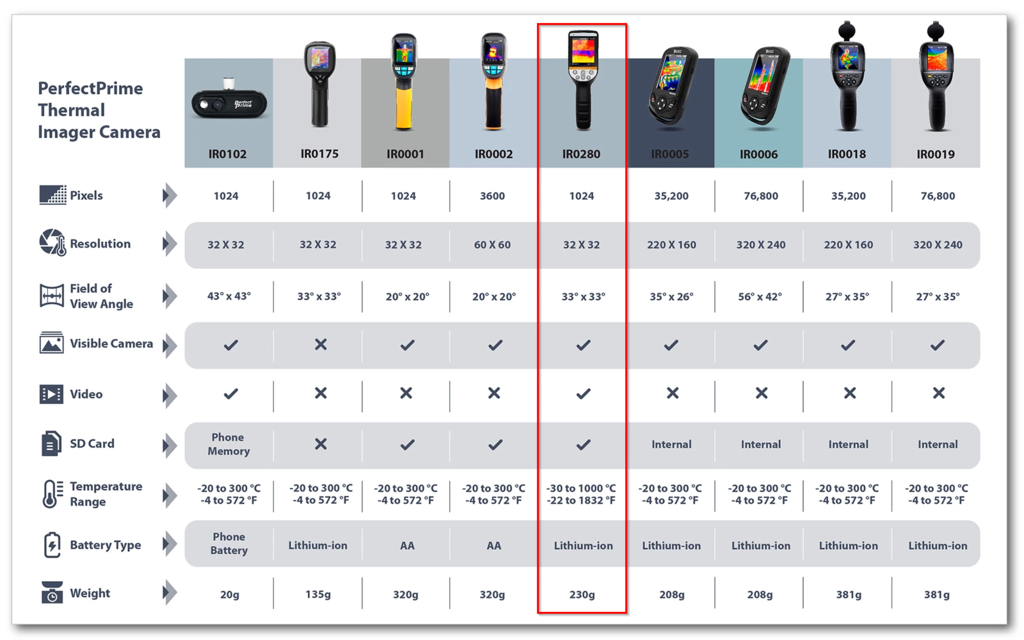
The IR0280 is one of PerfectPrime’s latest cameras. However, it is not the top of their line as you can see on the spreadsheet above. While other camera’s like IR0018 or IR0019 offer a much higher resolution this one here features video recording, a wider temperature range and – most important – a very budget-friendly price for less than $ 200,00. Eventually, when buying a thermal imaging camera you always need to ask yourself three questions:
- What is my budget?
- What scenarios/applications am I going to use my camera for?
- How often will I be using my camera?
My conclusion until here is:
As long as you don’t need thermal imaging cameras for your everyday profession where all your monthly income or even people’s lives may depend on you don’t need to invest into a $ 8.000 camera. Many home use tasks or semiprofessional tasks can be encountered with more budget-friendly devices The remaining question will be: Is the IR0280 good enough to fulfill personal requirements such as measuring and analyzing heat on flashlights? We will get to the answer later on.
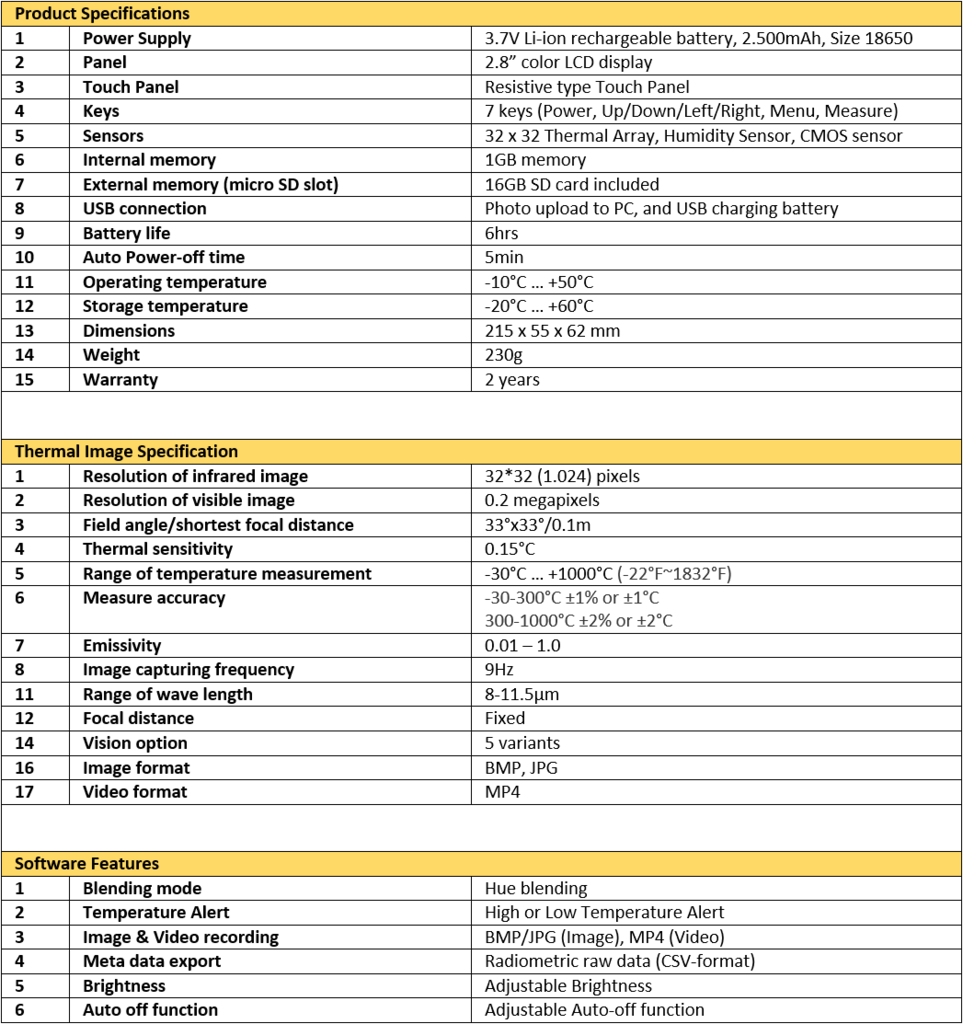
Key specifications of the IR0280's hardware and software
Where to buy the IR0280?
The IR0280 camera can be ordered through different sales channels.
PerfectPrime:
https://perfectprime.com/collections/thermal-imaging-camera/products/ir0280
Amazon US:
https://www.amazon.com/PerfectPrime-Infrared-Thermal-Temperature-22-1832%C2%B0F/dp/B07RFS28ZH
Amazon DE:
https://www.amazon.de/PerfectPrime-Infrared-Thermal-Visible-Temperature/dp/B07RFS28ZH
Content of package and first impressions
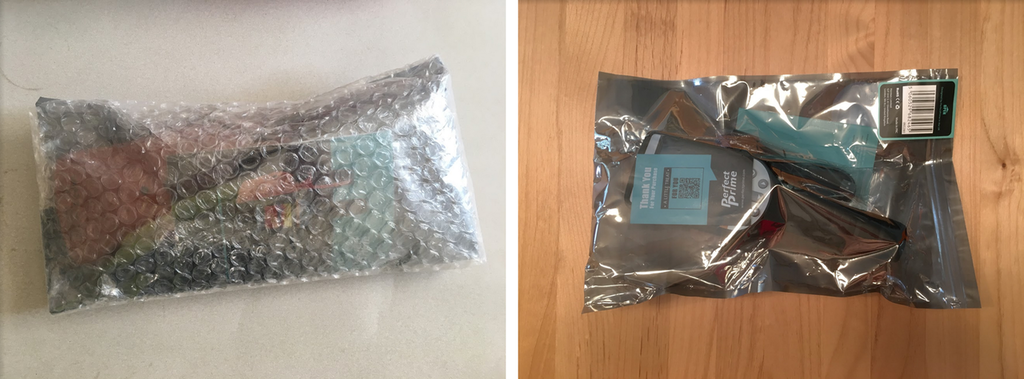
The camera arrived in a black plastic bag without much of a protection except for some bubble wrap. Fortunately, it did not take any damages during transportation.

Inside the plastic envelope I found the IR0280 camera, a miniUSB cable, the (English only) manual and a card with some instructions how to register and download the manual.
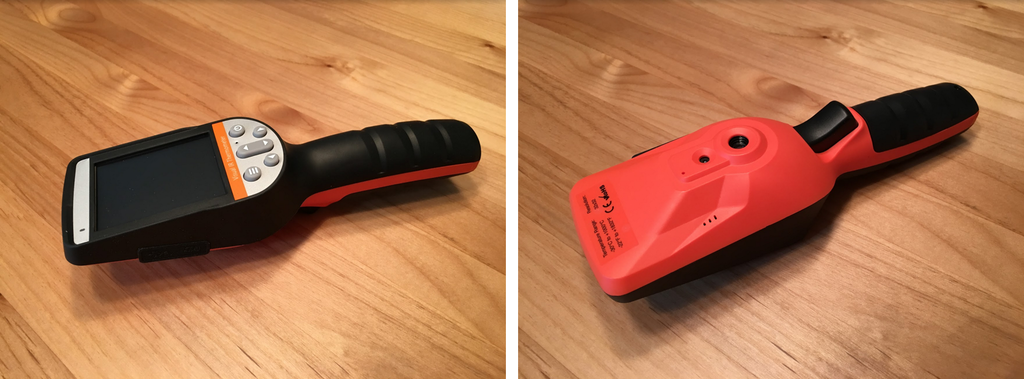
The camera itself feels very light-weighted and handy. On the read side you see both the visual camera as well as the infrared camera. The surface of the housing is slightly roughened in some places and conveys a tactile feeling.
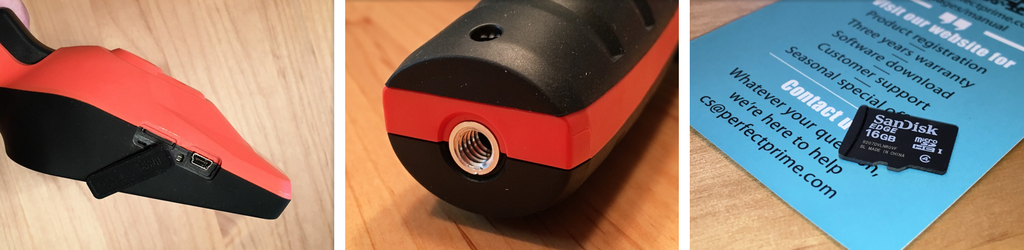
The left side shows a rubber boot and underneath the microSDHC slot with the inserted 16GB card as well as the miniUSB port to recharge the camera or connect it to a computer. On the bottom side you find a thread to mount the IR0280 onto a tripod.
Charging the IR0280
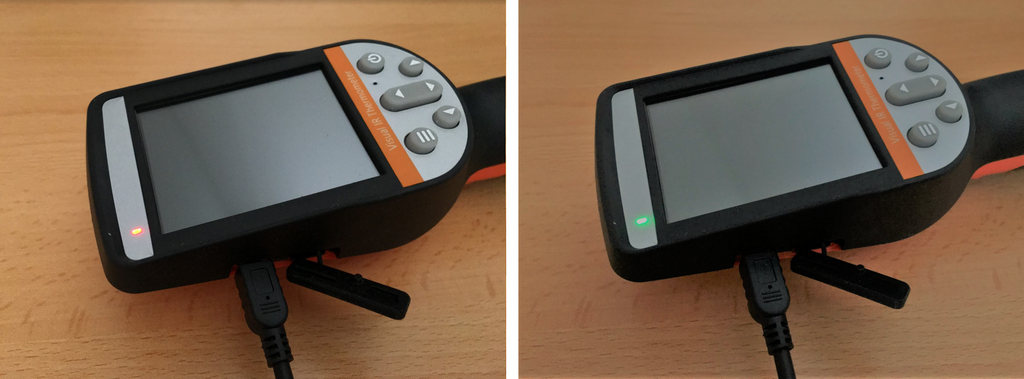
While charging the indicator is red. Once finished it turns green.
Functionalities and User Interface
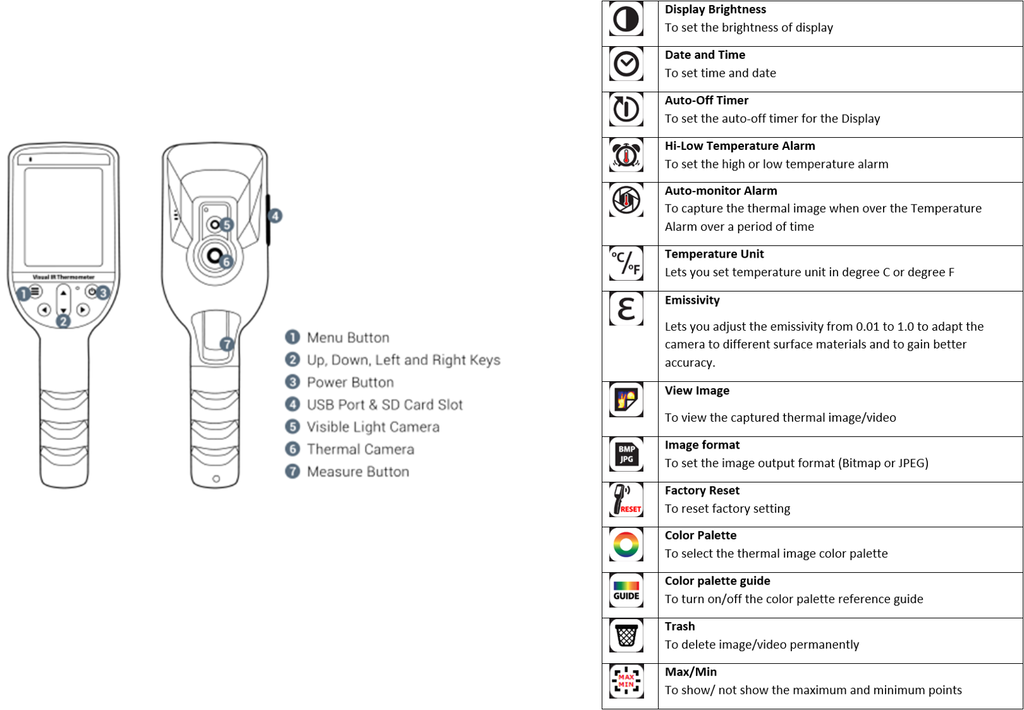
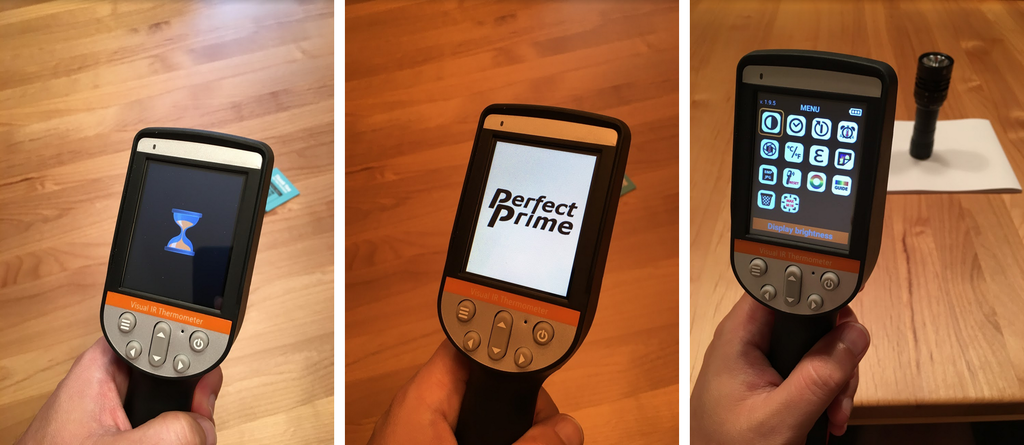
Starting the device requires to press the power button for 2 seconds. After some seconds to boot up the OS you can start to measure. Rest assured, the device can be put into standby for immediate use if you want to avoid waiting for booting up once again.
The IR0280’s operating system is based upon Android. This key feature makes it more flexible in terms of future updates, easier in handling software maintenance and more advanced in coding a state of the art yet simple user interface. The menu screen uses symbols that are easy to understand without looking up their meaning in the manual. All menu items can be selected by using the four-direction buttons below the screen. Pulling the trigger (measure button) accesses the selected menu item and is also used to save changes made by the user.
Once everything is set up to your liking you can start to measure…
For demonstration purposes, we here have a typical IR image of a human hand, indicating the temperature of the marked spot. By touching the screen you can easily select and measure any spot you see on the screen. Apart from that information you will get the minimum and maximum temperature and the color palette indicated on the bottom. The top area indicates the current time as well as the set emissivity value.
Any click on the trigger / measure button will save an image to the SDHC card. Press & hold will record a video (MP4-format) as long as you keeping holding the button. You can select of three different views

The overlay function is quite interesting as it compensates the low resolution a bit and enriches the image with visual details for better orientation.
Moreover, you have a choice of two filters.
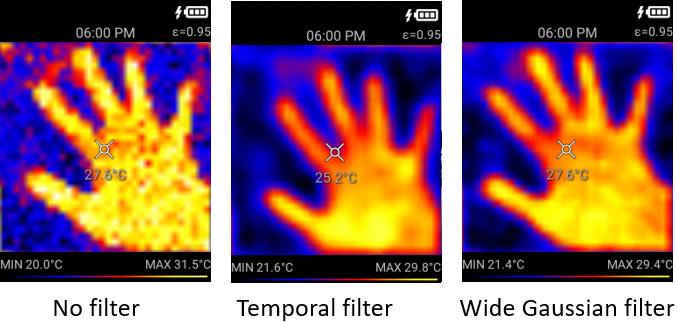
During my testing I found the Wide Gaussian filter most convenient as it reduces disturbing artifacts and smoothes out the low IR resolution. All my pictures and video footage were made with the Wide Gaussian filter.
There is also a zoom function available which I did not find necessary as details are not improving due to a lack of higher resolution.
If you always want to indicate the lowest and highest temperature spot you can activate the „Min/Max Crosshairs“.

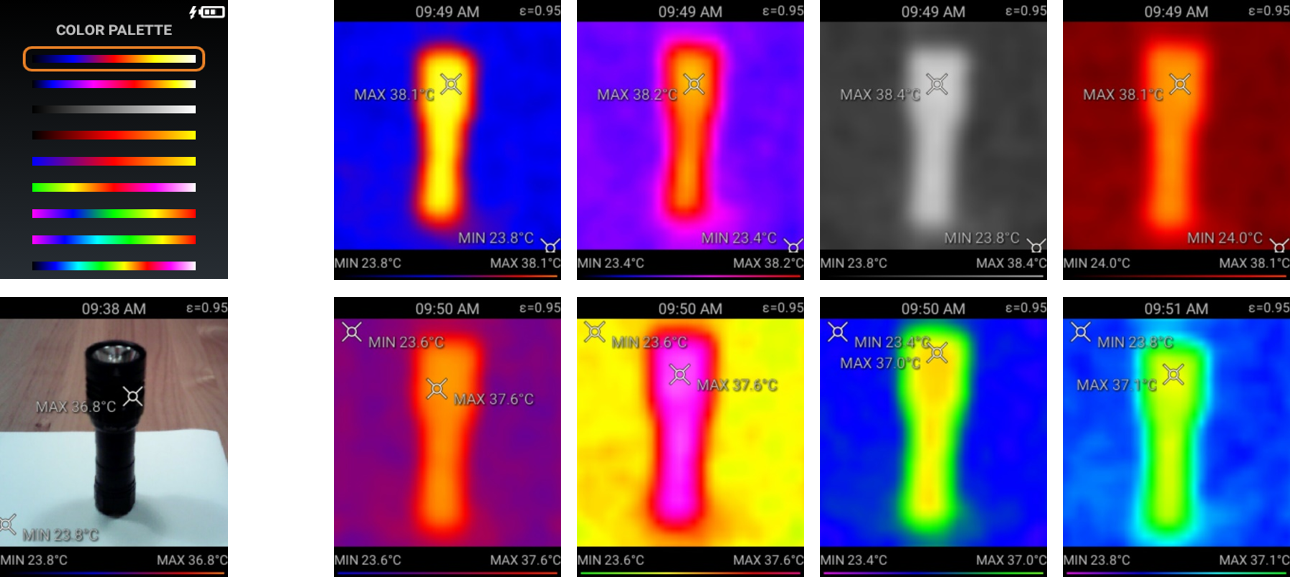
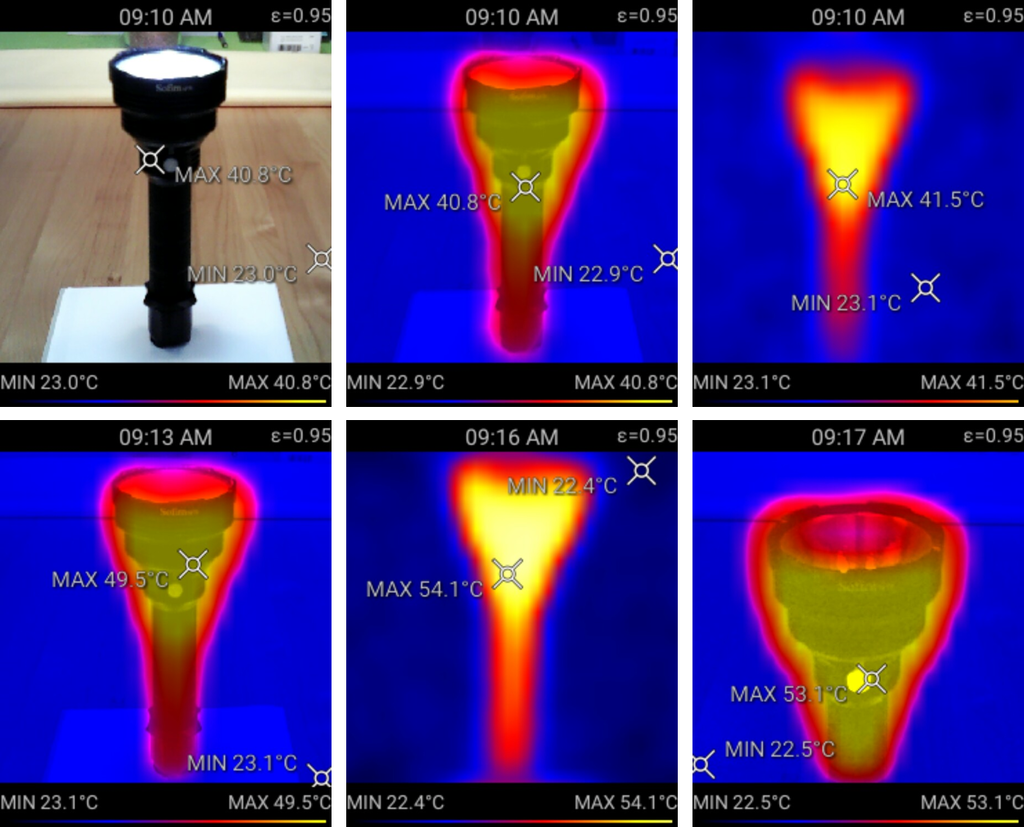
For individual needs the IR0280 offers 8 different color palettes. For reference, I have taken 8 pictures of a well-heated Sofirn SD05:
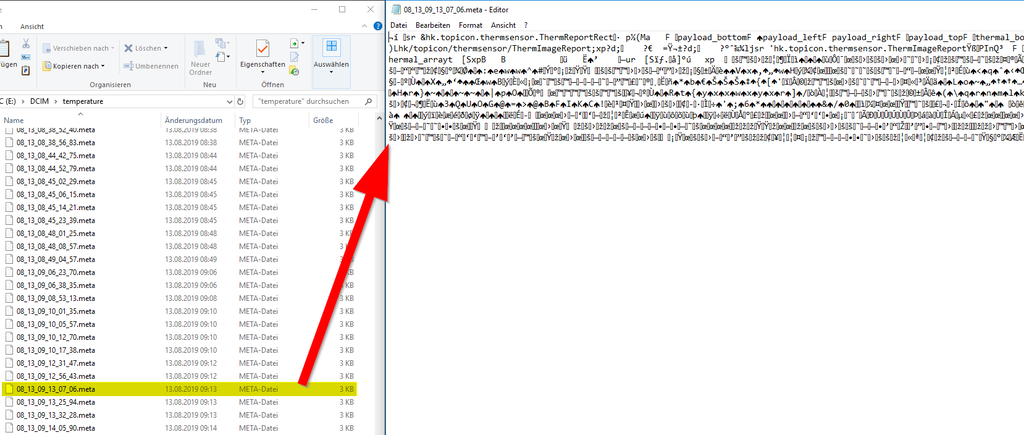
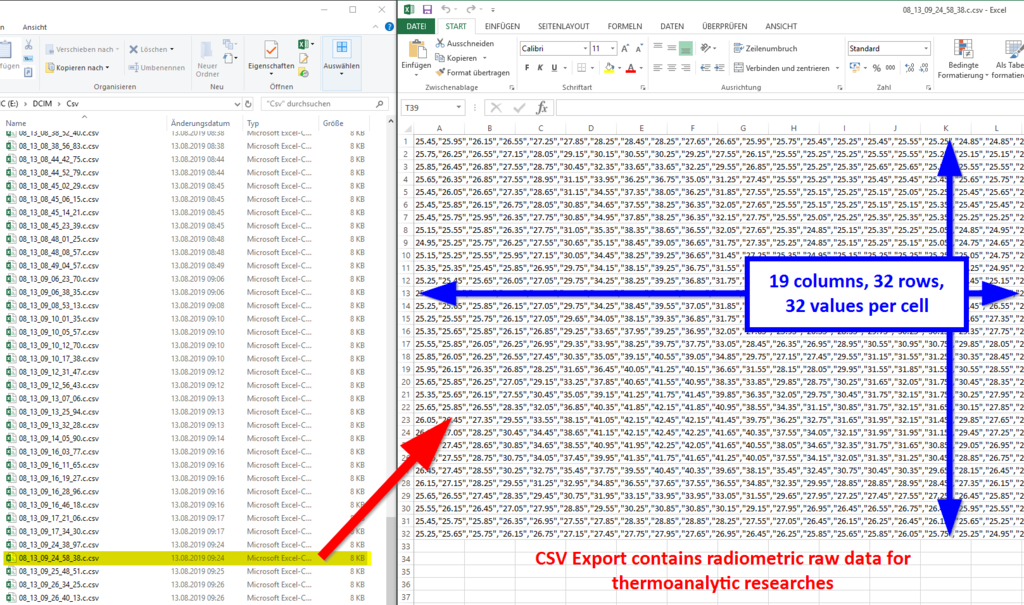
Radiometric data
This feature is a big advantage to those who want to run deeper analyses of their recorded images/videos. Along with each recording the IR0280 saves meta data, e.g. the actual temperature of each pixel. These data can be processed by thermoanalytical software suites like COMSOL Multiphysics® or The Mathworks® MATLAB.
Testing the IR0280
Zotac ZBOX CI520 Silent PC
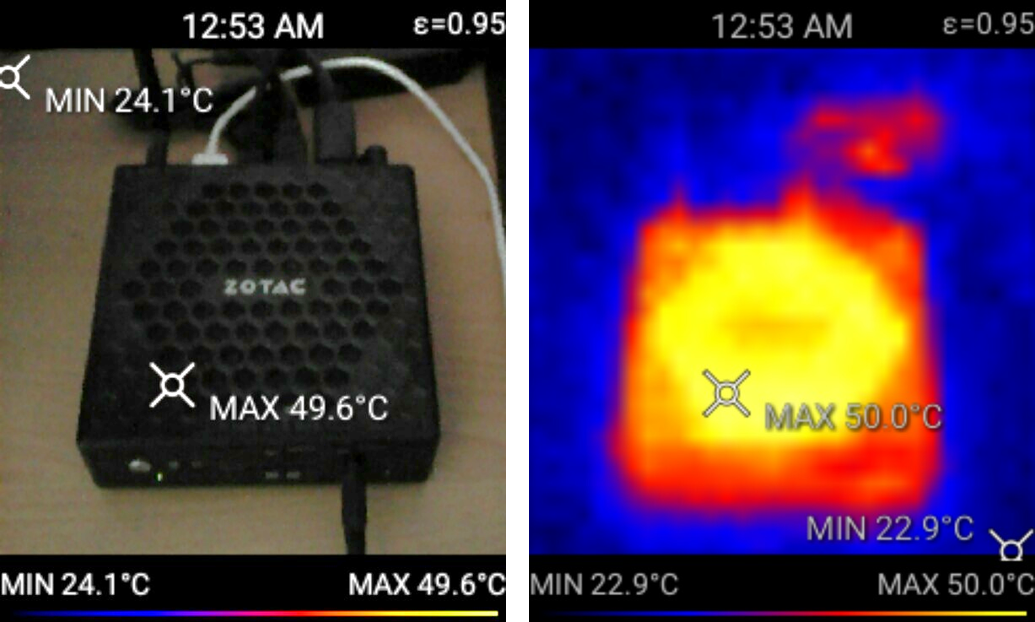
A silent PC is a very interesting item to use a thermal imaging camera with. As there are no active cooling components the PC needs to be cooled by passive means in terms of heat convection. As you can see on the picture above, the computer shows significantly more heat than its surrounding area. Details from about a foot / 30cm distance are sufficient enough to see hot spot areas in the center part as well as dissipated heat on the ac adaptor and the power cord behind the computer.
Miscellaneous

Taking pictures of farther heat sources reveals the camera's limitations. The resolution of 32x32 pixels is by far too low to indicate fine details or accurate readings. However, I am still impressed by the ability to safely locate heat sources from distances of up to 4-5m. With the overlay function in place missing details of the heat signature can be compensated by the visual image.
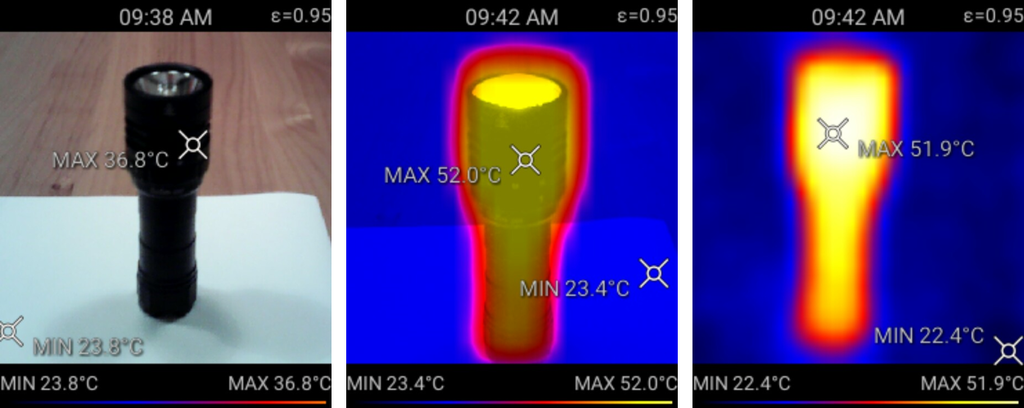
Sofirn SD05 diving flashlight (XHP50.2, 2.550lm)
Sofirn's brand new SD05 diving flashlight is advertised with a 3min timer-triggered stepdown and a thermal regulation that also reduces power/brightness when the driver's temperature reaches 55°C. I wanted to find out how hot the light will get with repetitive activation of the highest output mode and how the heat will distribute along the flashlight's host structure.
")
")
Conclusion:
The first video illustrates the heat generation via infrared spectrum. The second video uses the overlay function to show both visual and thermal images. The IR0280 is capable to visualize the heat generation starting in the flashlight's head and distributing all over the entire host structure. Details at close range are sufficient. I was not able to drive the heat beyond 53°C which is a good indicator that Sofirn's ATR technology works effectively.
Sofirn SP36S Flashlight (LH351D, 5.200lm)
Sofirn's SP36S is quite a powerhouse with its four LH351D 5.000K 90CRI LEDs and up to 5.200lm of luminus flux in total. Unlike the original SP36 there's no Andúril or NarsilM in place but a proprietary UI with Sofirn's ATR technology, triggered after 3min and/or 55°C temperature.

")
")
Conclusion:
The first video demonstrates how quickly the flashlight can get hot. You can see very clearly where the heat source is and how it distributes to the business end and later on back to the battery tube and the tailcap. The second video was shot in IR spectrum when I relaunched the turbo mode once again. It drove the SP36S up to about 57°C. At the end of the video you see that all the heat is evenly distributed along the entire host for optimal heat dissipation. The temperature decreases immediately as the flashlight is being shut down.
Sofirn SP70 flashlight (XHP70.2, 5.500lm)
Last but not least, Sofirn's SP70 is a big light with a long aluminum host structure. This example should visualize the heat transfer from its source even better. Sofirn's ATR is configured to 3min and/or 60°C stepdown.

Conclusion:
The SD05 and SP36S transfer their heat quickly onto the entire aluminum structure. The SP70 instead takes quite some time before heat gets down to the tail end of the host. This is of course due to the fact that heat rises upwards and that the major surface area for heat convection is located around the head structure with deep cooling fins and a wide bezel. The hottest area is around the side switch which is closest to the driver. To my surprise I was unable to trigger ATR since my SP70 did not heat up to 60°C, probably due to too much internal resistance or too weak batteries. Again, the IR0280 was able to visualize heat generation and indicate accurate readings of the surface temperature. However, the larger the object gets the more interested I am into a more detailed image with a higher resolution.
Bottom line and final verdict
Is the IR0280 good enough to fulfill personal requirements such as measuring and analyzing heat on flashlights?
Yes, in my humble opinion you get a good bang for the buck. At close ranges the camera is capable to effectively indicate issues in thermal conductivity, heat transfer and dissipation or issues with thermal thresholds of electrical components. Of course, higher resolution is very desirable and better looking on images or video footage. But as stated before this comes with a different price level and is necessary only if you really need more details or if you want to analyze remote objects.
WhatI like about the IR0280:
- Reasonable price/performance ratio with regard to competitive devices
- Cutting-edge user interface and firmware by using Android OS with the ability for software updates
- With Android in place and a touchscreen to use the camera’s UI is very easy to operate
- Wide options to customize image/video recording (color ranges, visual overlay function)
- A non-proprietary power source (18650 lithium-ion battery) is more environment-friendly for it effectively avoids planned obsolescence and is easier to replace if the battery becomes worn out.
- While some of the lower priced cameras use AAA or AA batteries, this one uses a powerful 18650 battery, providing longer runtimes and easier recharging.
- Capability to record video footage to visualize heat transfer and dissipation
- Capability to use both visual and IR spectrum (separate or overlay) for more detailed analyses, usually available on higher-end cameras (see FLIR’s MSX technology)
- Capability to adjust the emissivity coefficient for different types of surfaces to gain higher accuracy
- Wide measuring range (-30°C – 1.000°C / -22°F – 1832°F)
- Good tactile, light-weighted handling with grippy surface and tailstand capability incl. the option to mount the camera onto a tripod
- Capability to record and export radiometric raw data, normally to be found in high price cameras from Fluke or FLIR. These data can later be processed with professional thermoanalytic software suites.
- It comes with a replaceable 16GB microSD card.
- The manual is very easy to follow and understand.
What I would like to see improved:
(Actually, there is only little to gripe about this camera but I will list it anyway...)
- Press & Hold to take videos can be difficult for taking long-term videos as footage can become blurred when moving the camera. It would be a nice feature to have the option between “press & hold” and “hold 2s to start recording and click to stop recording”.
- The trigger switch is sometimes a bit less responsive, especially while recording you need to keep the trigger pulled with some force to avoid any recording interruptions
- Shipping envelopes could be padded or designed more sturdy in order to protect the device from damages during transportation
- miniUSB is fine but subject to wear with heavy usage – USB-C would be a nice improvement even though it may increase the total costs by $ 2-4 per device.
- A protective sleeve would suit nicely to cover the sensitive parts of the device.
- The camera’s thermal resolution is the only real weak point. 32x32 pixels will limit its applications to near-field scenarios (< 2m) as you may not see enough details in the distance. Furthermore, a higher resolution will also indicate more details on close-up pictures or video footages, e.g. heat spreading around a cold spot on an aluminum tube. However, the support of a second camera in the visible spectrum is a great add on and compensates the lack of a higher resolution a bit. Taking the IR0280’s price into consideration and comparing it with competitors in the same pricing range you get a lot.
- The manual does not feature the CSV export nor does it explain anything about radiometric data the camera is capable to record. Some supplemental information would be helpful.
I like to wind up my review by saying many thanks to Andy Ho for providing the IR0280 and to the entire BLF community for giving me the opportunity to present my impressions. Thank you for reading my review and sharing your thoughts.
Cheers,
Thomas
P.S.
If you are interested in buying thermal imaging cameras from PerfectPrime, please have a look onto Andy's thread and receive a 10% discount: https://budgetlightforum.com/t/-/57322