As a first post and “weekend project” Saying Welcome to BLF and thanks for your contributions so far is not enough.
Thank you and welcome to BLF.
As a first post and “weekend project” Saying Welcome to BLF and thanks for your contributions so far is not enough.
Thank you and welcome to BLF.
Lot of information through these pages. And we’ll mug you with it all. So just ask when needing component sources or already researched material.
Thanks for the warm welcome DavidEF and everyone here :). Thanks for the heads up for DTP heatsinks!
I reflowed the old XML LED off the original heatsink and replaced it with a XHP50 but as I've found, it gets very hot very quickly. As a result I've in fact ordered a few 20mm copper 'Sinkpads' for additional testing. I did some reading up and it appears that Noctigon is another good brand? These should perform better and I plan to do a quick thermal comparison test to try to quantify the improvements. Would appreciate additional suggestions for good heatsinks (short of just making my own! Though I'd like to keep to the spirit of this project which was to do a simple modification of an existing low-cost flashlight).
For reflow - I do reflow in an over on a regular basis, but I didn't send stencils to be made for this project just yet! I suppose if this project is successful enough I'd make a stencil so I can do a small run perhaps ^_^.
Again thanks on the input for 17mm, I'll definitely be trying to see how I can optimize the design for 17mm. One thing I'm concerned about is the drivers thermal performance and I tried to take as much care as possible during layout to ensure that the power components have good thermal sinking to the ground planes (and eventually to the outside ring to the host). For larger driver sizes I think it makes more sense to optimize it for even better components for less loss and to add some nice to have features such as larger packages for easier soldering and programming. But I'll like to focus on the GXB20 first, then perhaps 'GXB17' :)
Finally, with very minimal work (or in fact... none at all!), this driver can certainly drive 12V LEDs! This is a constant current driver so it will easily generate 12V to match the desired load current. I'll have to re-check the components (e.g. the output capacitor needs to be replaced with a higher voltage one, safety protection features need to be adjusted etc) but making it a 12V driver will certainly work. The reason I went for 6V was due to the fact that (1) commonly found XML heat-sinks have footprints compatible with XHP50 in 6V configuration and (2) I did some quick simulations on the boost drive and it's a little bit more efficient at 6V output compared to 12V output (across the range).
Will do - I'll try out with some Sinkpad IIs I purchased earlier (http://www.sinkpad.com/datasheet-sinkpad-2.php(link is external)) though it also seems like Noctigon is great too! I'll also document the spring bypass and additional methods I can do to improve efficiency. Speaking of springs, does anyone have any recommendation for good springs I can use which are not too large? For example the one I'm using now has a fairly large 8.5mm base spring which limits PCB space. I was looking at some springs like the 5mm or 7mm base springs on (http://www.mtnelectronics.com/index.php?route=product/category&path=25_81) - are these good or do you know of better ones?
Finally, I've been reading a little bit more about the different modes in flashlights and it made me wonder - would a 'moonlight mode' be something useful? And if so, what the typical brightness that people like?
Thanks again to everyone for the encouragement and kind words and for following this project. I do appreciate your time 
I like the small Convoy driver spring on my C8 or other drivers
Its around 4mm in diameter


The tail spring does the most of the job being higher snd softer
If you got problems with heat on a 17mm driver you can put the MCU and other non power parts on a slave board similar to this

welcome to BLF!
you found the right spot for your great project!
Moonlight is definitely a useful mode. There are disagreements about how low it should be, however. I find that around 1 - 3 lumens works fine for me. More than a few lumens can get into being too bright for moonlight mode use. Some want <1 lumen, which is IMHO more of a firefly mode and not useful to those of us who don’t have ToyKeeper’s super night vision. ![]()
You have the ability to assemble Indigo 5
http://forum.fonarevka.ru/showthread.php?t=20409
It is an advanced driver. Like a meteor M43 but an earlier version.
power part and signal lines should be possible to remove from each other
P.S. My Indigo (20mm Rocher F6) Показать сообщение отдельно - Indigo 5.0, или "не совсем форумный" драйвер? (Часть 2)
15W its ultimate load
P.P.S. Boost Converter
P.P.P.S Another driver Драйвер для питание XHP50 и MT-G2 от одного лития. | Мастерская: Tamagotchi и Rime
When using an external amplifier brightness does not change when the battery discharge. And there is a free one leg of the microcontroller.
Показать сообщение отдельно - Драйвер для питание XHP50 и MT-G2 от одного лития.
1uH vs 3.3uH is big difference.
Hi Loneoceans, welcome to BLF!
Saw your crazy tesla coil setup in the science center but too bad it was not switch on that day…
Anyway, really hope you can make a 17mm version!
Welcome to the forum and thank you for sharing your experiences! Congrats on your successful full power test (6V@3A). I didnt think those power levels possible from a 20mm boost driver, much less your thoughts for a 17mm. Your skills are simply amazing and accomplished at blinding speeds far beyond anyone else Ive seen to date. Is this just a hobby or are you also a NASA EE? ![]()
Id love to hear about some of your other projects when you have time to post.
wonderful, thank you
Loneoceans, there is a similar project in Russian forum , but with low current button.
http://forum.fonarevka.ru/showthread.php?t=31892
http://forum.fonarevka.ru/showthread.php?t=31484&page=3
Low current button has several advantages for example the function of beacon ,gradual increase /decrease of brightness and so on can be realised
As I know there is no such drivers on BLF.
Ramping is something i absolutly like in a flashlight Firmware. Like the Narsil FW (Q8, PMS SEND TO THOSE WITH ISSUES BLF soda can light - #2 by The_Miller).
Hi Loneoceans,
This is indeed a very impressive first thread! It addresses exactly what I am currently looking for.
I want to put a Nichia 144AM from the BLF group buy in a single cell light. The only driver I have found so far that is at least capable to deliver 2.5 A is the FX35 from Kaidomain.
However, I absolutely do not like the 5 modes with strobe and so on. Short question here: Is it possible to change the firmware on that one?
I am really looking forward to seeing the GBX20 or GBX17 become a series product! I’d be in for a couple of these!
Welcome Loneoceans you’ve sure have made a great first impressions, absolutely amazing, a weekend project?
Wow, wondering what your capable of in a week?
I would definitely be interested in a few. Just getting into modding flashlights and love it! ![]() Just bought a SMD 862D+ rework soldering station today.
Just bought a SMD 862D+ rework soldering station today.
My Atten 858D+ is on the way, too ![]()
Sweet! I love new toys that make fabricating easier ![]()
Hello all,
Again many thanks for all the kind words! I've been pretty busy lately but I managed to do some comprehensive testing across 20 power level settings which folks might be interested.
Before that, I want to say that I really appreciate all the comments and feedback I've received. But I'd like to reiterate that I never designed this project with an intention to sell them and make a profit, nor to produce a 'commercial' product - this was just a project I did just for fun and I did not plan to develop this extremely comprehensively and be fully featured, as I would have if I had designed this as such. As a result, I understand this driver has many flaws and 'lack of features', but I hope you can understand the motivations of the project! :) Some of you have pointed out some of the nice Russian drivers - they look great and a lot of respect to the folks who have made it as well! I'm not making this as a competitor, just making this driver as a fun project. And if people like it and would like to use the driver (with its particularities and feature (or lack of) set), or to continue to develop it, I'm more than happy to help! 
That said, given the big interest, I'll try to work a bit more on this driver and see if I can create a nice 17mm version when time allows. The use of a fairly powerful MCU also opens a lot of possibilities like soft-buttons and other features. I also made a whole bunch of PCBs (since making a batch is the same cost as making 1!), I'd be offering some for sale soon once I make sure the driver is actually worth putting into a flashlight  , so do let me know if you're interested. As a side note - what's the typical implementation of a soft button on flashlights and what should I design it for? E.g. are there any popular hosts I can take a look at that you can recommend?
Ok so back to the test!
The test was conducted as follows. The driver was hooked up to a constant voltage programmable Agilent power supply. In this case I conducted the test at 3.7V in across the range (driver was also tested at a variety of input voltage from 4.5V to <3V but less comprehensively). Input current and voltage was measured via Kelvin terminals to avoid errors due to lead resistances. Output current was measured across the load resistor as well as the output to find total driver efficiency.
A total of 20 constant current levels were tested and measurements taken.
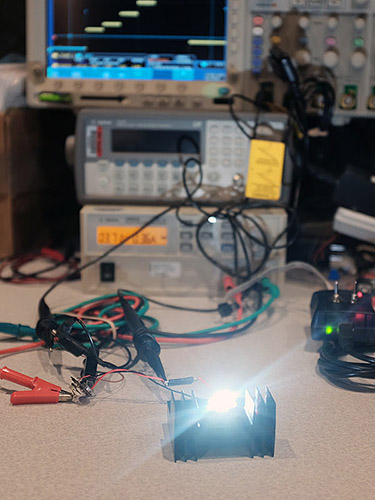
Above shows a photo of the test in action. The XHP50 LED was mounted on a 20mm star heatsink, which was in turn mounted on a big heatsink to keep it cool during tests. As a side result, the data will likely be inaccurate as the LED die temp rises, but I really don't have so much time to do a full datasheet-style test 

Here's an example scope shot showing the driver output at 5 different power levels. This was achieved by configuring the on-board MCU to run a 'test program' during startup at different power levels for 1 second each. Cyan shows output voltage and yellow shows voltage across the current sense resistor. Regulation is fairly clean, as expected with the very high switching frequency.
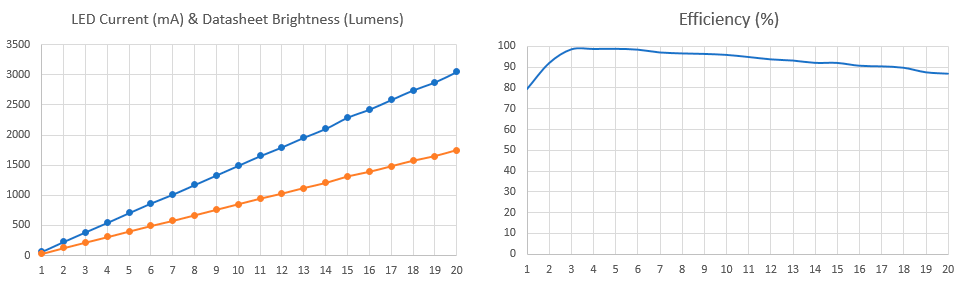
In this test, the maximum power tested was a massive 22.4W into the driver, driving the XHP50 LED at a measured 3053mA. At this power level, just putting my finger near the LED light feels very hot! Based on the specific bin of XHP50 I had on hand, this translates to a datasheet lumen output of around ~1700 lumens. Lower CRI bins less than this 90+CRI one used should yield close to 2000 lumens. As mentioned, heatsinking becomes very critical at these levels.
Maximum efficiency was measured at around 98+% efficiency at lowers loads of around 750mA out.This drops gradually to 87% or so at 3A output, meaning about 2W dissipated in the driver itself! Most of the heatsinking of the driver occurs through the ground ring around the driver so mounting it in a host properly is also critical. Increased temperature after longer runs will certainly affect the efficiency though. In all the driver seemed to regulate current just fine all the way up to the maximum 3A load. Finally, keep in mind that this efficiency number should probably be treated more as a guideline. I expect the efficiency to actually be better since there probably is non-trivial ohmic losses in connection points / spring, and a properly seated driver in a good host with a good switch should do a little better. So this efficiency is the measured system efficiency, driver efficiency should be a little higher (esp on the high currents). Finally the shape looks roughly in-line with my simulations should it at least gives me a good confidence in my measurements. Overall approaching 90% system efficiency is still pretty good for me!
In reality, I will likely turn operating current down to closer to 1.8A for a total lumen output of just around 1000 lumens of 90CRI light! This is due to the relatively poor heatsinking design of the host. Perhaps one day I'll mod this into a 'real' flashlight!
Overall I'm quite happy with the results as they are around the ballpark of what I expected, and most of all, I'm very glad that I didn't mess up the PCB (which is pretty rare given that this is my first run!). The next step is to work on the firmware for modes, and finish a more detailed write-up on the driver. I'll also be finally putting this LED driver into a host and do some beam comparison shots with the stock 'LatticeBright' LED and its driver, with this new driver!
More to come soon and thanks for reading.
Amazing work loneoceans and love the testing. :+1: