Interested in an attiny 85 narsil in the size closest to fitting a courui d01.
The turbo on rear switch is just a few lines different code.
for the illumination of the sideswitch when rear switch is on I can add a 4.7kOhms resistor to the driver
Just keep in mind that a the driver supports as well a indicator LED you could add a green as power LED and a red indicator LED to the sideswitch
the indicator LED can be wired on Pin 7 with an additional resistor
I can add for both LEDs a resistor to the driver for 1$
Which size has the driver and how much space is in the lights body so parts dont collide with it
It is possible just to piggiback a small driver on the original board
there is a 38.5mm TA driver design that could fit


Of course , now it’s an awesome light . First , it’s running Narsil and second , it’s making 292kcd with a dedomed xp-g2 .
Made the driver with LDO for low parasitic drain ![]()
More than 2S will burn the 7135 to hell
Yes on this FET-7135 driver, but I don’t run 7135’s only Straight up FET’s 2-4S no worries! Never used a LDO for a 1S 3v either and the Zener in 1S screws with the UI. But thanks!
Yes, please add both resistors. That will help me out.
Will I need to change the firmware code myself? I’ve never done this.
I assume that once the new line of code is added, the rear switch turning on will made the light come on in turbo, then I can press the side switch to turn it off to standby. Then it will function like narsil normally does, ramping up and down and turning off back to standby. Power LED stays lit.
Turning off/on the rear switch resets everything and makes turbo activate again.
Is this correct?
Oh wait there are two resistors for two leds? Then i want both haha
I need all the bells and whistles on my L6 :sunglasses:
I will flash your driver set to highest mode instead the 2 low blinks on drivers when you are requesting it.
As well other temperature for stepdown is possible, default will be 55°C depending how the light is build the head gets hotter than this value.
So every time you turn on the light with rear switch you will get a lot of light, so you could morse your SOS on your own,
a short press and the main LED turns off the power LED still on,
long press to ramp down or enter mode selection
I thought about a short video to explain how to operate and enter config mode of Narsil
Basically you can configure Narsil as you wish, ramping or modes, Mode Memory, indicator LED, Monn mode ON/OFF, brightness of moon,
just look in the manual its well written, after done the setup one time you get it, its similar to Bistro but a little different
after configuring 3 drivers for me its quite intuitive UI in the setup mode
This sounds great. Let me know when your ready to order it. If you only have 1 or 2 of this driver instead of 3, I might order one more so your not left with too many unsold drivers. Maybe I will buy another L6 to put it in. Lol
O.P. got updated with some other options
for 20mm and bigger sizes its likely to choose a spring with bigger diameter, that has less height when compressed
The extra boards on the 30mm are pretty cheap, the most comes from parts costs
only on 46mm SRK sizes the PCB price gets close as the parts for it costs, so it makes no sense to sell only one of this size and have 2 boards for 11$ left
I am not planning to stock those drivers in different sizes, just produce what is requested here and order some more of the 17 and 30mm,
as I am sure there will be more requests for those sizes as I wait for the parts
ordered today 200 AMC7135
As i had pretty long delivery time compared to Oshpark boards last time
Digikey delivers within a few days
I tested Narsil v1.4 today, seems to work fine
Had a short chat with Tom as there were no clear comments about the new startup configure lines
Seems LVP for 2S configuration will be implemented in Narsil triple,
as Narsil for the Q8 is similar to Triple v1.2 where the LVP for 2S works he can port the part with LVP and temp calibration to the triple easier
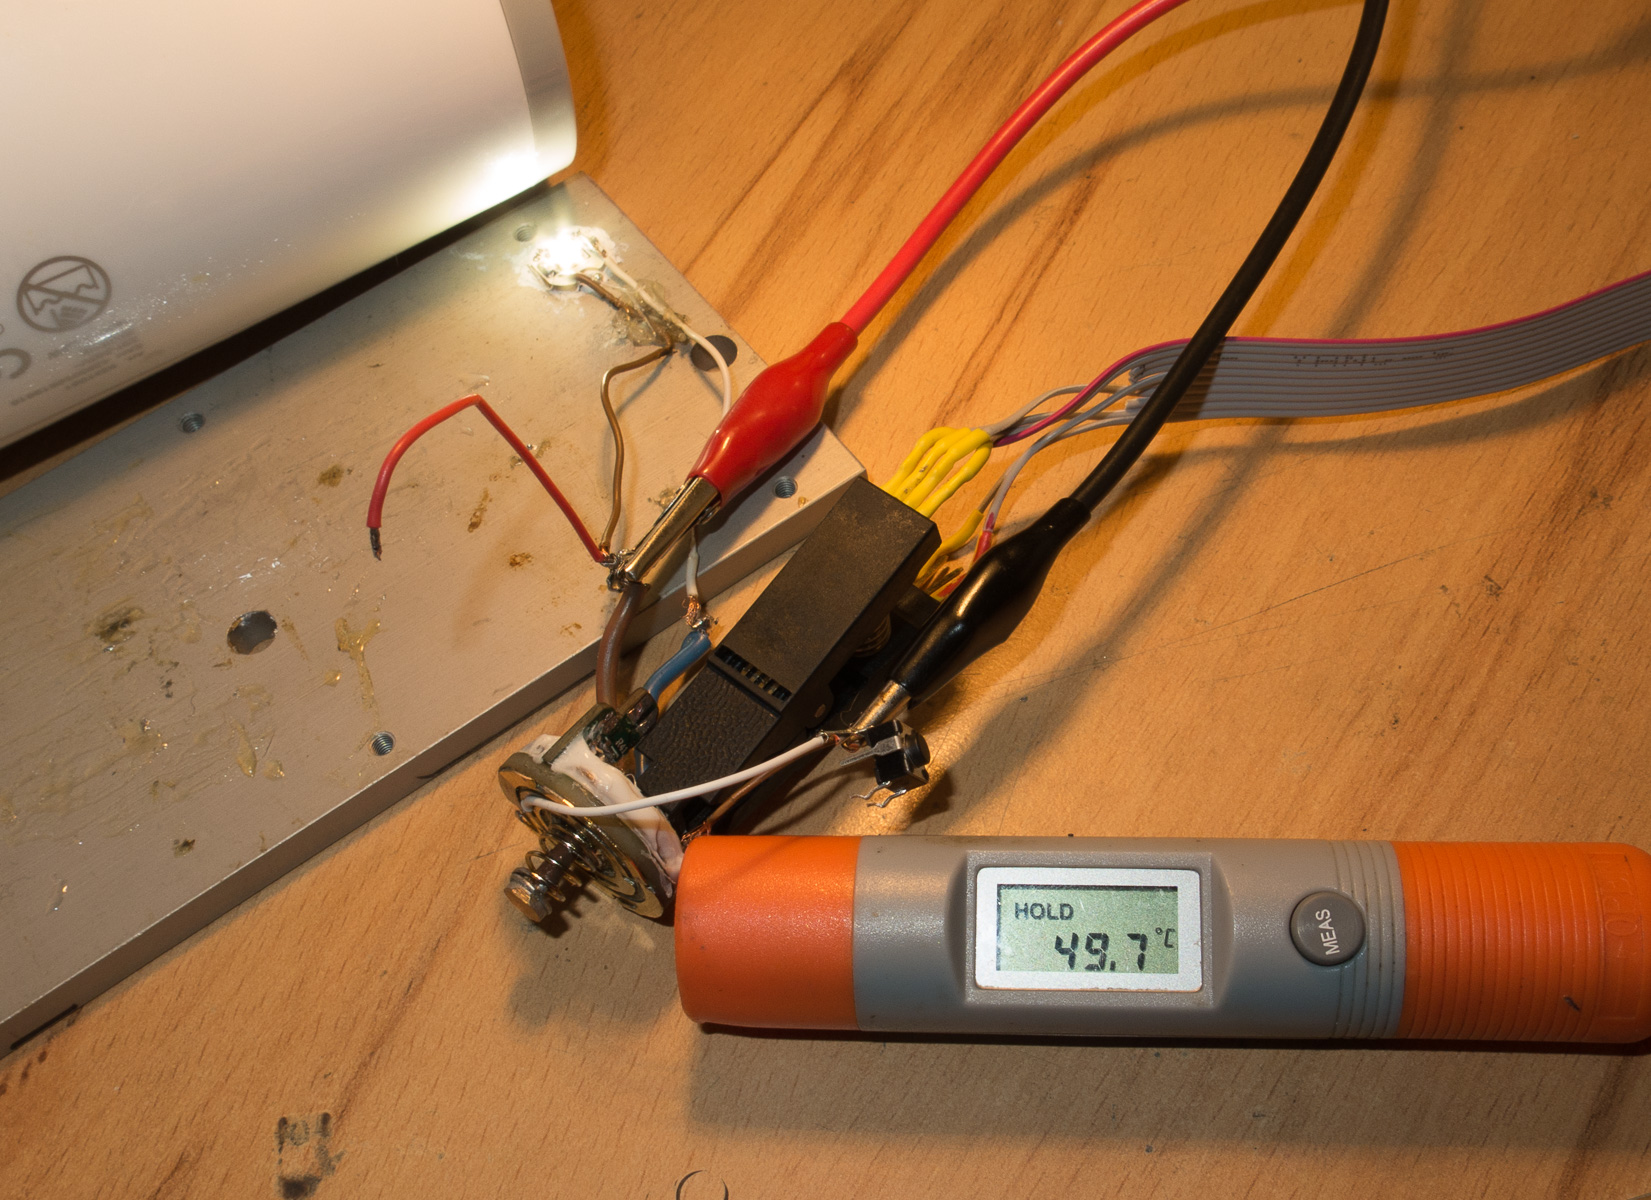
I forgot to show my old used crappy test bench for drivers

here for temp calibration with hairdryer
Does Oshpark just make the empty circuit boards and you have to buy all the components and solder them on?
Exactly !
I have a couple questions regarding the narsil driver for skilhunt h02.
I want to have the least parasitic drain possible. Do I need LDO? Are there disadvantages to LDO?
Will the e-switch indicator led option increase the parasitic drain.
Since its a 1S light I’m assuming the driver will have low voltage protection. Will I loose LVP by having the indicator option?
It seems that you forgot me in the 1st post ![]()
Low voltage warning is quite obvious on a DD light, it will get very dim, like <0.5 Lumens on a XHP70 when the batteries get below 2.8V
LVP shuts down the light in any case, LVWarning just reminds you to switch batteries, both is running in Narsil v1.2 fine for 2S
In 2S configuration the MCU does not see the cells voltage from Vcc of the MCU as it is regulated with the LDO
In Narsil v1.2 the LVP is on Pin 7 with a seperate set of resistors, no problem to flash this, but you loose temperature stepdown and indicator LED
in v1.3 and 1.4 he added there a indicator LED, those also have temperature stepdown
he is working very much on Narsil for the Q8, and will look into getting the 2S LVP
if he releases v1.5 I bet there is an option in the code to switch between indicator LED and LVP on Pin 7
it comes down that the Attiny 85 has a limited amount of IO pins, if it had more he would not have to remove the LVP in v1.3
The first 10 driver I soldered with an iron, took me about 35-40 minutes for each driver
This batch i will order solder paste and reflow em
I hope to get below 20 minutes per driver to assemble the driver reflowing
Bistro:flashing and testing Bistro adds another 10 minutes,
but a faulty one eats easily half an hour or more if you have to unsolder the 7135 for example if one is faulty
Narsil: Configuring code for different setups, flashing, testing, add resistors for Diodes and temperature calibrate the Narsil takes about 20 minutes
In both cases its possible to modify mode groups in source code if requested
or configure the driver as you like
It will add a little fee as it takes time
I calculated the prices above with about 10$ per hour just the time to assemble and test,
the first ones will be slower but with that many drivers I can reduce the time
the raw material costs for a 21mm Narsil are about 8$
there is no more parasitic drain on the 1 cell driver than the original Skilhunt driver
The LDO is only for 6V LEDs like XHP50, XHP70, or MTG2, with it the parasitic drain is also really low
just the 6V driver with Zener mod draws a few mA when off
as there are such nice LDO boards i would not recommens anyone a 2S driver with zener diode
a few hundred uA can be used for lighted sideswitch adding the bleeder resistor mid air and solder the LED wire on it
the indicator LED can be configured in Narsil to act as locator beacon, only this will increase parasitic drain, but the 1S driver got in any case LVP ad shuts down when the voltage drops betwenn 2.8 and 3V
you can read the manual for narsil, to see what a rich set of functions it has
the main settings are:
Setting # Function Clicks Defaults
1 Ramping Mode 1=disable, 2=enable; 2
2 Choose Mode Set 1-8 (1-7 is # of modes) – see Mode Sets; 4
3 Moon Mode 1=disable, 2=enable; 2
4 Mode ordering 1= sets low-hi, 2=sets hi-low; 1
5 Mode Memory 1=disable, 2=enable; 1
6 Turbo Timeout 1=disable, 2=30 secs, 3=60 secs, 4=90 secs,5=2 mins, 6=3 mins, 7=5 mins, 8=10 mins; 1
7 Blinky mode 1=disable, 2=one strobe, 3=all strobes/beacons; 3
the optional settings are:
1 Set Moonlight Level 1 - 7 (PWM value); 3
2 Active Temperature Regulation 1=disable, 2=enable; 2
3 Locator LED feature 1=disable, 2=enable; 2
4 Batt/Temp/Vers Ind. LED Only 1=disable, 2=enable; 2
5 Indicator LED Enable 1=disable, 2=enable; 2
6 Power switch modes w/mem 1=disable, 2=enable; 1
added
I also thought about UV hardened glue to fix the position of the SMD parts before reflowing
I have no expirience with it, I guess watch the reflow on my stove and carefully push misaligned parts with a toothpick should work as well
Anyone got expirience with reflowing boards with 0603 parts?
This should make it possible to both sides of the boards reflow in one run
It’s really nice to see the driver available from an EU source as :+1: well
I would like :
Two 21mm 1s short spring, with Narsil (for two Skilhunt H02)
What version of Bistro is it ? TA’s version or TK’s version.