That looks amazing ![]()
Love the CBT140.
I still haven’t tried my method of making round LEDs by masking the top.
yeh, at that price it can stay as elusive as a unicorn :confounded:
Be interested in seeing your attempt at masking Enderman :nerd_face:
![]()
Edit: guess I have to spell it out…Pink Panda quoted me and commented on what I said, then stated “Be interested in seeing your attempt at masking Enderman”
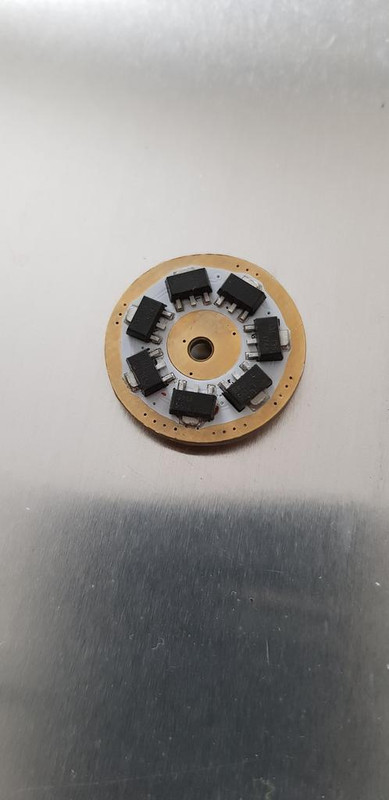
You are right, the resistance might go down when the spring is compressed. But maybe not by much since the spring doesn’t really touch itself upon compressing and the center shouldn’t actually touch the PCB.
The body tube on my D4s is ~70mm. My cell is 65mm long. That leaves 2.5mm for each spring. The spring wire is 1mm in diameter. I have a few extra Emisar springs I bought. When compressed to 2.5mm the electrical path isn’t the full spring length. There is contact between coils and it looks like there is more than one loop in contact at the battery end. It is a little hard to estimate the shortest path, though.
It looks to me like some tweaking the roundness and/or alignment of the coils could actually lead to better contact, by forcing the coils to slip against eachother as they are compressed and/or tipping a bit so that there are additional contacts and paths between spring, battery, and pcb.
Let the Build begin. ![]() Planning stage has ended.
Planning stage has ended. ![]()
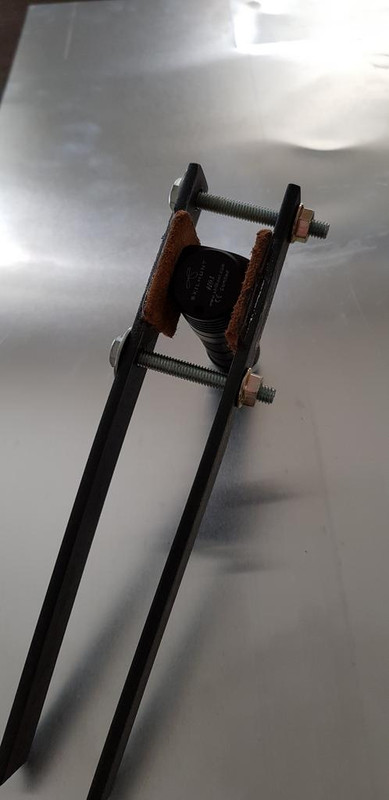
This will be a 3 step project. Had to protect the head with some quilting batting and painters tape.

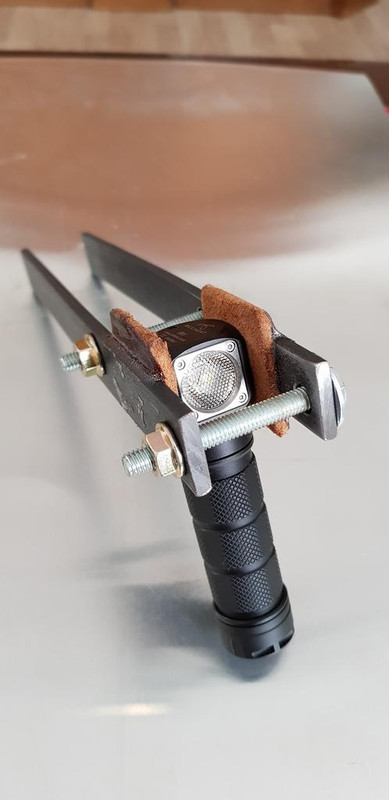
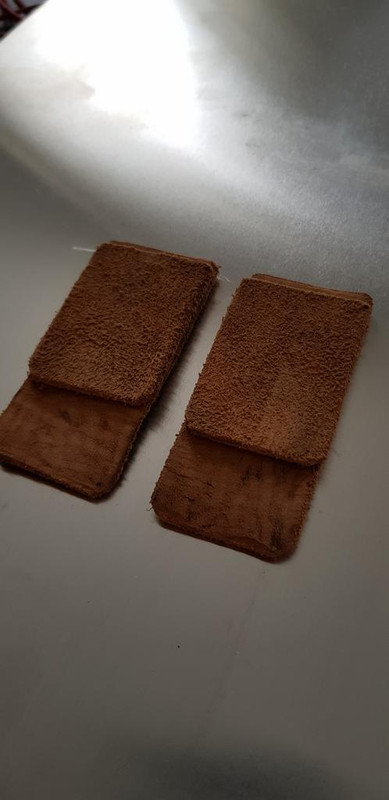
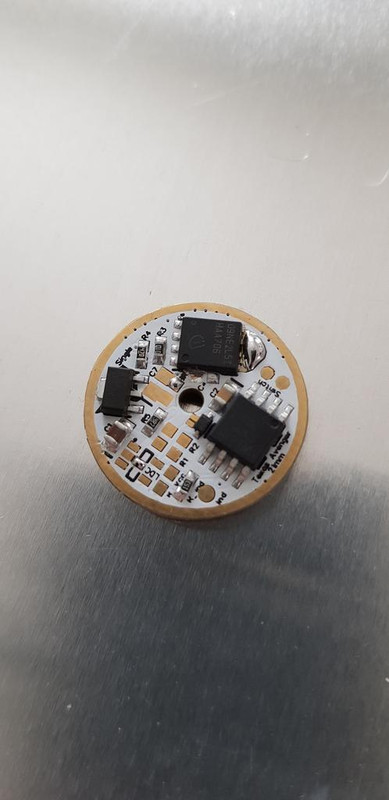
Tool is finnished so i do not scratch the head, lether cushions for the vise are glued together and cured and the new driver (from Lexel) is ready. So time to pop the H03 open. Have to get the heatgun ready first but then nothing will stop me. Wish me luck. Hope to get it open without doing any damage to the threads. Switch rubber and front glass/tir are removed. Tube is filled with a 19,5mm pipe to prevent it from squashing. I think there is nothing else i can do to prevent failure.

For the record, I have seen heavily glued threads remove the aluminum thread from a light leaving it stripped and impossible to reassemble, even with the use of a torch. Just saying… approach it carefully and take your time…
Good luck!
Oh, and watch for that to roll off to one side, careful not to scar up the head…
Edit… and watch for the tube to want to spin in the pads on your vice, the knurling may try to eat the leather and then get eaten by the vice. (Yes, I’ve seen a lot of things happen …)
I wanted to use my Proxxon Primus 100 but the smoth surface is not working with the leather pads. To slippery. Tomorrow i will install my big vice at the workbench (new thick beech board was delivered this week). And i glue the leather pads to some old Vice Jaws today and let it cure until tomorrow. The thread moved a little bit. But i do not like to have it slipping in the vise. To easy to scratch it this way. But with a little more grip and stability (no problem with the big vise srewed to the board) and enough heat and gentle approach it will work! Even with the small vise it was working. But to unsteady to be 100% sure to not scratch it if it slipps abruptly. I waited a long time for this light (everytime i wanted to order one in the last 2 years i saw something more interesting or something interfered) so i can wait another day.
But i really have to ask why they have to use threadlocker red (the nasty one). If they have to use it for sealing reasons please use the purple one (low strength). Keeps the light seald and you are not able to unscrew it with your hand. But with tools and heat its easy and you are not risking to strip the threads off the tube.
I would add a second and third nut inside the bars on the “handle” side so you can’t accidentally bend the bars when you apply force.
Not a flashlight, but for a flashlight.


@Cereal_killer
The picture was taken bofore i removed the lens /tir. . . I actually added the mentioned nuts to make it more sturdy when i am applying preasure. And the head is secured well. No movement at all!
Only the lether was slipping on the smooth surface of the Primus 100 jaws. The jaws on the big vise are stamped. And i glued the lether onto some old vise jaws. There will be no slipping or twisting tomorrow. And aslong i get it above 150°C/302°F but not above 170°C/338°F i am good. (most threadlocker give up above 150°C/302°F but if you have the wrong Aluminium and HAIII Anodizing it could chip because of the different thermal expansion coefficient if it is getting to warm) So i use my hot air solderstation with the biggest nozel and set it to 160°C/320 and give it time to get to temperatur. You really can feel that the glue is getting softer. But this stuff is still a mess!
Put a XHP50.2 (4000K 80CRI J2) in a Jaxman M8 - OP reflector (mini C8)
With the 17mm MTN-BST2 boost driver I estimate about 1,950 lm
Good luck Docc!
Nice combination contactcr. I have a MiniC8 with a wrong mod, you remind me to do something nice with it.
contactcr, are you only running one cell in the M8? I ask because the 50.2 is a 6V emitter and 2 cells makes for 8.4V, so a buck driver would be proper instead of a boost driver. Does the boost driver work in that instance? Seems odd that it would, since your overhead is a couple of V over the emitter requirement. Talking to Richard about his Boost circuit I sure didn’t think it’d work that way… as per the norm these days I seem to be missing something.
Edit: Aha! It sunk in, the Mini C8… I was thinking of the M2 because I saw “Jaxman” and 50.2… I put one of those in my M2 with an FET driver. Nevermind, just lost over here…
Tonight I did an emitter swap in a Nitecore Tube for a 5mm Yuji 3200k 95CRI. Stock Tube on the left, Yuji Tube on the right.

Re: the boosted mini C8. I like the throw and spill from this reflector and LED, good balance of both, but man this green shifted corona means its going to be outside only duty. With boost efficiency its prob better that way anyhow.
Another thing im not fond of is this brass pill. I’m spoiled with integrated shelf lights. This one barely transfers heat to the head which means it steps down too quick. The middle modes being constant output is nice though.
The brass pill is great for modding the light, did you use some thermal paste on the brass pill’s thread going back in? That helps a lot in some cases. Usually the reason is that in “standard” threads there is a lot of slop or free play, I’m told they need that excess so all the random parts in a box can be assembled without issue. But I’ve seen some things where the threads barely held, almost slipped teeth.
A thin copper foil can be wrapped around the threads for a more effective thermal transfer, snug the pill in and notice the difference. (an old P-60 drop-in trick)
Nice, will have to give it a try. In the comparison photo above, is the Tube on default-at-first-click Low or High? The brightness difference would indicate that the Yuji is many times more efficient than the OEM.