Well, I did'nt remove any components from the AK-47 and it had the same behaviour.
Now I have seen some hope in the horizon:
I took the 2.8Amp regulator from KD that I programmed the other day with BLF-VLD2-variable. It still has the leads with plug in the end soldered to it. And I tried to dump that.
I think that it was a success, because the flash dump starts with the same bytes as the original hex file and the fuses dump look just right.
Either I still have a clip issue or the KD print behaves better than the others. I will persue the clip failure thought.
Yes - that is weird. But perhaps the files from sixty545 was corrupt - cause the driver did not at all act like it should.
I will try to read out the 4 files from another BLF AA-Y4E I borrowed from a friend today, and see if I can get consistent files out of it.
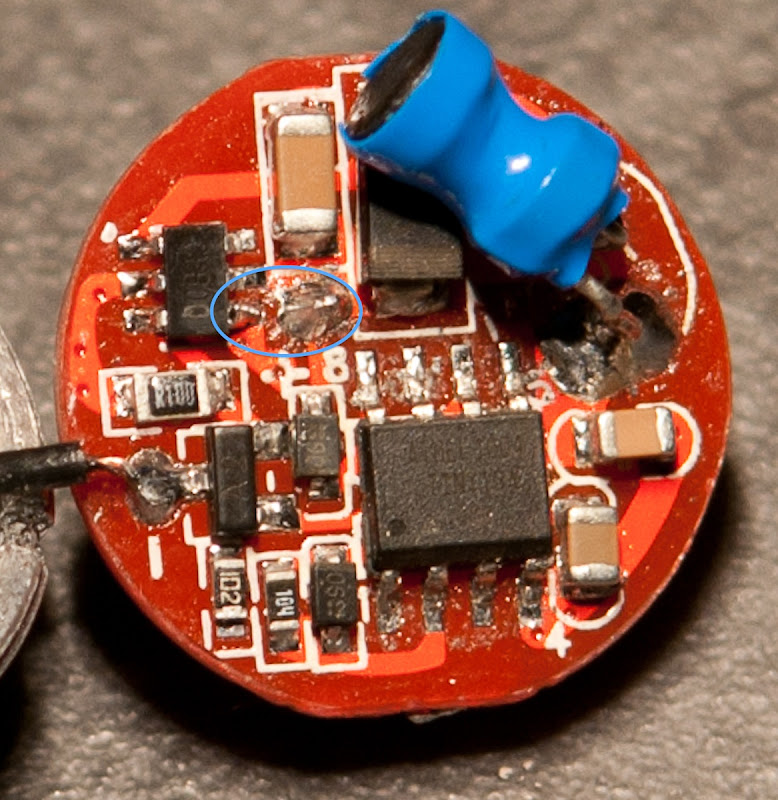
Hmm - it is hard for me to see, whether pin 4 of the PAM is connected to the µC. It looks as if it is connected to a through hole - right on the "+" mark.
(The big blob of solder right above the "+" sign, is the positive connection to the LED)
I just now tried to flash my driver board again, with the BLF-VLD software. I used my own 5-mode version (1/255 -> 32/255 -> 255/255 -> Strobe -> "Soft Beacon") and all of a sudden it worked with both NiMH and Li-ion.
Searching for a possible explanation, I saw that there perhaps had been a short - between pin 4 of the PAM and the positive LED pad (see picture below).
This evening I unsoldered the wire from the positive LED pad, and removed a bit of excess solder - this may have shorted the two previously.
The good news is that Tidos BLF-VLD seems to work fine with both NiMH and Li-ion, in the BLF AA-Y4E :-D
But I succeeded in getting my friends BLF AA-Y4E read out 3 times in a row, every time generating identical files.
If anyone is interested in these files, I have placed them for download here (Removed the link again, because it showed up, that the files were invalid)
So - sorry for - sort of - wasting your time sixty545, having you try to read out your driver board, when it was probably a mistake on my part, for the BLF VLD driver apparently not working on NiMH's...
Really no need to be sorry. I do this for my pleasure and the BLF light was going to be disassembled and modded anyway.
Congrats with your progress!
As I said above, I had my doubts about my clip, but there were no faults in the connections all the way to the tip of the clip.
I tried to read the BLF light (as you know) and a functioning AK-47. They gave faulty dumps. But the KD 2.8 Amp board that I programmed earlier I could read with soldered leads (not clip).
I have another of the KD, not programmed by me, which I could not read with the clip either, and I programmed it to my own fixed 4 mode version of BLF-VLD.
THAT ONE I CAN READ NOW!
I thought it could be the fuses that need to be set the "Tido-way" before I can read data back? You can see that I don't know the Atmel processors very well.
Then again, You could read your friends BLF, but with another programmer than mine.
Now I have to check if the drivers I programmed really work. If they do, the only thing I am missing is a possibility to take a backup of the original driver program.
Even though I succesfully read out the files 3 times in a row (that is the files where identical each time), I have not yet succeded in writing them back to the microcontroller again.
The writing seems to go fine - but the flashlight will not turn on afterwards and is just unresponsive...
Perhaps - I don't know enough about AVR's to say.
I tried looking at the fuses of the original image (lfuse:6A hfuse:FD) using this AVR fuse calculator - but I did not learn much :-)
Tido has already mentioned, that the the original image seems to be running with internal clockdivision by 8 in contrast to his BLF-VLD - is this the reason why I can see PWM flickering in the original image, but not with the BLF VLD without the CKDIV8 fuse setting ?
The original image seems to have BODLEVEL0 set and not have SELFPRGEN set - can someone explain what these settings do ?
I tested my AK-47 driver with my own fixed Lumen levels of:
100% - 25% - 6.3% - 1.5% but I got approx:
100% - 21% - 1.5% - glow
This could be due to the fast PWM, the narrow pulses do not look nice on an oscilloscope. I think that the circuit including the LED is not designed for such narrow pulses. I would be very interested in trying internal clockdivision but am afraid to fiddle with the fuses. I will try low fuse = 0x6A (or 0x69) and high fuse = 0xEF or 0xED
The BODLEVEL0 (=0) sets the Brown-out reset to occur if the voltage sink below 1.8 V to prevent destroying data in the EEPROM.
The SELFPRGEN bit could be the reason that we cannot dump the program. As I understand this bit is important for upload and download of program. Perhaps programming high fuse to 0xED will enable us to dump the original program.
Another point is that it seems to be a draw of luck to get the light to switch to next level (sorry Tido). Perhaps the timing of clicking is specified too narrow.
At least, it works - thank's Tido!
Now there is a lot of reading to do in the ATtiny13A manual.
With this settings the core runs at 1MHz, which is still fast enough to give flicker-free PWM (~5kHz with fast PWM, ~2kHz with phase corrected PWM). To see flicker the frequency would have to be scaled down more by setting a prescaler on the timer/counter or doing PWM in software (and implementing it very inefficiently, too).
Setting just BODLEVEL0 enables the brown-out detection at 2.7V. SELFPRGEN allows the program to alter the flash memory.
There are some losses due to capacitance of the components and leads and also switching delays by the linear regulators. If you want to have a lower PWM frequency, you could either set the system clock prescaler via the fuses or change the timer/counter prescaler set in the program code. You'd have to recompile the source in both cases (update the F_CPU compiler flag if you change system clock).
I'd recommend changing the timer prescaler. Look for the line "TCCR0B = 0b00000001;" and change it to "TCCR0B = 0x02;", this will slow down the PWM frequency by a factor of 8. I already made this a #define in the current dev version.
Nothing to apologise for, this is exactly the kind of feedback I need to improve the driver.
Two seconds should be plenty of time to switch the light off. Maybe the AK-47 is equipped with very large buffer caps, so the µC won't reset if power is switched off for a few milliseconds. Will it switch modes reliably if you keep the power off for a second during switching? If so, things may improve if you activate the brown-out detection by setting the high fuse to 0xEB.
No, if program verification (AKA "dumping the flash memory") has been disabled via the lock bits, there is no way to read it. Unless DebugWire has been enabled before locking the chip, but that would be pretty pointless. It's a security measure the prevent those pesky customers from stealing the manufacturer's oh so valuable imaginary intellectual property ;)
Oh I think I wasn't specific enough in my post: I asked if it was possible to read out the lock bits from the original driver, to check what measures the manufacturer might have taken, to prevent snoops like us from grabbing his precious code :-)
On the other hand - I have no reason to go back to the original driver software, as I find your driver a much better alternative.
My friend has even asked me to just put your driver on his BLF AA-Y4E right away :-)
The experiments with my AK-47 driver comes out rather good, I wished for:
100% - 25% - 6.3% - 1.5% but I got approx:
100% - 21% - 1.5% - glow, narrow pulses 5us on lowest, period 140us.
Changing only the low, high fuses from 0x79, 0xEF to 0x6A, 0xEF gave:
100% - 21% - 3% - 0.05%, broader pulses of 18us on lowest, period 480us. (this is near the 2 kHz Tido mentioned).
Changed the levels and ended with:
100% - 27% - 7.5% - 0.25%, Lumens measured to:
200Lm - 54Lm - 15Lm - 0.5Lm Very, very nice light, near the ideal light for me. It uses 20mA on lowest level and 1.06A on highest. The only draw-back is the click-speed. It should react on shorter clicks. How do I change that, Tido? Oh- I see now that we cross-posted..
I tried changing the SELFPRGEN bit in the BLF AA-Y4E light by writing 0xED to the high fuse but it would not change. Anybody know why?
0xEB was not good, the light never came on. I tried 0xED instead and now it reacts on very fast clicks, but it is still a lottery and I keep ending in the extended mode. How do I exclude that?
You can set the following in driver.c (line 48-50):
#undef EXTENDED_MODES      // enable to make all mode lines available
#undef PROGRAMMABLE        // user can re-program the mode slots
#undef PROGHELPER          // indicate programming timing by short flashes
Then go into the "Default" directory and do your build there.


 [quote=nkildal]