I'm sure requesting somebody else repair my flashlight is not in the spirit of this forum. I know I would enjoy the process but it just doesn't make sense for me to invest in the tools, time and practice materials to fix a flashlight I can replace for under $20.00. But I don't want to just toss it, all it needs is a new emitter.
I'm not looking to hot rod it any more than it already is by design. Replacing the emitter with another XPL 3D works fine for me. However, if someone wants to work with a new/different type of emitter I'm open to suggestions. As long as it works reliably with a tint around 5000K.
The sticking point may be that I prefer not to pay too much more than the retail price of a replacement to get this one working again.
Is anybody jonesing to replace a BLF A6 emitter?
FWIW, I can trade PhotoShop or HTML work if that would help.
Unfortunately, if you can get a new one for $20, and don’t want to spend over that to fix the one you’ve got, I doubt anyone can do it for that, unless they’re just being generous. Just the shipping back and forth takes a big chunk of that $20, unless you’re counting shipping separately. You might have better luck offering to sell it cheap to someone who will fix/mod it to their liking, then buy yourself a new one.
So, assuming I can de-solder the two wires attached to the MCPCB will it just lift out? Is there anything securing it from underneath? What grade/type of solder is best when installing the new MCPCB? What are the minimum/better/best specifications and features for an adequate soldering iron? Most of the soldering I've ever done was with a torch.
I've read a lot of posts here but all I find is a scrap of information here and another piece there and something maybe relevant off over yonder. Is there a MCPCB replacement for dummies thread?
The ability to do basic repairs is important if you want great tints and totally wonderful lights .
The forum proves that waiting around for vendors or manufacturers to put great tints in a light just isn't ever going to happen .IMHO the two NW tints used in the BLF A6 both suck .People like them , but my dog also likes to eat cat ****.
BLF has proved that you don't need to spend a ton to get some pretty sweet lights .A nicely designed driver by members here and a great emitter make things about as good as it gets . Whatever you spend on a soldering iron solder /flux and emitters pales in comparison to what you'd have to spend by buying multiple lights and expecting to finally discover a good or interesting tint, high cri light . Yes you can pay people to do mods for you but that gets silly when just shipping alone eclipses the cost of parts needed to fix or upgrade a light .Worst case scenario you become a flashlight modder fanboy and start endlessly promoting them and praising them only because you stupidly spent too much for a light .It happens all the time .people have to justify why they threw down big money so suddenly Mr. modder is a hero . I think if it's not some super custom designed Titanium light like a macgizmo , hanko or kuku than tossing too much money at a light is a sad admission of failure . It's like not being able to change your own oil or make a grilled cheese sandwich.
An emitter swap is clearly the fastest way to see real change in a light... and happens with just soldering two wires and some heat sink paste.
I will fix it if you want to buy the emmiter of your choice and pay shipping back and forth. How do you know it’s the emmiter? May have said already. Only read the OP.
Thanks Hondarider, but these other patient folks have convinced me I have nothing to lose and much satisfaction to be gained by performing what they all claim is an easy thing to do. I'm going to give it a go.
When it finally arrived it worked. I disassembled and reassembled it several times examining every little thing I could think of to look at. After lubing the O-ring and threads I reassembled it yet again and it no longer functioned. I've since learned that this LED should have a dome over it. This one does not. I honestly can't say if the dome was present or not when I started playing examining the light.
I read some posts about that problem. On my sample the MCPCB sits in the head end of the battery tube and is almost flush with the end of the tube. The only way I could have the tube reversed is if I screwed the tail cap onto the MCPCB.
Is the led not lighting up? If so are you sure it’s the problem and not the switch? Did you try a different battery? From reading your posts it doesn’t seem as if you’ve really narrowed down the issue with the light. If it was me I would try a different battery and if that doesn’t make a difference then determine if the switch is the problem or not (easily done with scrap wire). Also did you check that the retaining rings are all nice and tight?
Edited to say that I forgot to mention that you can also remove the tube from the head and directly apply power to it to see if the led lights up or not.
I tried several different batteries, protected and not, buttoned and flat. I tested each battery in another light.
The retaining ring in the tailcap is solid. I don't have a tool which will extend the length of the battery tube to reach the forward retaining ring. There is no play at the MCPCB from the forward side of the battery tube.
I did the wire scrap across the negative battery post and the body. No joy, no LED light.. I didn't think of applying power directly to the LED connections. I'll try that tomorrow. I assume polarity matters.
The red is positive and black negative on the board that the led is mounted on. You can use either a battery or 3.5ish volt power supply to briefly touch the 2 soldered connections. If it lights then the led is good and since you already did the wire test then it’s probably a bad driver or a lose connection in it. Be careful because it’s possible to de-dome the emitter (although you said it already is, which seems odd to me). The de-dome issue was mentioned in the BLF A6 trouble shooting thread here
If you remove the head from the tube you can use a small head phillips screw driver, etc to push against one of the dimples in the retaining ring to see if it’s lose or not.
Lights like the Convoy 2 ( + ) have three parts: the head, the tube and a tailpiece.
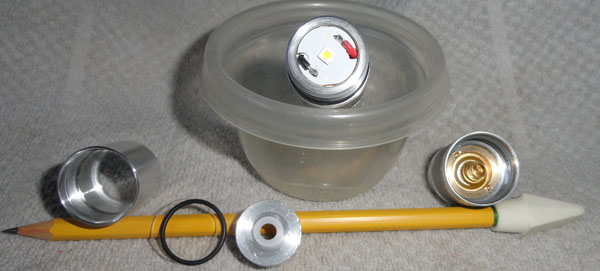
The A6 consists of four major parts:
- the bezel: here you find the lens, an O-ring, and the reflector,
- the “pill”: on one side you’ll find the PCB + led, and at the other side the driver + spring, and a retaining ring,
- the tube: a piece of aluminum pipe with threads and O-rings on both sides,
the tailpiece: with a PCB + spring + switch, a retaining ring, a washer and a rubber tailcap.
1/ MRsDNF has asked you to reverse just the tube. The manufacturer of the A6 does not use oversized pieces of metal. Sometimes two connecting parts just barely make contact, or barely not. Cleaning the rims of the tube and reversing it may help.
2/ Have you tried if the retaining rings on the driver and on the switch are properly fastened?
3/ You can test if the trouble is in the tailpiece by removing that part and short circuiting the (bare) backside rim of the tube with the underside of the battery with a pair of pliers or scissors.
SigShooter: No joy when power was applied directly to the LED connections. About removing the head from the tube; does it just push out the front of the light? I applied a little pressure with a pencil from the rear and nothing budged. I was reluctant to push too hard though.
RobertB: I'm very happy with my Weber thank you.
MRsDNF, BlueSwordM, Streamer & Henk4U2: Are you suggesting I remove the "pill" and reinstall it in what is currently the tail end of the battery tube? (Pls see my response to SigShooter above.) This is probably unnecessary, but without pictures it didn't really happen:
For reference, Image 1.
I found a pair of needle nose pliers which reach down to those two divets (one at about 11:00 o'clock, the other just visible at the bottom of the image.) I applied quite a bit of pressure in both directions and it didn't budge. Apply more torque? Counter-clockwise?
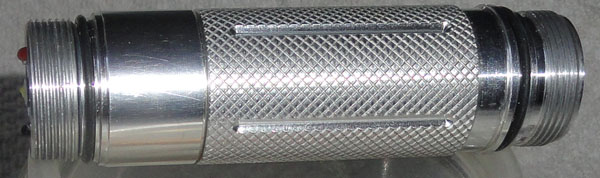
For reference, image 2.
For reference, image 3.
The LED wires are just visible on the left end (the head). On the other end (the tail) the distance from the o-ring to the end of the tube is visibly longer than the similar distance on the head end.
One more thing. If that retainer ring can actually be unscrewed, there are no interior threads at the tail end to mount it and the pill to. Is it a press fit?