There is no white film. that is just the centering ring, it lifts right out.
The board is held in by two screws.
Just desolder the two wires and remove the screws and the board comes right out.
Can I test this without desoldering? Considering that this is on a heat sink, it’s gonna be tough to desolder. After desolder the screws are shown? Meaning the solder is on the screw right now? Looks like led is either on the copper by itself or the white part is a very thin board that’s some how stuck to the copper.
You are making this way too complicated. And I am a newbie!
Put the screws back in. All it takes is a touch of a good soldering iron to remove each wire. Just hold it with a tweezer or needle nose, touch the soldering iron and pull it off. THEN take out the screws and remove the copper board.
You can put in a new board or reflow the LED. Search for that.
Where is the screw, I just don’t see it. The other thing I was thinking of was to cut the wire instead of soldering/desoldering
There are normally two screws holding the board down. They do not appear in the photos
Why in the world would you cut the wires when you know you have to solder them to connect them back?
That’s what I am saying, if I am replacing that copper assembly then I can just cut it and use twist and shrink wrap / tape. I guess I need to find out what I am replacing either just the led or that assembly. If it’s just led I don’t see how that can be done…I don’t know how they’ve attached the led to the copper
![]()
Google reflow LED.
Just desolder the 2 wires, order a replacement led on star, solder the wires back, add some thermal paste, assemble, ready.
You still have to solder the wire to the board.
You can reflow the LED. It is not that hard. I have done it three times.
What is star?
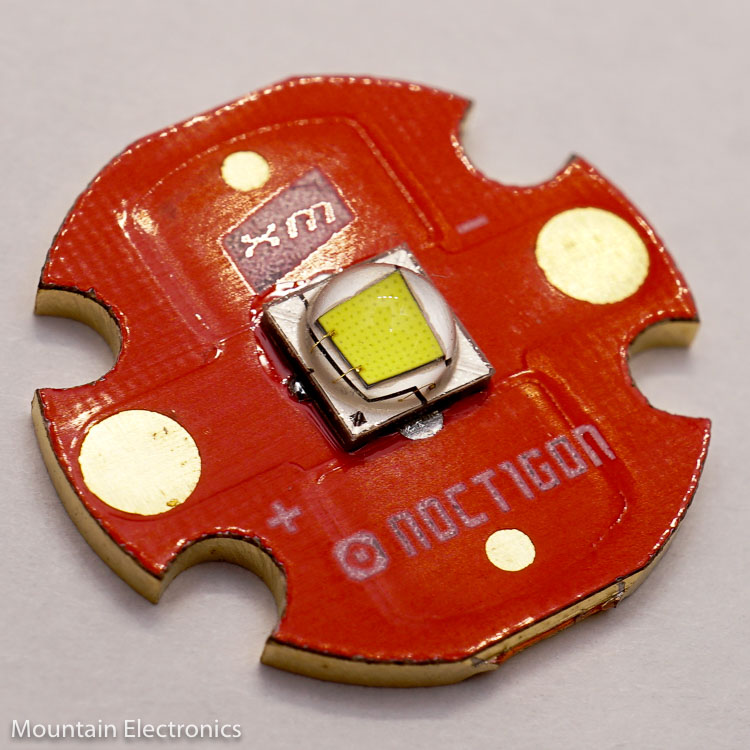
The white thing the LED is mounted on.
Here is a good video on reflowing a LED

You will not remove the led from its board. That is quite complicated.
You want to buy a led mounted on a new board. I thought you were trying to get the 3v xhp50.2 led? If you want a SST-40 then order from this US store.
http://www.mtnelectronics.com/index.php?route=product/product&path=60_130&product_id=879
He will mount the led on a board for you. The board is a mcpcb or metal core printed circuit board and is sometimes referred to as a star. You will need either the 26mm or the 31.5mm I can’t remember which.
This is the complete unit.
You have to be able to solder to do this repair and your iron has to be strong enough to undo and reattach those 2 wires.
I assume you can test like that. I don’t think the old LED will interfere.
I think it is 32mm
I don’t think MTN has the 3V 50.2
He said he is okay with a SST-40 which they do have on a 31.5mm board.
MTN does not carry 3v 50.2 yet.
The board may not be an exact fit.
I got a 32mm board from him with a 70 6500K mounted
I put it into a S70S, but it was very slightly too small for the screw holes to line up. So I had to mess with it to get the LED centered. But the centering ring holds it in place so it works OK.
Interestingly I put an L6 SMO into the other S70S, and it works great no donut hole. But it did not give a good beam in this light, went back to the OP which works awesome with the 70 (not .2). Just slightly less throw than the light with the 70.2 and SMO.
The board may be slightly thicker or thinner resulting in the beam difference. The LEDs APPEAR to be identical dimensions, but it may have to do with internals.
I have a spare star with a 70.2 6500K that I was going to reflow into this light, but I am happy with the current result.
Wow, I’ve learned quite a bit now, thank you all.
I had no clue the led is suppose to just sit (flow solder?) on the star/board with copper heatsink as 1 piece. I honestly didn’t know what I was looking at either ![]() Now I know.
Now I know.
I tested the board/star with a spare led from the leads it works, I turned it ~70% or so (guesstimate by lowest and turn it on, then holding it for a few seconds) the spare led was able to light up and this time it was quite bright.
now my options are
- replace the star w preinstalled led, easiest as it just requires me resolder it and call it a day
- try to find led and reflow it on the existing star/board, this is more difficult as it requires me to remove the star, reflow the led, then resolder it back on. All seems easy enough, but I’ve not done this ever.
Looks like mtn elec is OOS, but banggood has it and its an exact replacement, this is probably going to take a while to ship from china ![]()
looks like a direct replacement
Just order the part. It is an easy fix.
And then use the bad part to learn to reflow!
Don’t forget you need thermal paste also.
Reflowing is lot harder than soldering plus we don’t know if he has the tools to reflow, probably not. Remember, he’s not an advanced modder, but a complete beginner. I was modding 2 years before I bought a hot air station and tried reflowing.
He can reuse the existing thermal paste as long as it’s not dried out and chalky.
I have done three reflows using a soldering iron I bought on Amazon for $29.
All have been successful.