Thank you, guys ![]()
This light is often offered in the sales section of the TLF. Just in case anyone is looking for it desperately.
Thank you, guys ![]()
This light is often offered in the sales section of the TLF. Just in case anyone is looking for it desperately.
wow very cool gchart!
I decided to try an ammonia forced patina on my copper Olight i3t.
It was a spur of the moment decision after I absent-mindedly rubbed it with a rust eraser and wasn’t happy about the bright patch. I definitely could have done a better job with five minutes of prior research and preparation, but in the end I didn’t mind the result.
More photos of the process here: Olight i3t copper ammonia forced patina - Album on Imgur

I think its cool, and if you dont like it, just polish it.
First [light] mod at the new place! WF2 in a BLF D80 V2. This is on my barn varmint gun. I’m super happy with throw, it’s doing 128kcd but I have no way to measure lumen output. No centering ring for proper focus, just 2 layers of kapton for electrical isolation.

I’ve got more of the WF2’s, gonna toss one in the X6 on that 9mm Camp carbine, it’ll serve as the garage varmint gun (cause I’d rather not shoot 5.56 in the garage / next to the house). I’ll be happy if I get 90-100kcd from the X6 when I can get some spare time to swap it.

TrueRMS, nice job with the WF2, looks centered to me. Looking forward to seeing some beamshot in the X6, I don’t have “flats” in any light yet.
My mod today, an Olight i5T.
I like and carried the Olight i3T since it first released, so I was excited when the i5T was announced and picked one up during the first Olight Covid-19 charity drive. It was pretty much what I expected, a larger longer running AA version of the simply forward tail-clicky 2-level i3T, nice. The only thing detracting from this excellent light was the green tint-shift, so I decided to tackle an emitter swap.
I replaced the original cool Osram P9 emitter, which is a nice clean/cool white tint by itself (when viewed without the optic/lens in place) but as mounted in the i5T with the optic, suffers from green tint-shift. Perhaps it was an action-reaction thing with the cool white because I decided go in the opposite direction with a warm LH351D 2700K emitter for this reflow.
On the photo left is the view of the inside of the i5T with plastic lens and optic removed. The lens is press-fit so there’s no easy way to gain access without sacrificing the lens to get at the emitter inside. Similar to the i3T, Olight once again used a wireless post-through-the-MCPCB method of mounting. Clean looking but tricky to re-work.
On the photo right is the final light with warm LH351D installed. I salvaged the lens the best I could with repairs using optical epoxy. I have a glass replacement lens on order and will replace it later.

This was my first installation of such a warm emitter. For those desiring incan-like color temperature, the LH351D did not disappoint. Here is a comparison of the 2700K LH351D (on the left) with a real Surefire incan P-61 (on right); a 5000K neutral is on the bottom between the two for reference. The wider hotspot from the optic gives the illusion of the beam being slightly warmer/more orange than the focused incan hotspot. Frankly I found it a little too warm and may opt for something in the 3-4.5K range when I replace the glass.

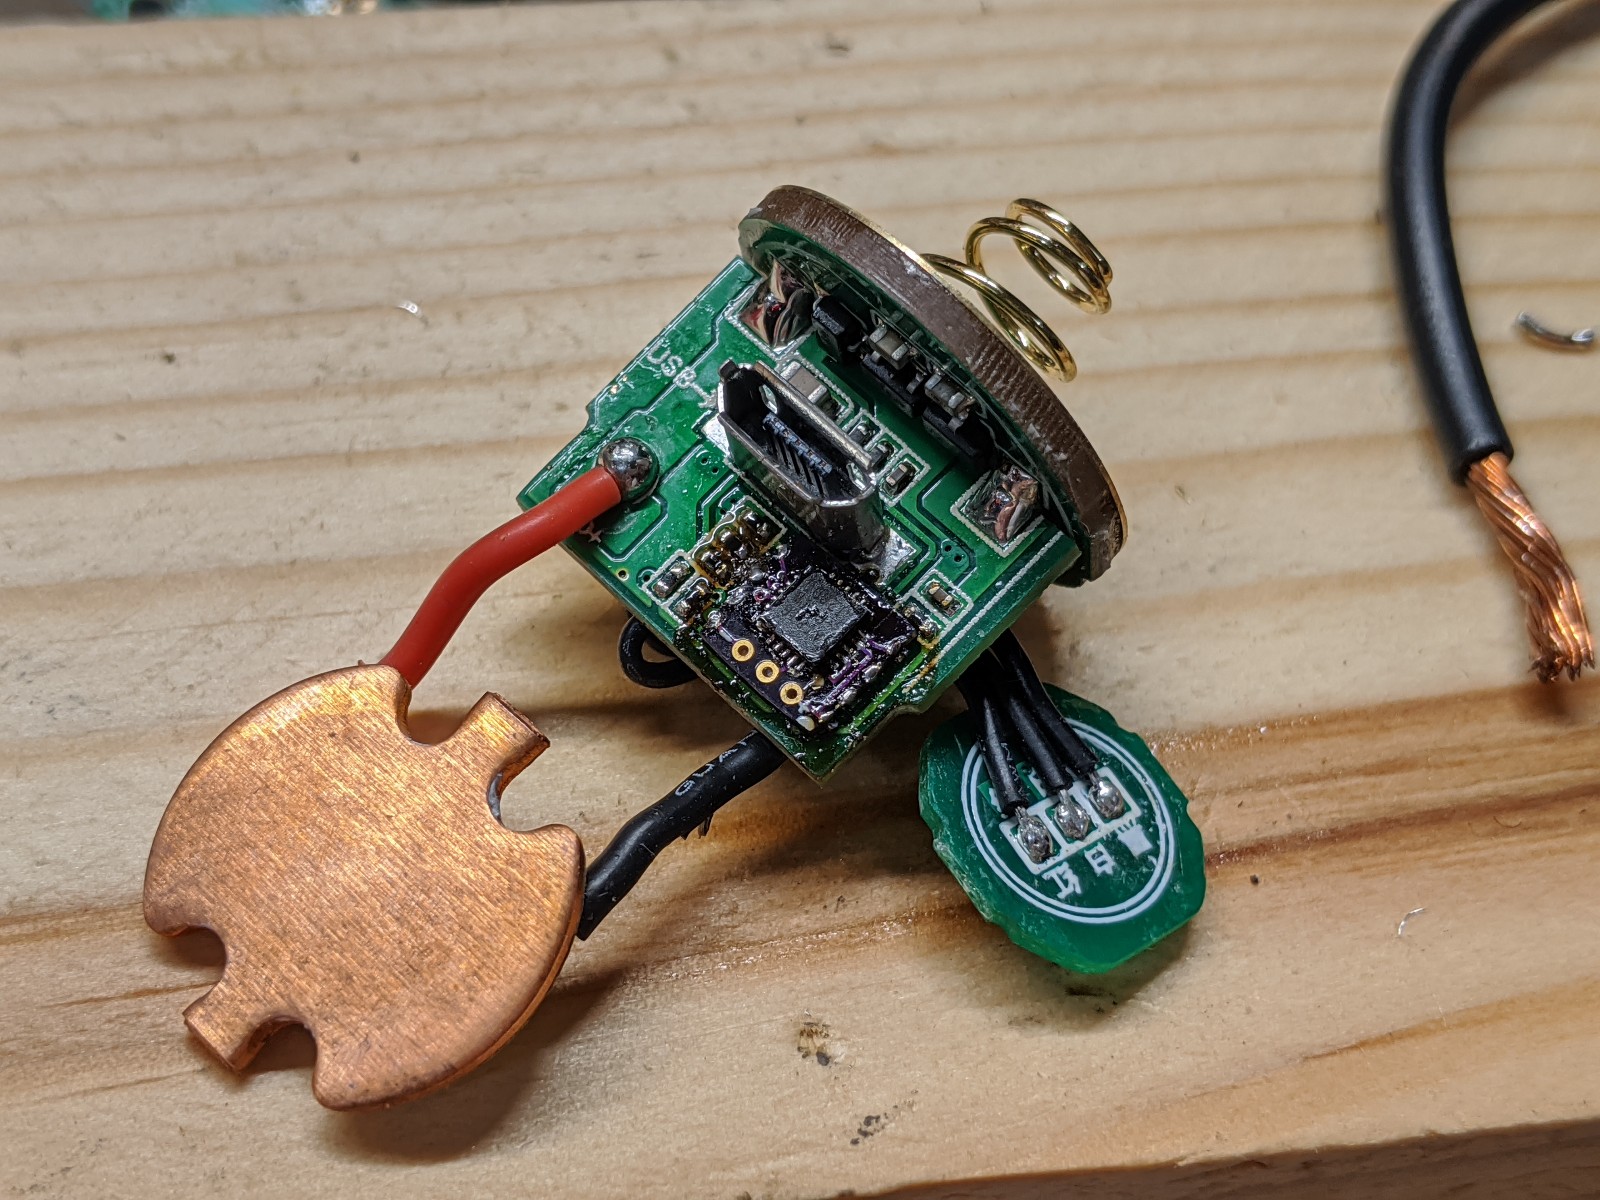
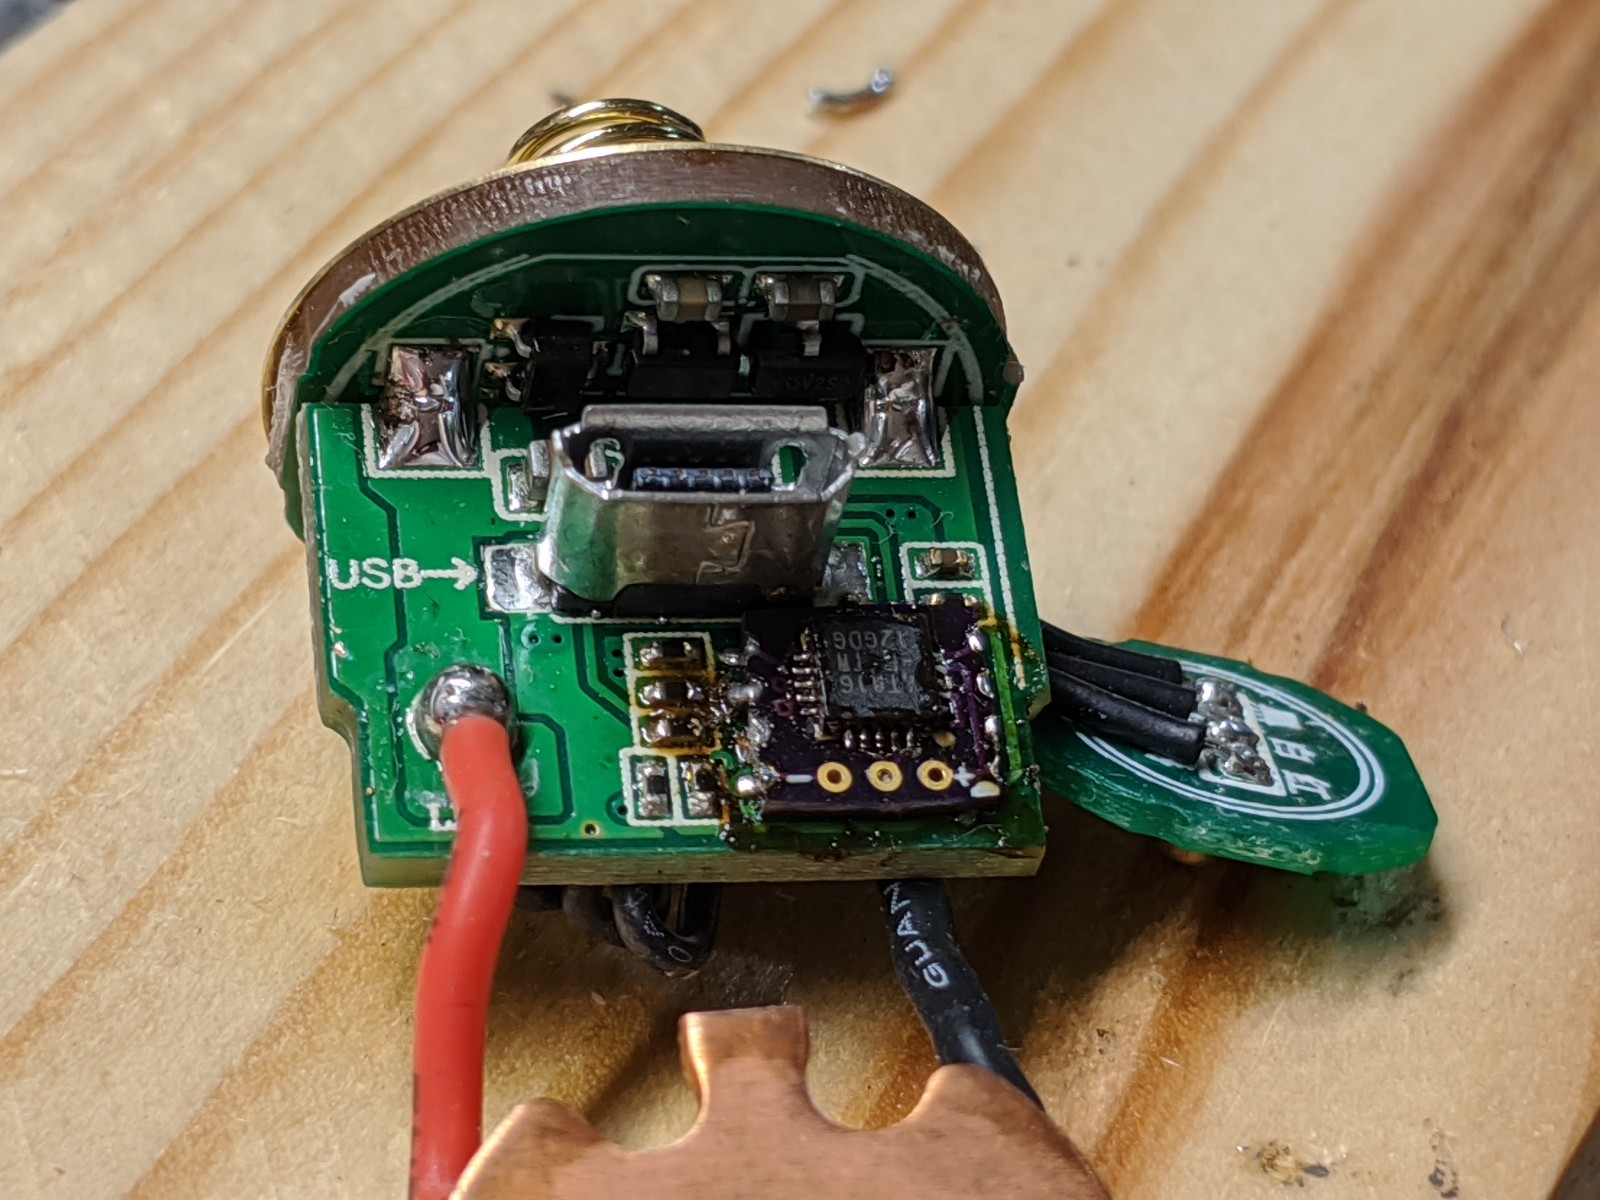
(Continuation from post 9028) Eureka! So, the TO50R driver must have been monitoring current where I had tapped into the ground. I found a true ground connection and now moonlight works again!
Congrats. Really nice, I wish I could do this kind of magic. And thanks for showing the innards. Maybe that justifies the breathtakening prices Wuben takes.
Agreed. At first I thought Wuben’s prices were nuts. But that driver really shows that they’re not messing around. They have been in business for almost 40 years which is pretty respectable for a Chinese flashlight company. They’ve certainly got experience.
Nice work pc_light. I’d like to do the same but I’ve never been game to crack open an Olight before.
Do you have any more photos of the process, and could you post a link to the replacement lens?
I didn’t take any in-process photos, I just dove in not sure what I would run into. Before I realized it, I was done.
I can describe the process. I drilled two tiny holes into the plastic lens on opposite edge/sides about 1mm deep. Then used some fine nosed tweezers to work the lens off. I used dual holes in case I needed to twist but as the lens wasn’t glued, perhaps a single hole would have been fine. In any event plan on replacing the lens when done, it’s soft plastic and would be impossible to extract without damage.
The lens measures about 0.8mm thick by about 15.7mm diameter. I ordered from ebay. The sizes available were 15.5 and 16 mm and I ordered the 16 thinking I could sand it down. If I were to re-order I would get the 15.5mm to eliminate the need to sand and simple fill any difference with adhesive (duh), We’ll see when the lens gets here if its worth the effort to reduce, otherwise I may re-order the 15.5mm.
The i5T is currently in active pocket rotation and the warm tint is great for night time use but I’ve decided I might like 3-4K better.
edit:
—————-
Follow-up. I had to sand the glass down to 15.5mm for fit, but in the end during install I still managed to crack the glass. Because of press fit I’m convinced that only a plastic lens will work.
After weeks (months) waiting for some things to arrive (a pack from Simon, at Convoy, and a pack from kiriba-ru), they arrived last friday.
So, I started working right away.
First thing I did was to finish a mod that I started and that went wrong some time ago: turn my Blitzwolf BW-ET1 into a 2x14500 flashlight with Anduril and 6V XHP50.2.
The story stared here and didn’t go well, as the LED burned (I didn’t use DTP MCPCB by that time).
Now, I ordered some *16mm DTP MCPCB*s from Simon and reflowed a 5000K H4-3A XHP50.2 (also from Simon) into one.
This was the final driver structure:

As for the LED, althouh I didn’t take photos the reflow and final soldering , I used a filed 16 x 1.5 mm old copper DTP MCPCB to help on heatsink. I put thermal paste + copper + thermal paste + MCPCB w/ the XHP50.2. I used a 5050 gasket and an+ OP reflector from the On The Road M1+ (I prefered the OP due to the tint shift that the original SMO reflector would aggravate even more).


I didn’t take beamshot, but it has - obviously - a shift in the beam ![]() . I will get a 3000K led to fit there
. I will get a 3000K led to fit there ![]()
Now I just need to get some longer button top 14500 cells to fit well, as the 2 button top I have are small (Sofirn 14500 900mAh) ![]()
I also received a +Convoy S6 +host from Simon and a S2/S6 triple spacer from kiriba-ru!
So, I joined these with the 17mm driver with Bistro HD OTSM from Lexel and the triple aluramic MCPCB with 3 x Luxeon V 4000K 70 CRI from led4power (that I picked as prize from the OL Contest 2019 ![]() ) and a aqua blue GITD gasket from CRX, and put this together
) and a aqua blue GITD gasket from CRX, and put this together ![]()
![]()
![]()
I only feel sorry (meaning: pissed off ![]() ) because I thought I could do a 18350 S6 as seen here and here with an Astrolux shorty tube, but it didn’t fit in the tail of the S6
) because I thought I could do a 18350 S6 as seen here and here with an Astrolux shorty tube, but it didn’t fit in the tail of the S6 ![]()
Actually, the tail of the S6 didn’t fit in any of the other Convoys I have. The head, however, and fortunately, fits in the 18350 tubes from the S2+ ![]() Meaning:I’m not pissed off anymore
Meaning:I’m not pissed off anymore ![]()
The clip is a regular “screw-in” pocket clip and was “flamed” to become more blue ![]()
BTW, the spring mod was inspired in this thread/post from Bocian ![]()


BTW, this is a HOT rod!!! My go-to hot rod ![]()
![]()
(I’ve calibrated the temperature already, otherwise I’d burn my hands ![]() )
)
Nice work MB!
Today’s mod is a work-in-progress.
I wanted to (1) test out my PIC to Attiny816 board and (2) get the recently ported Anduril for the AVR 1-series into an actual flashlight.
So I tried fitting it all together into a spare SC31B I had sitting around. I’m 90% there. I have 2 outstanding things that need addressed:
Sorry for the crappy soldering job, some of these close-quarters mods are frustrating and tedious.
To be continued…
i burned out the driver in my nitecore mh41 and since the led was damaged i ordered the cheapest xhp50 and driver combo i could find.i was posted the 5 mode driver though iirc i ordered the 3 mode. the damn thing changes mode whenever its powered on though. here’s a link if anyone has any experience with it. i’d love to disable the strobe if i could.
https://www.aliexpress.com/item/32975900309.html
Thanks gchart ![]() And…I don’t know what kind of black magic you’ll be doing there, but it sound fun
And…I don’t know what kind of black magic you’ll be doing there, but it sound fun ![]()
I damaged a driver from the SP32A and I may try to mess with it some time, but not in that way (as I wouldn’t know how to do it :zipper_mouth_face: )
I don’t have any experience with that flashlight or the driver you linked, but…I wouldn’t put much trust on it!
There’s are some store that seem to have nice drivers, with better user interfaces:
https://mantaraylights.aliexpress.com/store/113294/search?SearchText=driver
https://www.aliexpress.com/store/708513/search?SearchText=driver
https://convoy.aliexpress.com/store/330416/search?SearchText=driver
I would rely more on the quality of these stores :+1:
Or you can ask Lexel to make you a driver. Not as cheap as the combo one you managed to get, but certainly more reliable and with much better UIs :+1:
Looks amazing. Great work, MB! :+1:
thanks for the links, but i think i’ll wear out my driver first.
Oh man, I’m so happy! Today after two years of lurking here I did my first mod! It’s nothing really complex, just an old s2+, a copper pill from kiriba-ru and an A17-dd driver.The reason I’m so happy is that it all went well and I FINALLY have a flashlight with moon mode!!!Now I get it guys, why you go to such lengths to mod your flashlights, this was such a satisfying experience!!! Now on to mod everything I got!!!
!https://i.imgur.com/pSLHBpP.jpg !


And that’s the power of BLF and mod friendly hosts such as Convoy, and off course, your own input