My experience with them is you get a phony tracking number. It never shows your package leaving China . Sometimes you eventually get the order and sometimes you don’t .
But for some reason I keep making purchases .
I need some advice re my SP33 V3
2 questions.
1. The blue pilot light worked fine at first, going off after 5 secs but then stayed on. So I removed battery to reset firmware & all is back to normal. Anyone come across this ?
&
2. When charging the pilot light flashed red as it should but then after a hour or so it switched to blue for 1 sec & then back to flashing red. This was repeated. Could this be a fault with the charging circuit, the battery or just that the charging is very close to finishing. Battery is a new 26650 from Sofirm. I removed the battery & finished charging on a external charger. Measured 4.20 afterwards but forgot to measure after removing from SP33.
Suspect the problem is with the battery. I’ve got two SP33 V3 flashlights and no matter how long or short a period operated, both of the Sofirn 26650 5500mAh cells with which they came read 3.8V on my XTAR VC4S chargers upon insertion. Their measured voltages then swing up and down repeatedly until finally reading 4.2V dOne.
No such charging irregularities after draining down my 26650 5500mAh Vapcells in either the SP33 or Astrolux MF01 minis. Have also recharged the flashlights directly from their USB C ports but never kept an eye on the power indicator whilst charging.
@andychrist Thanks for your comments. I have 2x Sofirm 26650, one 5500mAh (came with the SP33) & one 5000mAh ( the suspect one) Will keep a watch on this one. I guess I will look for a better quality 26650. Probably only need one as the SP33 is my only 26650 flashlight.
Placed an order for the V3 only to find out it was using FET drivers. Am buying based on Zeroair review on the V2 which has regulated output , the high(approx 1200lumens) maintain flat regulation for 2hrs which is impressive. The place I bought only hv v3 in stock. :(. Anyone actually do a runtime test on High? How long do they last?
Haven’t done a runtime test. Just wanted to chip in and mention the V2 High was only 920 lumens, not 1200.
V3 High is 1500 lumens so it definitely won’t be as long. V3 has Ramping so it’s better IMO
I just want to mention that on the V3 the High output may start at 1500 lm (I’m not sure the actual number), but it will slowly go down as battery voltage drops. That is a trade off of the FET design and it’s brighter Turbo.
Note that the old v2 (“2500” lumens) is the one using XHP50.2 6-volt LED and regulated output.
The newer v2 (“3000” lumens) looks physically the same as the “old v2”, but now uses XHP50.2 3-volt LED and use FET (but seems to be limited a bit in the max output compared to the FET of v3).
Posted this in another SP33 V3.0 review thread:
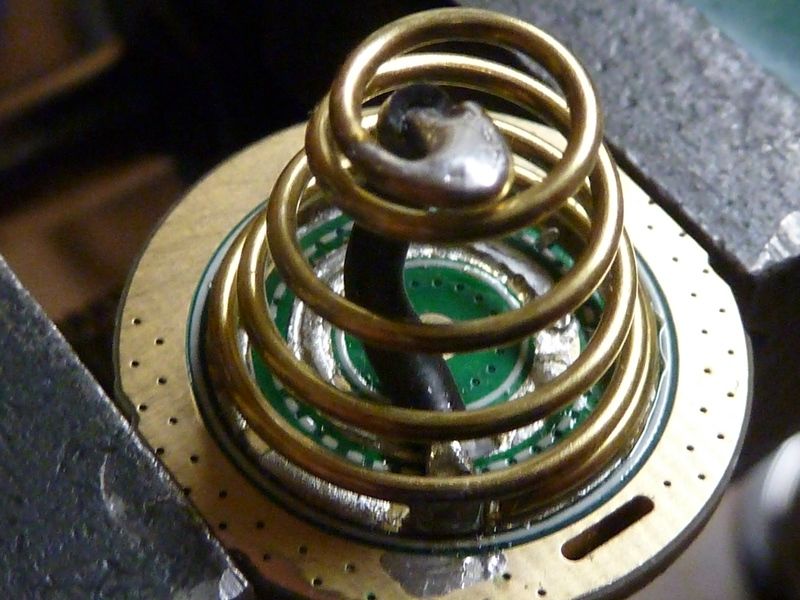
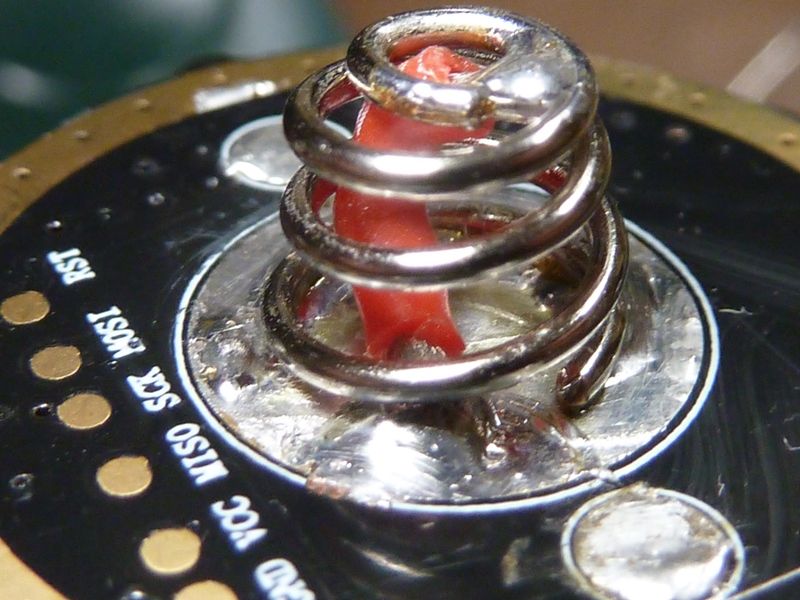
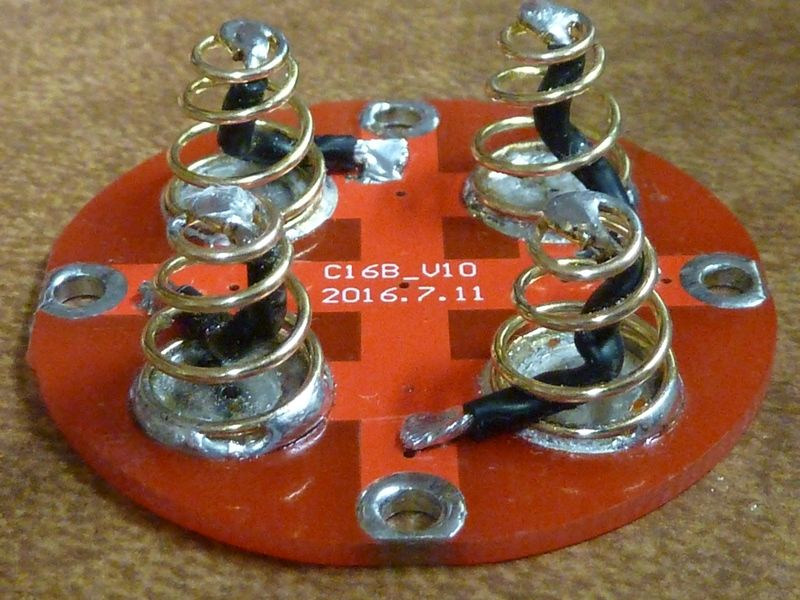
Interesting fyi, I added 22 AWG wire bypasses on the springs (short ones in the center of the spring), and got ~ 25% boost in lumens and candela.
Measuring amps at the tail, on a charged up 40T the amps went up from 14.7A to 16.5A, but that's only seeing the bump of the bypass on the driver side because my amp measurements are with the tailcap off. I did the before/after tests with both a 40T cell and a red Dolidada 5500 26650 and saw about the same percent bump. These springs are not high performance, accept maybe for their thickness but they are not low resistance. The bypass on the tailcap spring probably made a greater difference in amps based on the lumens/throw measurements.
"nnnn-nnnn" below is "at start - at 30 secs"
Before After
Sam 40T 4390-3890, 32.5 kcd 5340-4790, 40 kcd
Dolidada 3530-3270, 27 kcd 4450-4180, 35.5 kcd
Hey Tom E How about a couple of pics of the bypass as to what you did ? Sounds interesting.
Can't right now but standard bypasses, I've done dozens, taken/posted pics of many.
SP70:
FT03:

Q8:
Thanks from me, too. Difference is, the SP33 spring is not soldered. But then, one cannot accidentally desolder it.
Yeah, but I've added bypasses on many unsoldered springs and always get a boost. I do cleanup the contact surfaces though, clean with isop. alcohol then applied a light coating of NO-OX-ID. Dunno for sure it makes a difference though. Was think'n of using 20 AWG, could have, but the 22 is easier to work with and hopefully should last longer with better flexibility. These are classic budget springs, unlike Hank's lights or FireFlies. Even the Haikelite's and the better Astrolux's use double spring for their high amp setups.
It's just something to look out for. They got a high performance driver in there so I knew there had to be something else suppressing the amps/output. They got a nice MCPCB, so for high amps, it's got everything except the springs.
Actually look'n at my notes, I got a nice bump on the EC01, though not as dramatic, maybe ~15%.
Interesting. I don’t see a way to do this on the SP33v3… There is no switch in the tail cap so there’s no exposed circuit there.
I added a bypass on the Sp33V3 tail spring. You can pop out the spring - usually just a good pull gets them out - there's nothing holding it down except for a slight recess at the bottom. The you solder a wired from the top (usual) to the bottom rung of the spring, keeping the bottom rung flush on the bottom. I've done many of this type as well.
I assume it’s not much different from bypassing the “springs sprung into a tailcap” seen on many E-switch lights. I recently was briefly confused by it on my Boruit D10.
Another goal I’ve had with my more recent spring bypasses has been to try to fill-in the top hole of the spring, when practical. I noticed MTNE drivers, if purchased with a bypassed spring pre-installed, are done this way and I like it for the possibility of reduced contact resistance. I know if I really cared I should put a brass or copper contact pad at the top instead…
Yeah, I haven't used the buttons on springs, but I do try to fill in top hole. I'll use a small file to flatten out the top. Also for a tail spring like this, there's usually extra solder bumping out on the bottom and I'll file that out smooth, flush with the last rung, as well. Solder is easy to file down.
Interesting. So essentially this is an additional electrical pathway on the spring… and somehow this provides a little power boost. Very curious. It makes me wonder why flashlight makers don’t fashion a spring with a wire connector like this by default, so they can claim even better specs.
It’s handwork, it reduces spring travel, solder may scratch the battery terminal. Many reasons. Maybe better to use double springs, don’t know. I’ve seen a nice solution by putting some copper wool into the spring. If it was copper wool, that is.
Edit: I’ve seen a Sofirn with bypassed springs, IIRC.