Sadly no. I’m thinking about pulling out the driver once, attach some wires and a connector that fits through the hole for the switch. This would allow one to update the firmware by screwing off the switch bezel and pulling out the switch PCB.
With the Sofirn SC31 PRO flash-light off and the LEDs in the switch turned off too there is a parasitic current of 0,04 mA and regular peaks of 0.23 mA.
See

Is that normal?
Sounds normal to me. The microcontroller wakes up several times per second (and even in power save mode needs some current) and the ADC measurements for low voltage protection need more power (IIRC that’s done once per second).
Whoada. That's some nice equipment!
Haha! I was thinking the same.
Edit of #199: As many know, the A6 clip is great for clipping to a cap visor, too... I might be changing my clip preference!

Ok, this is a picture of all my favorite clips & EDCs with an SC31 in there somewhere. (L-R, Emisar, EagleTac, Convoy, A6 & Nitnumen)

Here is my clip solution , It is a silver clip I had in the parts bin , it is exactly the same as the standard black clip but in plain stainless steel , Not sure where it came from? Maybe off another light or Banggood??.
Cut it down and reformed the end for a reasonable shape ,I quite like it ,would prefer a deeper pocket fit I guess , What do you think?
That looks good! It looks like it may have been a Sofirn clip.
Is it possible to pull the driver down and attach a SOIC8 clip to update Anduril without removing the bezel for the reflector or desoldering?
I managed to remove the rubber switch cover with my fingers and then used circlip pliers to remove the switch bezel.

Notes for flashing the SP36:
Could the same be done with the SC31 Pro? :student:
I.e. Press down on the positive wire? ![]()
.JPG)
You know, the usual way is the other way around: First unscrew the bezel, then remove the switch cover. ![]()
Yes, it should be possible. I will try it with a pogo pin adapter when I have time.
Does this light have a fet reduction in the firmware like the Emisar D4 with Nichia leds which has the fet limited to 80% if I recall it correctly?
Full fet for the SST40 seems a bit like overkill.
Does anyone know where else can I get the 18350 tube? Sofirn shops seem to be out of stock.I messaged their CS and they said maybe 2 weeks before they restock.
I could just buy an sp40 I guess, but that seems excessive. Even if it is a good deal of a light.
Full FET is OK if the resistance of the circuit is high enough.
It uses the firmware of the SP36 so it should have full FET. I just checked it with the scope and it is indeed fully enabled.
Good to know. But I guess it’s not very efficient then.
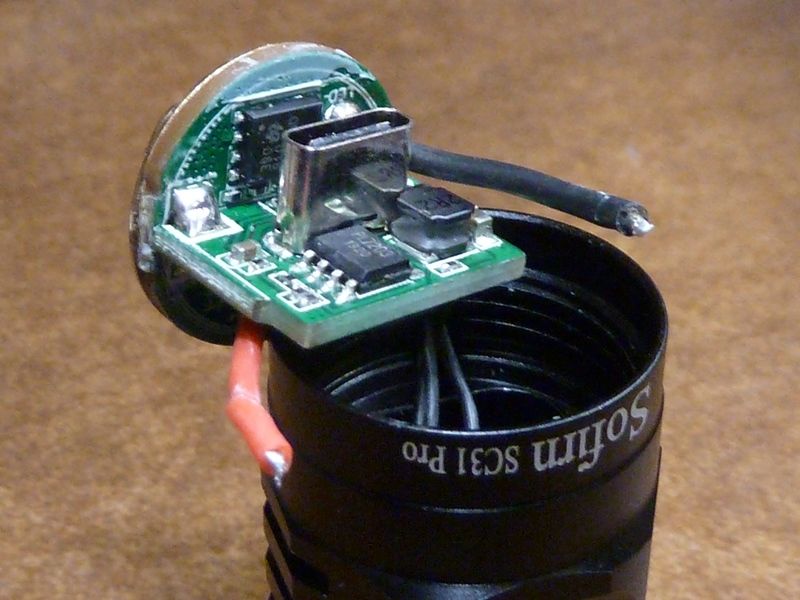
I'm not clear on exactly what the questions are above, but the stock wires appear to be ~24 AWG and are too short to pull the driver out and get a SOIC-8 clip on the MCU. My plan would be to replace them with longer 22 AWG's - think it should fit and allow the re-programming without de-soldering the LED wires. The switch wires appear to be just long enough to allow this, as shown below:
lol ![]()
I tried to remove the bezel with circlip pliers first but I slipped and scratched the bezel. I then just tried to rip the cover out with my fingers and it worked. :innocent:
Wait 2 weeks and buy from their official website? ![]()
If you want an SP40… it’s a nice way of getting an extra 18350 tube.
Thanks! I was thinking of trying to push a SOIC8 clip through the switch hole to reach the MCU as a backup plan to avoid soldering. I’ll probably end up swapping the emitter anyway… but it would be useful for those who just want to update/change Anduril.
To be able to pull the board down to reach the MCU, would you need to do the following?
- Remove the bezel with some straps, a vice and heat
- Desolder the 24awg wires from the PCB with the LED
- Pull the board down by pulling on the spring
This is close to what I did, but:
- removed the bezel by clamping the head in a vise, cushioned by pine boards (no damage)
- either I used my sticky blue gloves, or used a strap wrench - seem to recall it came off fairly easy, no heat used (sorry, I mod a lot of lights and lose track of details, and had no notes)
- de-soldered the LED wires form the MCPCB
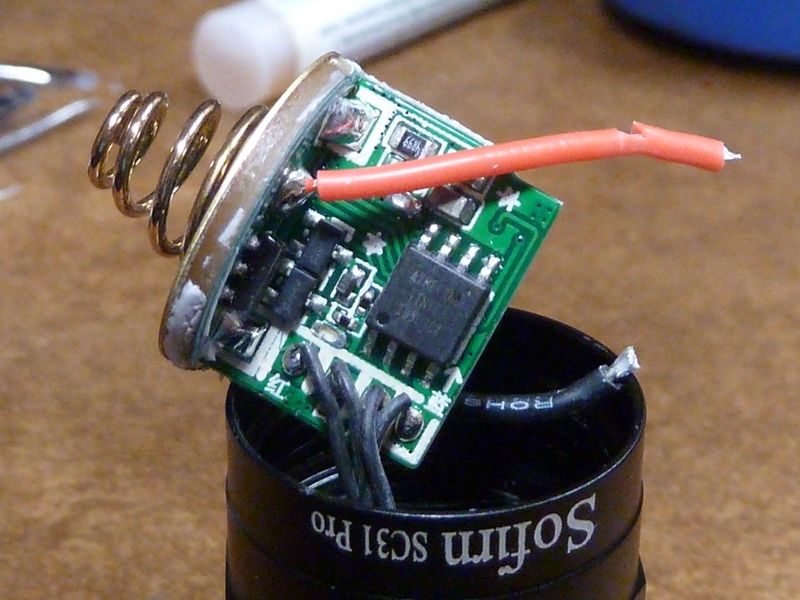
- using a solder pick, pocked it thru the Batt+ LED wire hole in the shelf, try to feel I'm not sitting on a chip, applied steady pressure til breaking the glue bond holding the driver in
- then pulled the driver down by the spring
You really can't fit the clip thru the switch hole, plus the MCU isn't right there to access.
Finished my mod today:
- replaced the 24 AWG with longer 22 AWG wires (so I can re-flash without de-soldering)
- replaced the stock 6500K SST-40LED and 17 mm MCPCB at 1.5 mm thickness, with a 5000K SST-40 on a 16 mm Noctigon (slightly thicker at ~1.6 mm)
- sanded the shelf MCPCB contact surface out to 2500 GRIT, applied fresh MX-4
- tossed the set screw used to keep the stock MCPCB from turning (Noctigon didn't have the cutout to support it)
- re-flashed with Anduril2
- 22 AWG bypasses on the tail and driver spring
It now measured 8.1 amps on a 35E cell at 4.20V. Max lumens and throw is about the same as the stock light did on a VTC5D cell. For the heck of it, tried a 25S at 4.17V and read 9.0 amps, only about 75 lumens higher.
The lumens on the 35E initially is 2310 (Tom E), 2040 calibrated. It drops pretty quick. It really is more amps and heat then the SC31 Pro can handle.
The 5000K tint is an improvement, least from what I recall...