Hello everyone… Today we will see the Olight Marauder 2: powerful barrel torch with double beam (flood and throw) and with a maximum power of 14000 lumens.
The flashlight can be purchased on Amazon at the following link.
.jpg)
.jpg)
.jpg)
Introduction
The Olight Marauder 2 is an updated version of the Marauder X7R. The differences and with the previous model are quite evident both in terms of the optical sector and in terms of performance and features. The lines and design have remained quite similar: size of a can, head enlarged with respect to the body, non-removable battery pack.
The Marauder 2 has a maximum output of 14,000 lumens and allows the user to choose between a flood beam, to illuminate everything in the vicinity, and a throw beam, particularly directional to be used for long distances. It has a thermal sensor, a proximity sensor and cooling fins to ensure maximum safety in case of overheating and obstructions. In addition, there is a retractable bi-directional typeC charging interface inside the tailcap and which therefore also acts as a powerbank.
The rotary switch, the charge and level selection lights make the user interface simple and intuitive to use. But let's see it in detail… happy reading !!!
Packaging and content
The Olight Marauder 2 arrives in a beautiful white rigid cardboard box with magnetic closure with all the main features of the product printed on it. Inside, we find the torch immediately and in plain sight. On the side, inside a box, there are all the accessories.
The packaging as a whole includes
• Olight Marauder 2
• 30W TypeC charger
• European adapter
• USB-C charging cable (C2C)
• User manual
• Wrist strap
• Internal and non-removable battery pack consisting of 3x21700 5000mAh (54Wh)
.jpg)
.jpg)
.jpg)
.jpg)
.jpg)
.jpg)
.jpg)
.jpg)
.jpg)
.jpg)
.jpg)
.jpg)
.jpg)
.jpg)
.jpg)
.jpg)
Technical specifications
• It uses 12 LEDs for the flood beam + 1 LED for the throw beam
• Max beam intensity: 160000 cd (L7 spotlight) - 50625 cd (L7 floodlight)
• Max distance: 800m (L7 spotlight) - 450m (L7 floodlight)
• Max Output: 14000 lumens (L7 spotlight) - 850 lumens (L7 floodlight)
• Bi-directional USB-C charging interface
• 3x Battery 21700 5000mAh battery pack
• Floodlight and Spotlight
• Optical lenses (12 TIR lenses and 1 converging lens)
• 3D rotary switch for level selection and toggle switch for beam switching
• 7 Flood Levels + 7 Throw Levels + Strobo
• Waterproof IPX8 (2m)
• Weight: 750g (including battery)
• Dimensions: 79mm (Ø Head) x 53mm (Ø Body) x 140mm (Length)
The body and the materials
The Marauder 2 is a barrel torch, slightly larger than a can of Coca Cola. Taking it in your hand ... well ... yes, it's heavy, the 750g are felt. Despite this, the handle is really very comfortable. The 5 cm diameter of the body is perfect for me who for example have a medium-sized hand.
.jpg)
.jpg)
.jpg)
.jpg)
.jpg)
The central body is also rubberized, Seeker 2 style: the grip is exceptional both with the bare hand and when wearing gloves.
.jpg)
.jpg)
.jpg)
The flashlight is well balanced and does not tire much if used for a long time. Of course ... after a few hours of use, the forearm and bicep will begin to ask for explanations...XD
.jpg)
.jpg)
The Marauder 2 is a torch designed to go far and to illuminate in an exceptional way in the immediate vicinity. To do this, Olight has equipped it with a head composed of a crown of 12 small LEDs with TIR lenses and a large central LED surmounted by a thick aspherical lens. The result is a Flood beam which at Turbo produces a real wall of light and illuminates daytime up to 200-300m away, and an incredibly directive throw beam with a strange rectangular shape.
.jpg)
.jpg)
.jpg)
Below is the detail of the LED that produces the throw beam. It was a challenge to be able to photograph it through the aspherical lens, I could not do better. There is also a small QR code that I have not yet been able to read.
.jpg)
The lens is made from a single block of plastic and has an anti-reflective treatment. In the center it is slightly rounded and protruding.
.jpg)
.jpg)
.jpg)
.jpg)
.jpg)
.jpg)
.jpg)
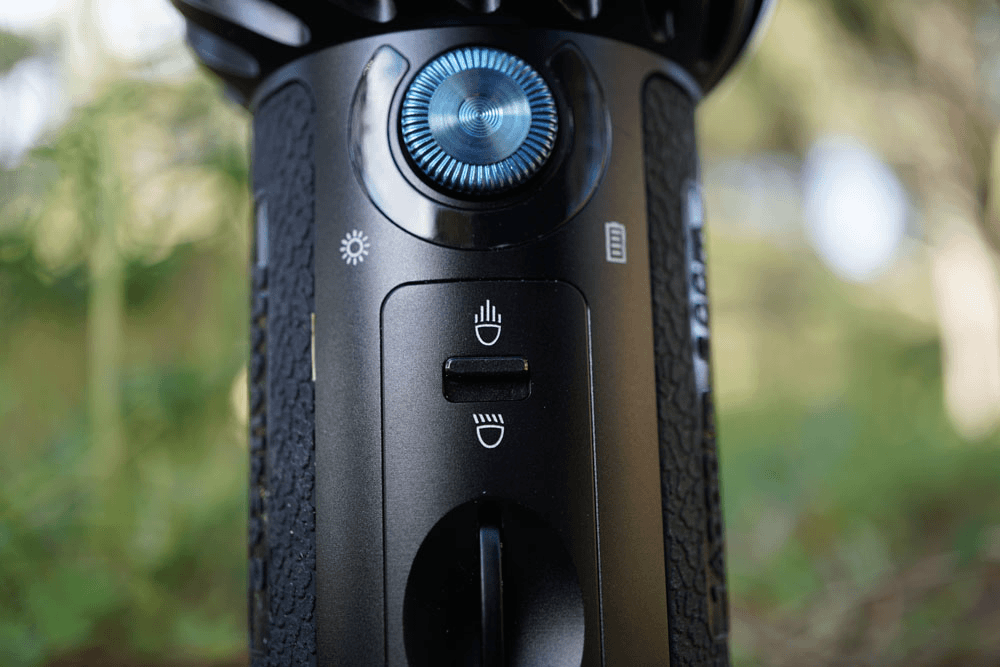
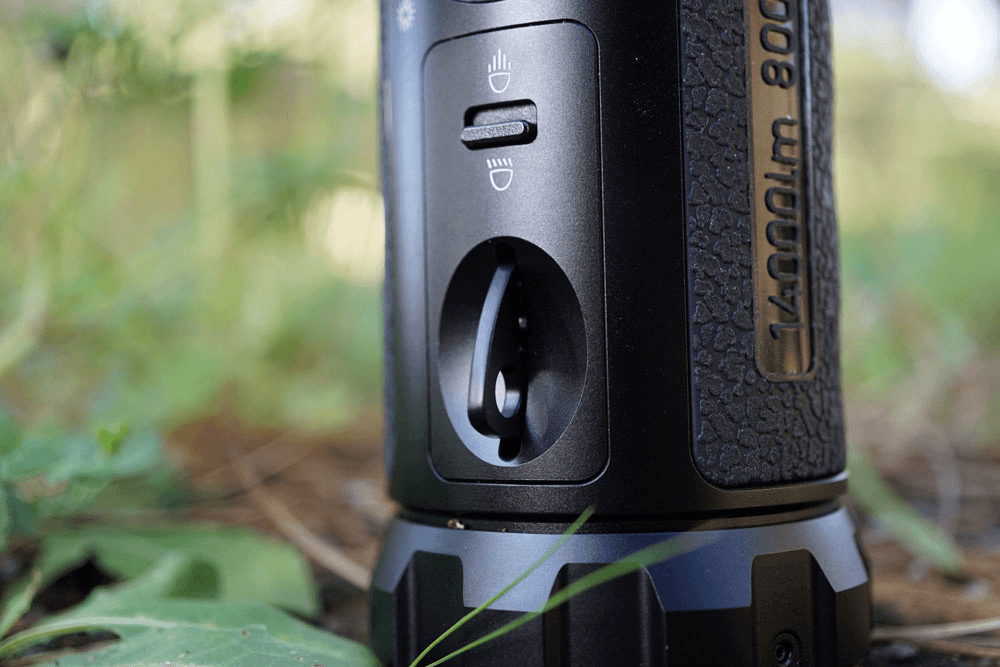
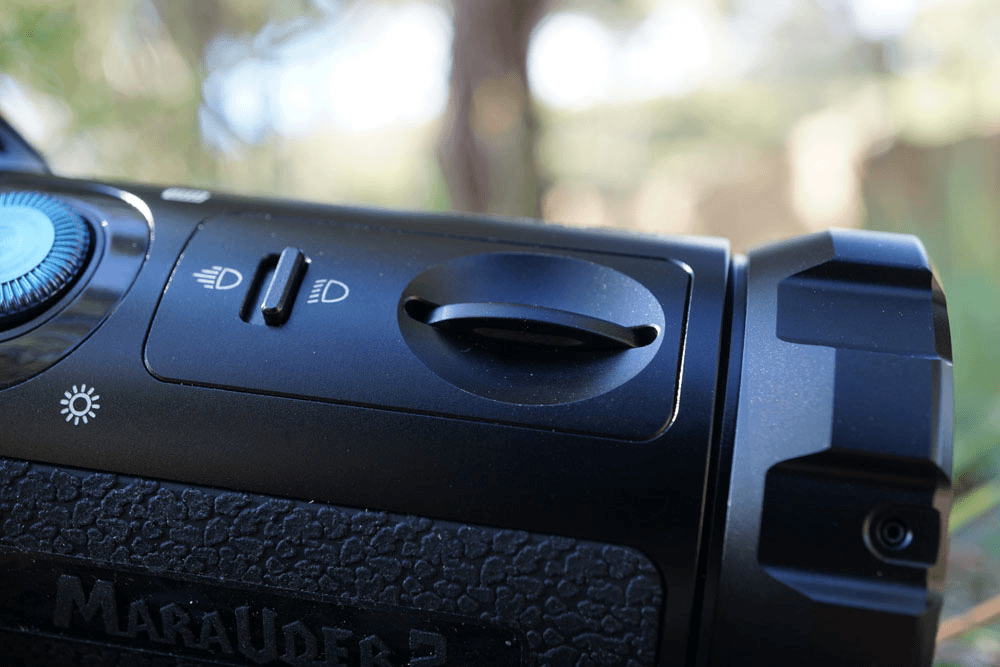
The possibility of switching from one beam to another is given by the presence of a slightly protruding lever placed under the rotating switch. As the drawing suggests, when it is moved upwards, the active beam will be Throw, otherwise it will be Flood.
.jpg)
.jpg)
.jpg)
Olight in his manuals and in the description of the object does not mention the types of LEDs used and I honestly do not understand why. May they keep their secret as well!
The Marauder 2 is equipped with a proximity sensor that adjusts the brightness of the flashlight when obstructions arise in front of its lens. It sits nestled between the head LEDs and appears as a dark dot under the lens.
.jpg)
Olight defines it as a "proximity sensor" but I believe it is simply a brightness sensor made using a photoresistor. In fact, it does not activate at a set distance but activates only when it receives a certain amount of reflected light: this is evident because, for example, if we point the light on black surfaces that are not very reflective, the sensor will intervene at a much shorter distance (10-15cm) than when the flashlight is aimed at highly reflective white surfaces (80cm-1m).
The head has deep dissipation fins with a particular shape. They do their duty really well. The heat dissipation was one of the things that pleasantly surprised me about this flashlight (see runtime charts below).
.jpg)
.jpg)
The electric blue bezel is laced and particularly protruding.
.jpg)
Perfect lettering and anodizing!
.jpg)
.jpg)
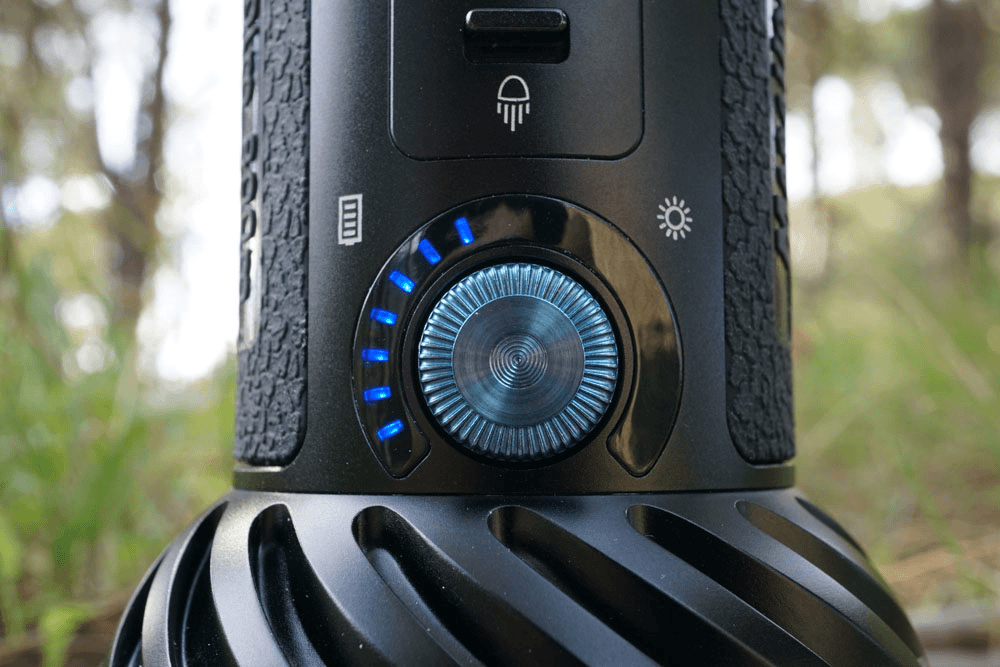
The main switch is rotating and clickable. When pressed it is silent and has a fairly long stroke. When it is rotated, it emits "silent" clicks. Easy to activate with your bare hand, you have some problems in rotation if you use particularly thick gloves.
.jpg)
To the right and left of the rotary switch there are a series of LEDs that show the residual capacity and the selected output level.
Under the switch there is a small status LED that lights up:
• Steady red: during recharging operations
• Steady green: when charging is complete
• Green Flashing: during reverse charging when using the flashlight as a power bank.
.jpg)
.jpg)
.jpg)
.jpg)
There is also a removable ring for the wrist strap identical, if not for the different color, to that seen on the X7R.
.jpg)
.jpg)
.jpg)
.jpg)
.jpg)
.jpg)
.jpg)
The tail is flat and there is no problem using the flashlight in tailstanding.
.jpg)
.jpg)
.jpg)
.jpg)
.jpg)
.jpg)
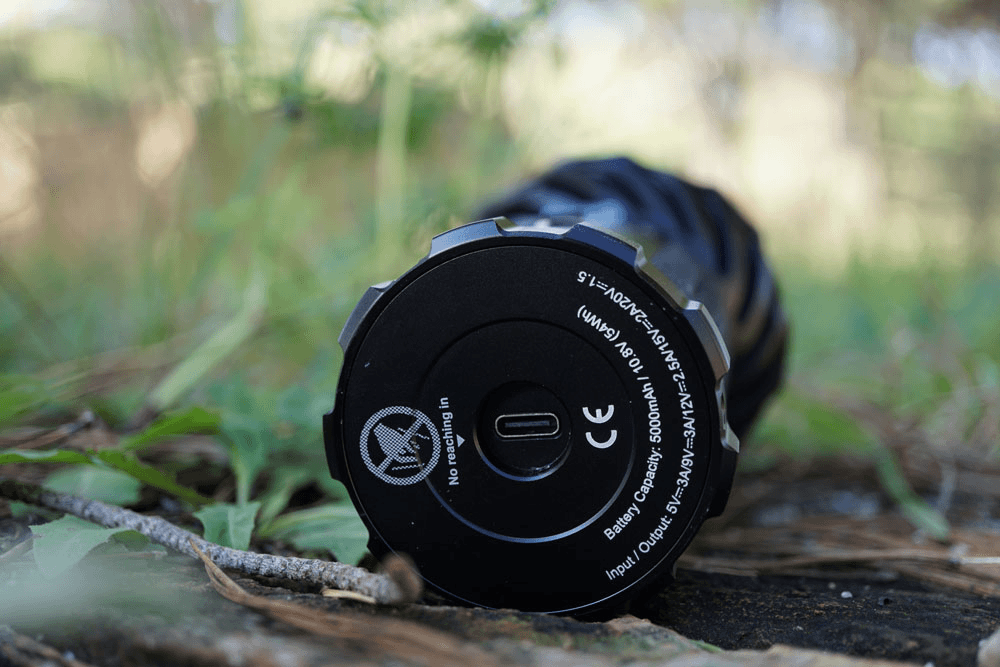
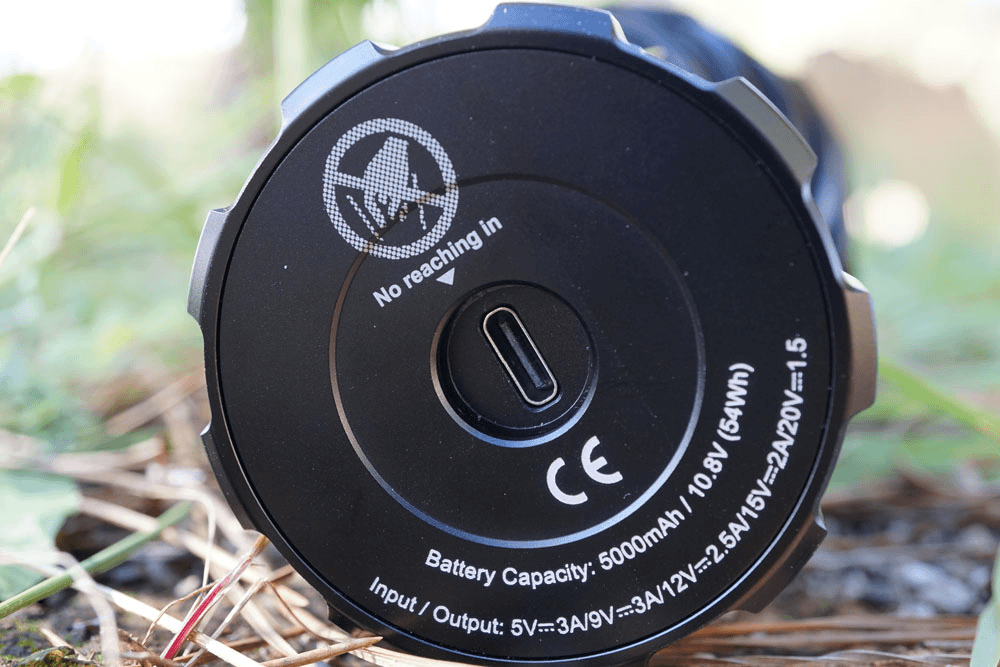
The charging interface magically disappears by rotating the tailcap with a system similar to that seen on the X7R. Olight, in the user manual, specifies that the TypeC door is itself waterproof, so no worries about water and dirt infiltrations. Obviously it is always advisable to keep it closed when you do not have the torch under charge.
The fact of being able to use the flashlight as a real powerbank is very convenient. Thanks to the C2C cable (i.e. TypeC on both sides) it is possible to connect any device that uses this charging interface to the flashlight.
.jpg)
.jpg)
.jpg)
For example, it is possible to charge a powerbank with the Marauder 2 or charge the Marauder 2 via the powerbank!! XD
.jpg)
.jpg)
.jpg)
Compatible protocols: QC2.0, QC3.0, PD2.0, PD3.0, Apple, DCP, AFC
The tailcap reads:
• Input / Output: 5V 3A, 9V 3A, 12V 2.5A, 15V 2A, 20V 1.5A, which I guess are the inputs for charging the battery pack but I'm not totally sure if the same values apply to the output.
• Battery Capacity: 5000mAh / 10.8V (54Wh), so we are faced with a battery pack formed by 3x21700 5000mAh 3.6V in series with each other (3S)
There is no holster in the package, too bad! I would have given up all the accessories supplied in order to have a nice Nylon holster that would allow me to carry the flashlight safely.
Below is a comparison between the Olight Marauder 2 and the Marauder X7R
.jpg)
.jpg)
.jpg)
.jpg)
.jpg)
.jpg)
.jpg)
.jpg)
.jpg)
.jpg)
.jpg)
.jpg)
.jpg)
.jpg)
.jpg)
.jpg)
.jpg)
.jpg)
.jpg)
.jpg)
Levels of Output and Runtime
The Olight Marauder 2 has 7 brightness levels (including Turbo) + 1 special level (Strobo) for both Flood and Throw beam. Following are all the measurements on the various output levels made through a self-built lightbox. The data are therefore to be considered relative to the use of my non-professional equipment and therefore may show differences compared to the real case.
Spotlight
L7: 850lm declared(measured 1050 lm)
L6: 650lm declared(measured 790 lm)
L5: 500lm declared(measured 620 lm)
L4: 300lm declared(measured 380 lm)
L3: 200lm declared(measured 250 lm)
L2: 100lm declared(measured 120 lm)
L1: 50lm declared(measured 60 lm)
Floodlight
L7: 14000lm declared(measured 14560 lm)
L6: 6400lm declared(measured 6410 lm)
L5: 3200lm declared(measured 3300 lm)
L4: 1600lm declared(measured 1656 lm)
L3: 800lm declared(measured 870 lm)
L2: 400lm declared(measured 480 lm)
L1: 200lm declared(measured 230 lm)
The measured data are to be considered peak and all proved to be consistent with what was declared by the manufacturer.
Below are the complete runtime tests on levels “L7”, “L6”, “L5” for the Floodlight configuration and a focus for the first 40 minutes.
.png)
.png)
.png)
.png)
.png)
.png)
.png)
.png)
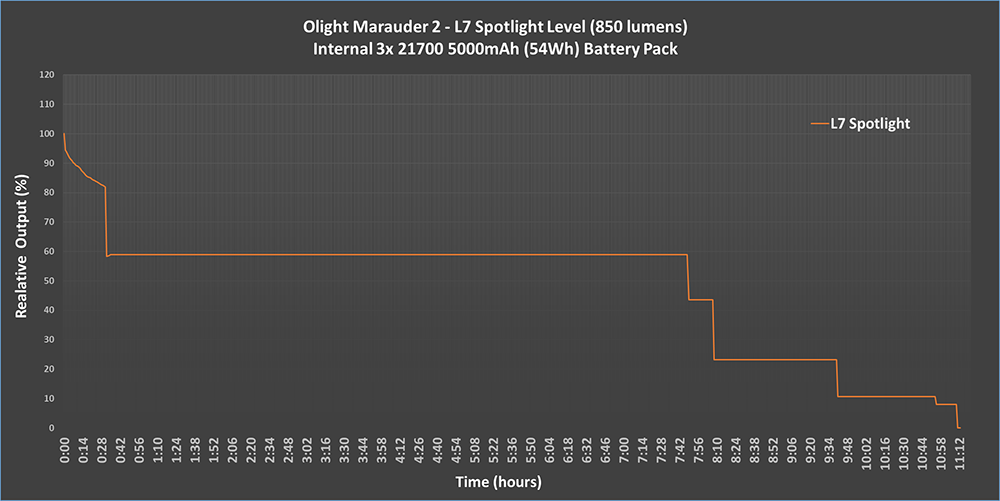
Below is the runtime test on level "L7" for the Spotlight configuration.
And finally, the test of repeated ignitions on the L7 level (14000 lumens) in Floodlight mode for the first 25 minutes. Between one ignition and the next, I let a time interval of two and a half minutes elapse.
.png)
.png)
.png)
User interface
The user interface of the Marauder 2 is managed by two switches: one rotating that acts as a switch and a brightness level selector and the other a toggle that allows you to switch from the flood beam to the throw beam.
As we have seen, the output levels are many, 7 (including Turbo) for each mode. In addition there is also the Strobo, but the Beacon and the SOS mode are missing.
By default, to always guarantee maximum safety during transport, the flashlight locks automatically 30 seconds after switching off. To unlock it, the rotary switch must be turned at least 90 degrees
And here's how the interface works:
From light off (after more than 30 seconds from switching off)
• Single / Click: no operation
• Rotate the switch 90 degrees to unlock the interface
From light off (within 30 seconds of switching off)
• Single click to turn on the flashlight at the last level used
• Double click to access the Turbo
• Triple click to access the Strobe
• Press and hold the switch to directly access the Low level
From light on
• Single click to turn off the flashlight
• Double click to access the Turbo and further double click to go directly to L4
• Triple click to access the Strobe
Memory Mode
The Marauder 2 has the memorization mode of the last level used:
• Strobo and L7 are excluded from the Memory Mode
• L5 and L6 will only be stored for 10 minutes. After this time interval, the torch, at the next ignition, will set the output to level L4.
• All levels from L1 to L4 can be memorized at switch-off and recalled for the next switch-on.
Turbo and Strobo
Double click on the side switch to access the Turbo. Triple click for the strobe. It is possible to directly access the Turbo and the Strobo only if you are in On mode or if you are in Off mode within 30 seconds of switching off. Any pressure made on the switch after the flashlight has been turned off for over 30 seconds will have no effect, unless you first rotate the switch 90 degrees.
Lockout
The interface is blocked automatically by simply leaving the torch off for 30 seconds. This solution can have pros but also cons: for example, it can happen that you put the flashlight in your backpack after using it and that it turns on inadvertently before the 30 seconds that would allow it to be blocked have passed. If we also consider the fact that the proximity sensor can also be deactivated by the user, the risk of causing damage increases exponentially if the necessary precautions are not always taken.
Also I don't find it so unlikely that inside a backpack the switch could rotate 90 degrees and be clicked accidentally, it could easily happen, especially if the flashlight is not safe inside a holster.
Low Battery
When the battery is running low, the Marauder 2 will show the user a red light, and the output will also undergo a stepdown.
Proximity sensor
The flashlight is equipped with a proximity sensor that allows the Marauder 2 to decrease its output if obstructions are found in front of its lens. This is a safety measure that prevents damage to things or people due to the excessive heat that develops near the lens when the flashlight is turned on at high levels.
However, the proximity sensor can be deactivated and configured as follows:
• From flashlight on or off, 15 quick clicks on the rotating switch will allow you to activate or deactivate the proximity sensor
• With the flashlight off, triple click + long press will allow you to enter the sensor management mode and vary the activation distance. At this point with a click of the switch you can choose one of the two available modes. To confirm this, we will see the LEDs on the right or left of the switch flash.
The light sensor is not active for the Spotlight function.
Beam, Tint and Beamshots
The Flood beam of the Marauder 2 is very wide and allows you to illuminate well even at a distance of 200-350m. The tint is uniform, Cool but to the eye it seems less than 6000K.
The Throw beam is rectangular, very directive. Due to the aspherical lens, at close distances, a change in warmer colors is particularly visible in the contours of the beam. The spill is almost totally absent.
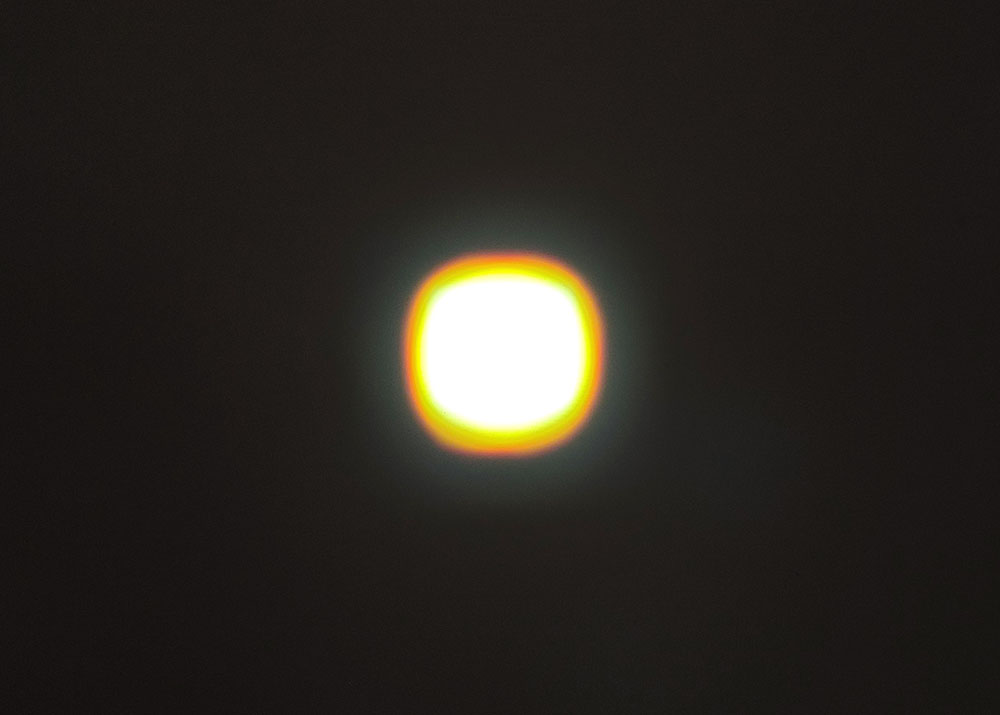
I am not too excited about this solution, even if after the field tests, I had to change my mind a little. Indeed, the Marauder 2 throw beam does its duty despite having an unusual shape.
Following some shots in the dark ...
Beamshot #1
.jpg)
.jpg)
.gif)
Beamshot #2
.jpg)
.jpg)
.gif)
Beamshot #3
.jpg)
.jpg)
.gif)
Beamshot #4
.jpg)
.jpg)
.gif)
Beamshot #5
.gif)
Beamshot #6
.gif)
Beamshot #7
.gif)
Beamshot #8
.gif)
Beamshot #9
.gif)
Below is a comparison between Olight Marauder 2 and Marauder X7R at the Turbo. From the photos it can be seen that the flood beam of the Marauder 2 has a slightly warmer tint than that of the X7R. The maximum output between the two is comparable, the difference is only 2k lumens, but the Marauder 2 has a slightly greater exit angle.
In summary, the Marauder 2 and the X7R have a very similar beam. Instead I expected a clear difference given the totally different optical sector.
Beamshot #10
.gif)
Beamshot #11
.gif)
Beamshot #12
.gif)
Beamshot #13
.gif)
Beamshot #14
.gif)
Beamshot #15
.gif)
Beamshot #16
.gif)
Final considerations
The Marauder 2, like its younger sister X7R, is a product of the highest quality, impeccably made and with attention to detail. Although it is not a very small torch, it is still quite compact given the dimensions slightly larger than those of a can of coke. The weight is abundant, 750 grams, but not excessive when compared to the type of flashlight it is and the fact that there are 3x21700 5000mAh inside.
In my hand I find it particularly comfortable, the grip is excellent, the switches are easily identifiable even in total darkness.
At the Turbo on the Flood beam, the Marauder 2 generates a real wall of light. The Throw beam is useful for illuminating well at great distances.
Switching from Throw to Flood is done in an instant, just move the lever under the rotating switch.
The aspects that I liked most are the following:
• Excellent build quality
• Excellent Turbo power in Floodlight mode
• Reactive rotary switch and easy to use if you are not wearing gloves
• Simple and intuitive interface
• Excellent heat dissipation and excellent regulation
• Lots of well-spaced output levels
• Possibility to switch between Flood and Throw beam
• Retractable charging interface
• Deactivable brightness sensor
• Possibility, if necessary, to use the flashlight as a power bank
• Fast battery charging and good charger supplied
What convinced me less:
• Relatively little throw beam for a flashlight of this level. Rectangular shape that I do not mind, but strange changes in warmer colors due to the aspherical lens.
• There is no holster inside the package! Because?!
• Non-removable battery pack and therefore not easily replaceable in case of problems
• The blocking of the automatic interface some times I found it annoying.
• There is no really Low level as we start with 200 lumens for the Flood level and 50 for the Throw level.
Below is the video of the unboxing ....
https://youtu.be/8CZlxiKnfJE
Thanks for reading!!! XD
Really outstanding and extensive review. The photographs and gift files are excellent and quite descriptive. Thanks!
I just got mine on eBay at an excellent discount. I just love it. And I agree with everything you said. It is an exquisitely made instrument and a joy to play with.
I like the rectangular beam a lot as it is wider with more coverage than most of my throw flashlights.
I really love the rotary switch and it’s surrounding display. The build quality and attention to detail is just extraordinary. And the crackled rubber grip is truly excellent.
The flood beam is not my favorite but it is ok and quite bright.
Can you share ebay link please.
Thanks.
lock, you make one of best review I have seen especially with your good photography. Excellent work!
For this flashlight, it is overkill for many people but now I want one. However, this flashlight can be improved if it use single new tesla 4680 battery (sad not for sale yet). That will be next generation flashlight.
My dissapointment is that it use non removable cell, so if USB C port is damage or cell degrade after time, the flashlight is not as useful.
My guess for led is Osram culpm1.tg for thrower and Osram pusta1.pm for ring of flood.
Not sure how to explain the nearly square spot from the 2 mm^2 Osram. It’s slightly out of focus, isn’t it? My OTR i3 shows a 2:1 rectangle. Maybe Olight did this to not annoy customers that are not used to focused LEDs?
Anyway, it’s an outstanding light. I wish I had that kind of play money [or an application for such a monster].
Thanks for showing, great review! ![]()
![]()
![]()
Edit: The X7R is not the younger sister ![]()