<< Lume X1: 40W Single-Cell Boost Driver with Anduril2 and UDR >>

[quote = loneoceans]

所以BLF,我终于有机会购买Zebralight SC700d。

昂贵的,即使有很多。但是由于我的目标是尽可能地开发出更好的手电筒(驱动器),所以我认为我至少需要有一个良好的基准来挑战自己。

Zebralight SC700d不仅在物理结构和机械加工方面,而且在驱动器效率和性能以及散热设计和耐用性方面均被视为市场上最好的手电筒之一。我必须说,我的第一印象非常好。尽管手电筒是21700的光,但它却非常紧凑,甚至比18650 KR1还要小,并且明显更轻(即使带电池),几乎使KR1显得笨重!即使与Noctigon / Emisar手电筒相比,其加工,阳极氧化和表面处理也比竞争产品高出一步。手电筒是一体的,底部只有唯一的螺纹-螺纹是精细切割的,但经过阳极氧化处理,精确,润滑良好。开关的设计是经过深思熟虑的-凹进但有触觉。我可以继续,但这是另一篇文章。

底线-短时间使用它确实验证了我一直在将其用于高效开关模式驱动器的所有工作。ZL的性能确实比使用线性驱动器的便宜手电明显好。我知道绝对需要低成本的手电筒(例如30美元或更少)-对于这些手电筒来说,线性驱动器是明智的选择,并且会长期存在。

但是,使用了这些开关驱动器后,我个人发现很难证明为价格超过50美元的手电筒仍使用线性驱动器而花钱。这就像购买一辆出色的跑车,其车身,内饰,音响系统和出色的悬架都令人赞叹不已,但其发动机采用的是紧凑型轿车。

我购买该产品的原因之一是因为SC700d还被认为是“月亮之王模式”的竞争者之一,具有极低的月亮模式。

在这里,您可以在左侧看到ZL SC700d的最低模式(实际上,它非常低,尤其是与几乎所有AMC7135驱动程序相比)。但是,与Lume X1相比,它还是非常明亮的,即使Lume X1的运行亮度约为其最低亮度的10倍(可能更低)!该图像以ISO1600 f / 4 1 / 10s拍摄,并被晨曦照亮。我很高兴这个测试也验证了Lume X1驱动程序的UDR性能。

为了获得顶级性能,SC700d配备了效率更高但CRI较低的LED(尽管仍然高达90 CRI),XHP70.2的表现非常出色,产生了3000流明(根据ZL的规格表),相当于大约22W的输出功率。配备Lume X1和GT-FC40的KR1达到的峰值亮度(从我的角度来看)比SC700d稍低,但这告诉我Lume X1的性能要比SC700d驱动器高,因为GT-FC40效率极低(但CRI 95),我期望光学器件后大约有2500流明,并具有约33W的功率驱动。在Lume X1上运行XHP70.2可以产生4000流明以北的声音,而不会出现问题。

在这一点上,我更好地理解了XHP70.2为什么是一个有争议的LED-尽管其输出效率无疑很高,但SC700d中这种5000K 90 CRI发射器的色彩却呈现出绿色(与FC40的桃红色相比),更糟的是,从OP反射镜上会出现中等偏强的淡黄色偏黄。光束的中心是令人愉悦的,但很快就掉落到坦白而丑陋的电晕中。在户外,这不是问题。但是在室内,这是非常明显SC700d的绝对负号。我忍不住想像SC700d中的Ledil Olga之类的东西会显着改善(但可惜的是Olga光学镜不适合,因为它要小得多)。替代地,将LED束缚可以产生更好的光束轮廓,同样,增加一个简单的绿色减少滤光片/薄膜即可。

旁注-我测试了一些不同的渐变表,发现我确实喜欢x ^ 4曲线比x ^ 3或我测试过的其他曲线好一点,所以我现在将对其进行测试。

[quote = annyli fhashlight]

我是一家中国手电筒制造商,想在我们的手电筒中尝试使用此电路,

[/引用]

annyli fhashlight,是的,请随时给我下一个PM,我很高兴看到您的要求。

[/引用]

I cannot send you private messages,

I can contact you on Facebook

facebook : https://www.facebook.com/profile.php?id=100056276523603

Our appearance is very good, but we are always looking for the best circuit partner

[quote = Agro]多年来,我一直希望一些中国制造商能够与Zebra品质竞争,甚至可以在提供优质的LED,BLF UI,更高的输出量且没有胶水的情况下击败它。间隙。不过,它在其他领域仍然很广。[/ quote]

I spoke to some manufacturers and they seem open to the idea of unibody designs. The only concern is that it is a little more expensive to machine since regular flashlights can be machined from short stock for the head and pipes for the bodies, as opposed to a single long stock with a lot of material cut away.

Today I managed to open the ZL SC700d, and reassembled it back after (it's challenging for those without the right tools so I don't recommend anyone doing so without a risk of damaging it) and it's nicely designed; they used a PIC microcontroller, a TPS61088 regulator and PCB-side-mounted e-switch, all on a single but fairly large PCB (basically one inch square).The main inductor is a Coilcraft 7030 1uH, a perfect choice for the 61088. The design is very similar to most of the switching driver circuits including the Lume drivers, so I guess I'm glad that this shows the Lume is on the right path. I can see ZL swapping out the 61088 for the 61288 for future flashlights for even more power, but I think the Lume X1 is still the first driver to use the 61288 !

The LED is mounted in a channel cut in the PCB where a copper block provides thermal contact and heatsinking to the body. The regulator and inductor are potted, but in a soft silicone. It's compact, but perhaps too compact - and here comes my main criticism. The design does come at the cost of difficulty of reparability and warranty for the product, though it's robust enough that I think the failure rate is going to be quite low.

This also makes LED swaps difficult since the design is intrinsically package and footprint specific. It doesn't really save much room either since it uses a separate PCB as the positive-battery-spring contact (using pogopins), so it still uses 3 boards in total, just like regular flashlights if you count the MCPCB (driver, positive spring, tail spring), but it does improve thermal performance.

Regardless, I think there is still some value in a 3-piece design (head, body, cap) - it's cheaper to machine in general, and I guess it's required for easy re-flashing without using a ridiculously long pogopin programmer (going with the AVR-1 and 3-pin UPDI makes this almost possible, though). I'm not sure how many manufacturers will want to go with the casting method - perhaps there are other possible options but I'm not familiar with them. The unibody does improve on thermal sinking, though.

Unibody is one thing, the quality of the machining and anodization is another. I think so far Emisar/Noctigon comes the closest. I think the main thing that strikes me about the ZL is the economy of design - it's so compact and tidily built and I see no reason why other flashlights can't be designed similarly even if the machining isn't as good. I'd like to keep the LED and MCPCB swapping though, since that's really part of the ethos of the BLF community, and I think all these are not difficult to achieve at the same cost of machining.

Nice tear down and info, loneoceans :+1:

There was someone else struggling to open the SC700d recently, mind sharing how you did?

The front bezel is a typical interference fit - very compact and well machined. I tried one quick attempt to pry it with a small pry tool, but the fit was too tight - didn't want to damage the ring or the flashlight... it is a $120 flashlight after all!

So, I heated up the outer shell with hot air and cooled the ring with an aerosol freeze spray. Then immediately, one sharp blow to the ring with a small hammer and I got the ring out. The glass didn't break but perhaps I was lucky. I have a fair bit of experience taking apart consumer electronics so this is probably the most tricky to do, but not too difficult with some experience I think.

The reflector looks custom and is very well machined - fits perfectly in the body, and the hole at the bottom is surprisingly big. There is one big O ring around the lip that creates the waterproofing seal and it's compressed in very well. However, you can't just press the glass down to move the O ring because the O ring looks like it's being compressed radially instead of axially, so there is basically no play in the bezel ring fit in the z-direction. The tight tolerances of the ZL machining help make this work. I was hoping to replace the reflector with a TIR optic to fix the tint shifting, but none I could find fit without modification and maintaining a good deal, so I decided to just leave it be just to keep this one as original as possible. I figured that the ZL SC700d makes for a great 'benchmark' light.

Removal of the board is more tricky because it's potted in, and one of the main connections is soldered down to the spring PCB with a solid metal post instead of a wire. The spring PCB is glued down and impossible to reach with a soldering iron, but I managed to desolder the joint. I used a very high power Metcal iron and I'm not sure if a typical soldering iron would do the job without risk of damaging the joint on the other PCB or damaging the plated TH pads.

Potting was the easiest to remove. I flooded the bay with isopropyl alcohol and used needle tweezers, and it came out safely.

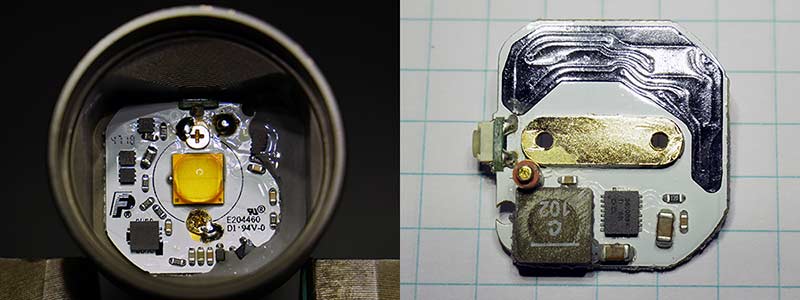
The only thing I think can be done to mod this flashlight is to either replace the LED with another XHP70 (it's in 6V configuration), but I suspect most people will have trouble replacing it because it's bonded in two parts (half to the PCB and half to the gold-plated copper block, so reflow is going to be tricky if you don't have the right tools), or an easier mod would be to de-dome the LED to reduce the tint-shifting (likely you get 1 good attempt at it!), or to add some sort of filter film to the glass.

Fitting it back requires care as well. I cleaned up the internals, re-tinned and refluxed, and resoldered on the main connection to the spring PCB. I also cleaned up the silicone potting to make sure there wasn't any contaminants or loose pieces of potting, and reassembled it back, taking care to reprep the surfaces with thermal paste (I used arctic silver). The two screws serve both to clamp the LED onto the body, as well as a high current path for the negative terminal, so the screw are in fact soldered on. Those were easy to desolder, though. I resoldered them back during reassembly.

Finally, I relubricated the seals and pressed the ring back in with an arbor press, but I did file a very tiny notch in the bottom of the bezel ring with a micro file just enough for a pry tool, in case I wanted to reopen it again more easily.

I've been using the ZL for a short while and I'm starting to like the UI more. It's not as fun as Anduril for sure, but it definitely is very practical and works really well 'in the field' as a utility tool.

For a moment I thought about building a driver to replace the ZL driver with the Lume X1 design with Anduril, but it's challenging enough for most folks without the right tools to mod that I'm not sure if it would be practical. A ZL with Anduril though, that would be fun!..

So do you have an idea how they achieve low moonlight ?

How about a kapton PCB overlay to translate the format to 5050 or 3535?
PCB would move the anode and cathode closer together and leave the center open, so the thermal pad is soldered directly to copper? Bond line would be thicker but it should still work OK.

Thanks for sharing, it’s the first time I see this trick. Previously I’ve seen people opening Zebras by cracking the glass and prying on the ring from below.

You don’t need very long pogo pins to flash unibody light. The programming pads could be placed at the front of the head instead. Or one could use USB for that.

As to swaps…years ago, it would be easy to swap pills or drop-ins. Inside a pill or a drop it, it would be quite easy to swap the driver or the LED. With a simple spacer, one could also turn that to a triple or quad; spacers were available for the popular formats.

Nowadays, most lights come with solid shelves, so no pill swapping.
Drivers of e-switch lights are often of non-standard size which makes swapping harder. I’m not sure if I’ve seen an Emisar with a swapped driver before Lume X1 (though I’m not sure whether the RGB Emisar D4 had a heavily modified or replaced driver).
Keychain lights often choose LiPo cells and these always have custom drivers as well as custom LED PCBs (metal or not).

We’ve got over that, I think.
Should we give up LED swaps? IMHO - not easily. But the question is whether moving the driver to the front of the head precludes the ability to swap LEDs - and I think the answer might be no. Could driver be placed on a flex PCB wrapped around the optics, freeing lots of space for a regular MCPCB? Or driver overlaid on top of a regular MCPCB? Leave 10 mm in the middle of the light for a regular PCB and put the driver as a ring around it? I don’t know.

At the same time - it the driver-in-the-front strategy worth pursuing? If Zebra couldn’t figure out a good way to avoid a PCB at the battery positive contact, maybe there is no easy to manufacture replacement that would be more compact and as performant?

BTW, from my limited experience Lumintop anodization is more durable than that from Emisar. But I have only 1 Lumintop to compare (GT Mini).

BTW, Zebra’s approach to weight is the opposite from what most budget brands do. Zebra cares a lot about making lightweight lights. Budget manufacturers tend to prefer hefty.
I understand how huge shelves help Emisar or Fireflies increase Turbo duration. I recognise that they still get criticised for Turbo being too short. It was their choice, performance-to-size at the expense of weight.
The only budget maker that chose to make his lights small and light is DQG. But DQG is at the opposite extreme with his lights being poor performers.

I so wish there was a brand that would try to make their lights as small and lightweight as possible while maintaining proper thermal design…I’m a huge fan of DQG but I sometimes miss higher output in his lights.

I opened an old H600 mkII, they had the lowest moonlight, it uses 3 current sense resistors :

Is it the same in the SC700d ?

A couple of years ago I made the GXF22 which was a 10A linear + FET driver for my Emisar D4 - https://budgetlightforum.com/t/-/57383, and fitted it with four Luxeon Vs. It looks like the newer Emisar / Noctigons are now using the same linear + FET configuration, but I didn't continue any development on that project because it was just... inefficient and I didn't see significant added value over cheap AMC7135 drivers other than the fact that it is PWM-free.

It's possible to make E-switch drivers swappable, but I imagine it would only apply to side-switch flashlights with a separate e-switch board. (I have to say I much prefer side-switches though, much more ergonomic IMO). There just needs to be a few standards which I suppose is challenging...

Personally I prefer a slightly lighter flashlight. I bought a copper FW3C for my Lume1 project and while it does feel nice in the hand, I've wound up not carrying it around much because it's just too heavy in any sort of pocket. Including the battery, the FW3C is 16g heavier than the much larger ZL SC700d with 21700 battery.

Regarding swapping the LED, keep in mind that the driver is configured for 6V. Perhaps you could swap it out for a XHP50.2 but I don't think you're gaining much there for the amount of work. Likewise the 144AM could possibly fit but at the expense of significant loss of thermal performance; best to just design a driver-led-sink assembly specifically for the flashlight. If I manage to get another SC700d for some reason it could be a fun project.

There are also numerous 6V automotive LEDs. And Nichia NV4WB35AM.

Ha! So my idea does work… Awesome work getting this open AND reassembled cleanly! :beer:

Do you really find the SC700 an EDC-able size? I personally set a soft cutoff at 26mm dia and 105mm length and a max of 28x120. Ideally its 23x95, personally.

The unique feature of Zebralight it is not just ultra lower moonlight but I think here more important is power consumption in that mode. loneoceans can you post measurements in that mode of your driver compared to ZB?

You say these had the lowest moonlight - how does it compare to the SC62(w)? Those are also pretty low. I know the newer SC64-series is a bit higher.

Famously a SC62w on reddit ran for over a year on the lowest moonlight mode, from a fully charged 3500mAh 18650.

They have the same specs so I would assume it’s the same guts in a different body. More recent ZLs have a higher moonlight and a higher power consumption, my H600IV draw about 1mA on the lowest level, it would not last as long as the MKII. To have very long runtime the components need to be carefully chosen to have very low power consumption.

Also firmware is very important to have very low power consuption. In that mode we have active CPU and we need to have very low consumption of DC/DC converter, analog part and etc. About DC/DC switching devices I find very interesting AN from TI.

Well there is Olight with build quality 2nd to noone and driver more efficient than Zebralight. Problem is they refuse to offer anything other than piss poor low CRI CW emitters. I’m so glad Fireflies is using the Lume drivers in their new series of lights. I bought 5 of the FF lights and am super happy with all of them. Finally these lights have regulation and can sustain a good amount of light and do it efficiently!

Though one thing I admire about Olight is their extremely simple and intuitive UI. I know some prefer the much more powerful Zebralight or Anduril UI but I never use those advanced features…

Olight with their marketing department second to none. As far as opening the lights it’s just as bad as zebralight. Then they’re dedicated to proprietary charging as well as cells.

I also can’t say I’m impressed with the constant practice of leaving plastic TIRs exposed. From the two olights I’ve had apart I didn’t notice anything special about the build design, even if the machining and finishing is done well.

Of the things I mentioned, it fails at good LEDs, BLF UIs and no glue….
…quite far from we could wish for.
That said, thanks for the mention. I was not aware that their drivers were so efficient.