Hello everyone ... Today we will see the new Armytek Wizard C2 Pro Magnet USB Warm : headlamp with 2330 lumens of max output at Turbo.
Here the link of the company and here the link of the product.
.jpg)
.jpg)
.jpg)
.jpg)
Packaging and Contents
The Armytek Wizard C2 Pro USB comes in the classic Armytek colored cardboard box on which all the main informations is shown. The package is full of accessories and overall includes:
- "Wizard C2 Pro Warm" flashlight
- Armytek 18650 Li-Ion battery with 3500mAh capacity!
- Steel belt clip
- 2 x spare O-rings
- Proprietary cable for charging
- Bicycle Mount(AMB-01)
- 8 languages User manual
- Headband
.jpg)
.jpg)
.jpg)
.jpg)
.jpg)
Main features
- Rechargeable flashlight by magnetic USB charger
- Side switch for interface control
- Tailcap magnet and tailstand possibility
- Efficient TIR lens for a non "tunnel vision effect"
- Multicolored status LED
- Active temperature control with automatic power reduction /increase
- Low battery indication
- Check against battery under-discharge
- Can be used with any 18650 Li-Ion battery. Full short circuit protection
- Total protection against water, waterproof up to 10m (for two hours)
- Shock resistant up to 10m in height.
- 10 year Armytek warranty
Manufacturer's specification
- Cree XHP50.2 LED
- Light output: 2330lm
- Max Peak Beam Intensity: 4160cd
- Max Beam Distance: 129 mt
- Max Runtime in maximum mode: 2h 40min (605 lm after 30s)
- Max Runtime in minimum mode: 200 days
- Premium type III hard anodizing 400HV
- Optic Lens: TIR
- Body Material: Aircraft-grade aluminum
- Hotspot: 70 °
- Spill: 120 °
- Battery: 1x18650 Li-Ion
- Waterproof: IP68, 10 mt, 2h
- Impact Resistance: 10 mt
- Memory Mode
- 12 Output Levels
Measured Dimensions and Weight
- Length: 112 mm
- Body diameter: 20.4 mm
- Head diameter: 33 mm
- Tailcap diameter: 24.8 mm
- Weight: 65g for the flashlight + about 50g for the 18650 (115g in total)
- Total weight (flashlight + headband + battery): about 148g
Output and Runtime Levels
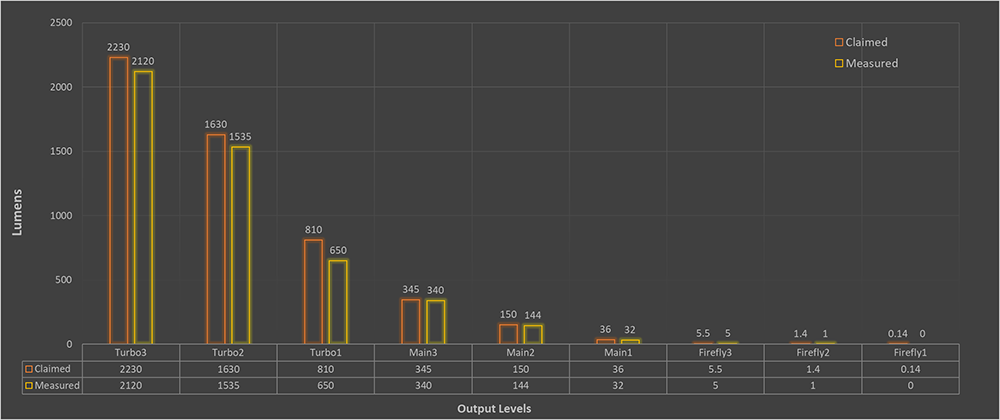
The output levels of the Wizard C2 Pro are many and well spaced. In total we have even 12: 3 Turbo levels, 6 normal levels (Main and Firefly), and 3 special levels (Strobo):
- Turbo3- 2330 lm / 2h40 min (605 lm after 30 sec) -measured 2120 lm
- Turbo2- 1630 lm / 2h45 min (605 lm after 2 min) -measured 1535 lm
- Turbo1- 810 lm / 2h50 min (605 lm after 9 min) -measured 650 lm
- Main3- 345 lm / 5h15 min) -measured 340lm
- Main2- 150 lm / 12h15 min -measured 144lm
- Main1- 36 lm / 43h -measured 32lm
- Firefly3- 5.5 lm / 12d -measured 5 lm
- Firefly2- 1.4 lm / 40d -measured 1 lm
- Firefly1- 0.14 lm / 200d -n.d.
- Strobe3- 2330 lm / 10Hz / 5h45 min (605 lm after 100 sec)
- Strobe2- 2330 lm / 1Hz / 12h (605 lm after 9 min)
- Strobe1- 150 lm / 1Hz / 55h
Runtime Test
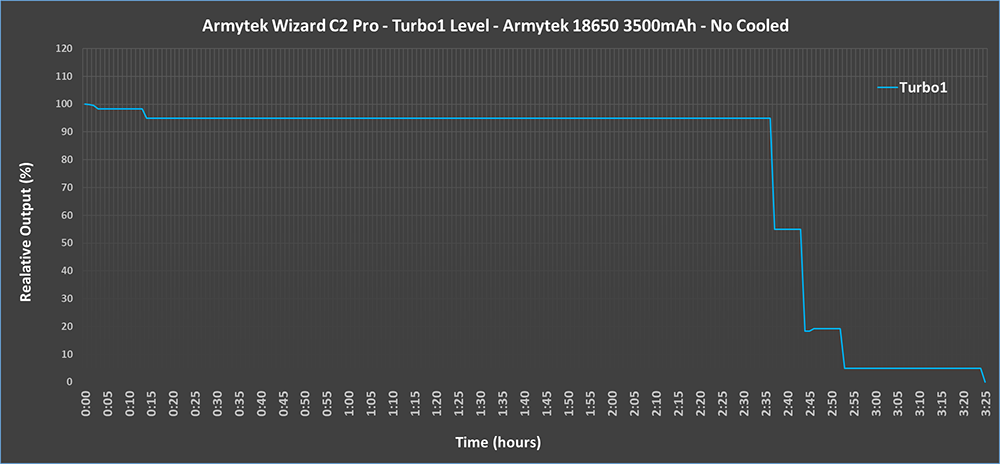
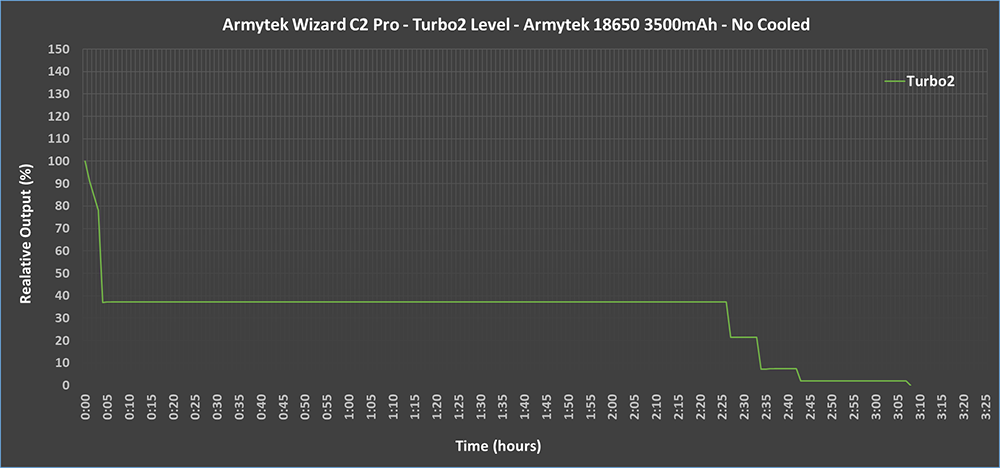
The runtime tests were carried out in a home environment at a temperature of about 24°C using the 3500mAh Armytek battery supplied as power source.
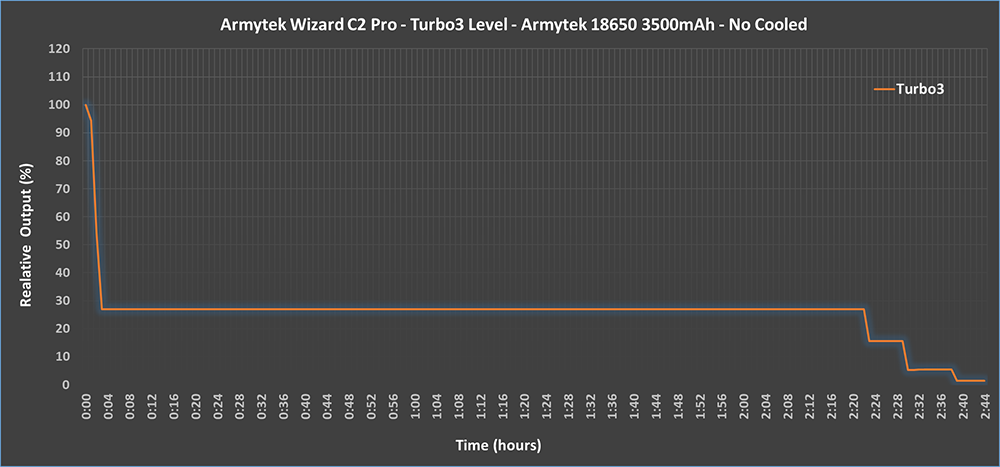
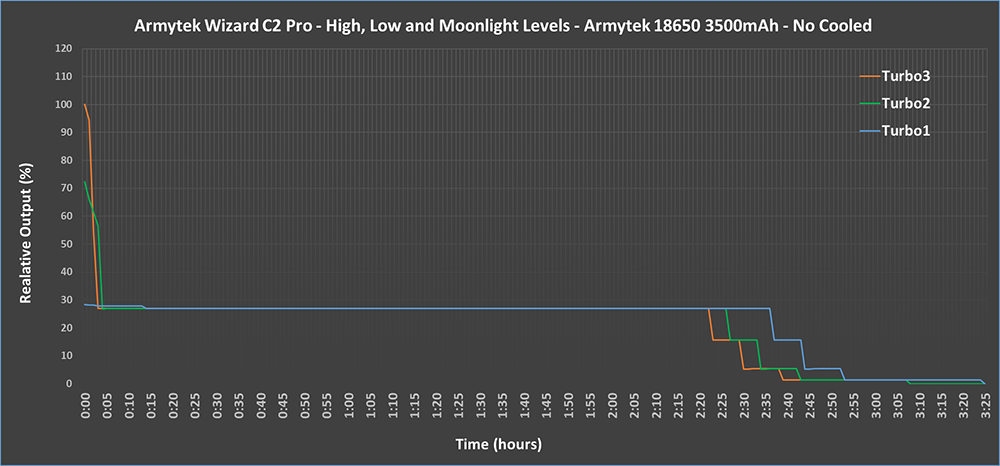
The Turbo3 runtime graph starts from an output of about 2100 lumens to settle after less than a minute at about 550 lumens. The flashlight remains on this level for about 2 hours and 20 minutes and then undergoes further stepdown on lower levels until the firefly.
Turbo2 and Turbo1 have a very similar trend to that of Turbo3 except for the first few instants. In fact, the Turbo2 starts from about 1500 lumens to drop to about 550 lumens after just 2 and a half minutes. The Turbo1 starts at around 650 lumens and reaches 550 lumens after about 12 minutes.
All levels below the Turbo, therefore M1-M2-M3-F1-F2-F3, showed a runtime with a flat discharge curve until the final stepdown (direct drive) when the battery ran out.
I can conclude by saying that the regulation of the Wizard C2 Pro is truly exceptional. I also like the fact that the stepdown of the Turbo levels is not dictated by a timer but by the active protection against overheating. This means that if the flashlight is able to dissipate the heat, so if, for example, you are in cold or particularly windy environments, the maximum brightness of the selected level can be maintained for much longer.
The Body and Materials
The Wizard C2 Pro, evolution of the now famous Wizard v3, is a headlamp with a thin and elongated shape with a diameter slightly larger than a normal 18650 battery.
.jpg)
The optical part is composed of a CREE XHP50.2 LED (previously on the Wizard v3 there was a first generation XHP50) which allows to deliver 2300lm to the Turbo.
The lens is of the TIR type with honeycomb processing, and produces a flood beam with a spill of 120° and a spot of 70°.
.jpg)
.jpg)
The Wizard C2 Pro is made entirely of metal with a special matte finish that makes the flashlight particularly pleasant to the touch and always provides exceptional grip even with wet hands.
To the touch, the flashlight immediately gives an excellent feeling of robustness and build quality. There is no type of cosmetic defect and everything is taken care of in the smallest details.
.jpg)
.jpg)
.jpg)
Under the head we note the presence of a series of dissipating fins. These too have undergone a slight change compared to the previous version.
.jpg)
.jpg)
The only part of the flashlight that can be unscrewed is the tailcap for inserting the battery. On the threads, it is possible to notice the presence of a pair of O-rings that guarantee perfect waterproofing.
The threads arrive really well lubricated by Nyogel grease (tArmytek uses it to lubricate all its lights) and although these are not anodized, physical lock-out of the interface is still allowed by unscrewing the tailcap by ¼ of a turn. The physical lock-out avoids accidental starts and the annoying parasitic drain (measured in about 7uA).
.jpg)
.jpg)
The tailcap is magnetic and has the connection for charging using a proprietary USB cable (supplied). The latter is different from previous versions: it changes the size, color and amount of current delivered. A full charge of the 3500mAh battery takes approximately three and a half hours. It took more than 6 hours to fully charge a 3200mAh cell in the old Wizard.
.jpg)
.jpg)
.jpg)
.jpg)
.jpg)
.jpg)
.jpg)
.jpg)
.jpg)
.jpg)
.jpg)
.jpg)
The charger, inside, has a small status LED that lights up red and green during the charging operations:
- Green: The device is in standby mode
- Flashing green - battery voltage assessment.
- Flashing red: unscrew the tailcap for 1/4 to refill
The magnet (not removable) placed on the tailcap is really powerful and allows you to attach the flashlight to any ferrous material, even in a horizontal position.
.jpg)
The switch, the only one on the flashlight, is electronic and allows you to control the entire user interface. It is made of yellow rubber and offers good grip to the touch. It is very responsive, has a short stroke and offers excellent tactile feedback. To activate it, you have to apply a good pressure and it is very easy to find in the dark or when you have a flashlight on your head, even when using thick gloves. Inside there is a status LED that acts as "warning indication" or "battery status notification".
Compared to the previous version it would seem larger in diameter and also slightly softer to the touch.
.jpg)
.jpg)
At the negative pole we have a thick and sturdy golden spring. Even at the positive pole, unlike the WIzard v3 where there was a small protruding button, we have a spring.
.jpg)
In the following photo the detail of the spring present in the Wizard v3 (version previous to the Wizard C2 Pro)
.jpg)
The lettering is well done, without any smudging.
.jpg)
.jpg)
.jpg)
The tailcap is flat and allows the use of the flashlight in the tailstand for example as a desk light. The head is also flat, so headstanding is also possible.
.jpg)
The Wizard C2 Pro is powered by a 18650 lithium battery. Both "flat top" and "top button" batteries are compatible. Armytek recommends the use of high drain cells with at least 7 Ampere of discharge.
A 3500mAh high drain 18650 cell by Armytek is included in the package. The amperage is greater than that of the batteries that were supplied with the previous version. In fact, it was usually 3200mAh.
.jpg)
.jpg)
.jpg)
.jpg)
.jpg)
.jpg)
.jpg)
The bezel and the bezel ring around the power button are made of stainless steel, as is the belt clip. The latter is particularly long, with a good thickness, and can be mounted in both directions. The grip on clothing, pockets and belts is perfect.
.jpg)
.jpg)
.jpg)
.jpg)
.jpg)
.jpg)
.jpg)
.jpg)
.jpg)
.jpg)
.jpg)
.jpg)
The band is elastic, it has been updated, it mostly changes the color, but like the previous version it is always very soft and comfortable to wear even for long time. The light mount is made of plastic and allows you to install and release the flashlight very quickly, as well as to rotate it from top to bottom. An O-ring can be added to the holder to completely avoid the possibility that the flashlight can accidentally release, for example by hitting branches or other obstacles, when wearing it on the head.
.jpg)
.jpg)
.jpg)
.jpg)
.jpg)
.jpg)
.jpg)
.jpg)
.jpg)
.jpg)
Amytek also provides a plastic support to fix the flashlight to the bicycle tube: this is the ABM-01, which can also be used for the Tiara and Elf models. Also here, as for the elastic headband, an additional O-ring has been added to ensure an even more secure fixing of the light.
.jpg)
.jpg)
.jpg)
.jpg)
.jpg)
.jpg)
.jpg)
.jpg)
Unlike the Wizard v3, the Wizard C2 Pro package does not include the handband, i.e. the elastic wrist or arm band. The latter accessory that, i have rarely used and that I have never found particularly useful.
Below is a comparison between the Wizard C2 Pro and the previous version Wizard v3
.jpg)
.jpg)
.jpg)
.jpg)
.jpg)
.jpg)
... in spite of the anti-covid19 rules, a gathering of Armytek ...
.jpg)
.jpg)
.jpg)
.jpg)
.jpg)
.jpg)
… and my favorite EDC kit
.jpg)
.jpg)
.jpg)
User Interface
The UI provides 12 levels divided into 4 sections: Firefly, Main, Turbo and Strobo. Using the interface is quite simple, it takes very little practice to be able to take advantage of all the different levels.
The Wizard C2 Pro also has two modes of use:GeneralandAdvanced : To switch from one to the other just unscrew the tailcap by ¼ of a turn while the flashlight is off press the button and screw the tailcap back on while continuing to hold the button down.
Memory Mode
After switching off, the last mode used is memorized for quick access to the next switch on.
Active temperature control
The Wizard C2 Pro used at high levels, given the great power of the LED and the scarce surface on which to dissipate the heat, will overheat quickly and reach 55-60 degrees in a few minutes, especially after a series of consecutive starts at the Turbo. At this temperature the light begins to regulate the output and therefore to decrease the power.
When the flashlight overheats the LED will flash three consecutive times at 2 second intervals. When a critical temperature is reached, the LED will flash three consecutive times at 1 second intervals and the brightness will automatically decrease. After the flashlight has cooled, the brightness will automatically rise. There are no preset timers for stepdown, but only active controls in real time by measuring the temperature.
In general, the electronics of the flashlight allow for constant brightness throughout the runtime. So, for example, if you use it at the "Main 2" level, you will have constant brightness until the cell is exhausted, except for any lowering of brightness due to active thermal protection.
Low battery level
Under 25% charge, the LED under the switch will flash red every 2 seconds. As the voltage drops, the flashlight will step down on the lower section to preserve the battery from any stress. When the charge is less than 10%, the LED will flash red once a second.
Lock-out
For the physical lockout of the interface, just unscrew the tailcap by ¼ of a turn.
Locator function
This function allows you to use the power button LED as a light localizer. To activate it, you must first turn the flashlight on and off, unscrew the tailcap by ¼ of a turn, press and hold the power button, screw it back on and unscrew and finally release the button. At this point the LED under the power button will flash green every 5 seconds even if the flashlight is off. To disable this option, you can proceed in the same way with the same procedure used for activation.
The charging system
To load the flashlight, simply connect the supplied cable to the flashlight and unscrew the tailcap by ¼ of a turn. If this last operation is not performed, the LED on the cable will start to flash indicating that the tailcap has not been unscrewed correctly.
Approximately, to recharge the 3500mAh cell, it takes about 3 hours, but this varies according to the charger that is used.
The LED under the power button indicates the battery charging status:
- LED color RED: battery under charge
- LED colorGREEN: Battery full
- LED colorROSSOflashing: indicates that the tailcap has not been positioned correctly and that it must therefore be unscrewed by ¼ of a turn to start charging.
General Mode
- From light off:
- With a click, the light is opened to the last stored level
- Pressing and holding the switch will enter the Firefly section and the F1-F2-F3 levels will be cycled. Release to select your preferred level. Keep the switch pressed to cycle through the Main levels (M1-M2-M3)
- From flashlight on:
- With a click the light is turned off.
- Pressing and holding the switch will cycle the levels of the current section, so if for example you are in the Main section, holding the switch down will cycle the Main1, Main2 and Main3 levels.
- Double click to access the Turbo, further double click to return to the previous mode
Advanced Mode
- From light off:
- With a click, the light is opened to the last stored level
- Pressing and holding the switch will enter Firefly mode. Keeping the switch pressed, all F1-F2-F3-M1-M2-M3-T1 levels will be cycled except for Turbo2 (T2) and Turbo3 (T3)
- From flashlight on:
- With a click the light is turned off.
- Pressing and holding the switch will cycle through the various levels of the current section, so if, for example, you are in the Main section, holding down will cycle through the various Main levels (1,2,3)
- Both with flashlight on and off:
- 2 clicks to activate the Main section. Double click to switch between the various M1, M2 and M3 modes
- 3 clicks to activate the Turbo section. Double click to switch between the various T1, T2 and T3 modes
- 4 clicks to activate the Strobe section. Double click to switch between the various S1, S2 and S3 strobe modes
Tint, beam and beamshots
The tint of the Wizard C2 Pro seen in this review is Warm, particularly warm, to the eye it seems even warmer than the color of the Wizard v3 Warm.
The beam is clean and uniform without any artifacts. At the Turbo there is a real wall of light that allows you to illuminate until 30-40mt. The color is pleasant, not tired even if used for a long time and performs particularly well in natural environments.
To follow some night shots ...
Beamshot #1
.gif)
Beamshot #2
.gif)
Beamshot #3
.gif)
Beamshot #4
.gif)
Beamshot #5
.gif)
Beamshot #6
.gif)
Beamshot #7
.gif)
Beamshot #8
.gif)
.gif)
Conclusions
Pros:
- Excellent build quality
- Good Turbo power
- Excellent regulation and good runtimes
- Many levels and well spaced
- Full user interface
- Packed full of accessories
- Direct access to the Turbo and Firefly level
Cons:
- Nothing in particular to report
In short, the Wizard C2 Pro has particularly pleased me. We will see how it behaves in the field with the intensive use that I will make of it this summer !!!
P.S: From personal experience I add that Armytek's after-sales service has always been particularly efficient. In many years I have never had problems in repairing / replacing flashlights under warranty, or in finding spare parts! Last experience a few weeks ago: a Wizard that after several years of use began to have problems with the electronics, was replaced for free, simply by sending the defective product to the company. For the inconvenience caused, Armytek also allowed me to choose a "gadget" from a list that included holsters, mini chargers, diffuser and other small accessories. In short, free gift + light replaced, all in less than 3 weeks ... really not bad ..?
Thanks for reading ... XD
