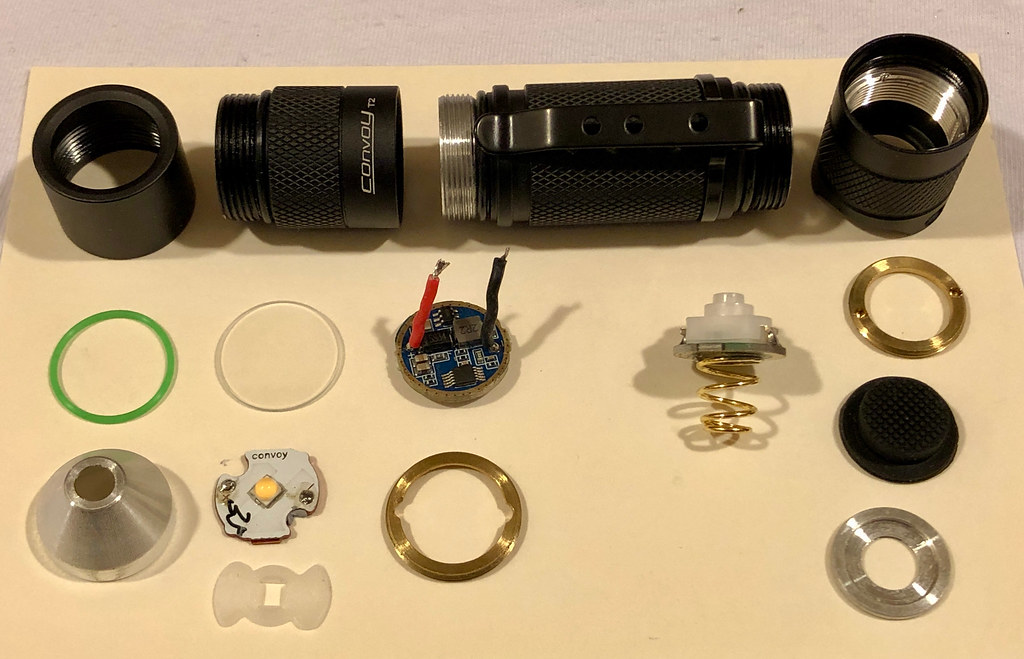
I modified my LH351D 3500K T2 by installing an AR lens and a lighted switch. Of course I took everything apart and “fixed” some things along the way.
When I went to solder the LED, I noticed that the MCPCB didn’t sit well on the shelf. The snap-off spot was hitting the side of the shelf. So I filed it down and then it fit no problem. I like how the 1mm x 15mm MCPCB has little protrusions that fit into the other 2 holes of the shelf so it doesn’t rotate when the reflector is installed.
I noticed that there was a gap between the driver and the retaining ring. The driver was too wide to fit inside the groove of the retaining ring. So I sanded down the perimeter of the driver to make it fit.
BUT, when I went to install the driver there was not enough threads left in the head to tighten it. I guess that’s why it was left that way!
So then I made a spacer from a spare retaining ring to fit inside the T2 ring and that resolved the issue. And I think it looks better without the gap.
The lighted switch was a little bit of a challenge since the new Kaidomain clear silicone tailcap was slightly different than the original black one. When I first installed it, it was hard to turn on the flashlight since the button was too far away. So I sliced the tips of 3 switches and superglued them onto the new switch. Now it works perfectly.
The mixture of purple and green 0805 LEDs makes a nice light green color and draws 0.09mA.
I like the tint and beam of the “U6” binned LH351D LED which appears accurately to be under the BBL.
Thrunite Ti3 V2 mod to dedomed 519a 3000k, w pebbled Tir .
.
.
I pulled the dome off right after the reflow, while it was still hot… that worked well, came off clean and left the glass shiny. The 2400k Duv –0.0036 looks like a delicious strawberry color.
This is how it looks in a Tool AA Cu, dedoming has never been so easy, just gently pop the dome off!
I really like the tint now the end result of dedoming Simon’s 4500K 519A its somewhere around 3600 K.
It outperforms a 219B and even a 219c for sure.
With dome on, it is very floody. Now its a bit narrower than a 219c, however an SST20 is still more concentrated.
Today I modded my Convoy 4x18A.
I bought few SFH55 leds from Pioneman Store and spare driver from Convoy flashlight store.
There seems to be some design changes on Convoys driver. Right one is the original. Left one is new. I modded it so that it should produce about 25A.
I also added extra 22awg wires. Screw holes are different on Pionemans mcpcb. Well, I just have to screw bezel tightly.
And here it is. Even original centering piece was same, that Pioneman provided. It’s bright, gives plenty of flood and quite a good throw. Tint is surprisingly good for such a monster led. Neutral even on low and if I must guess maybe 5500K. I’m very happy how this turned out.
Thanks for the pics! The dedome looks very clean. May have to consider that for my next flashlight. I don’t want to dedome my existing 519As since I like them a lot as is.
Some reflow preparation with 3 different B35AMs. Ran out of drivers and hosts, so only managed to get the 3000K fully assembled in a S21A.
Since I had everything on the table anyway, I swapped the ugly stock XPL HD in a Lumintop tool AA 2.0 with a 219B as well. Finally got rid of that eye sore!
And I’ve always wondered if the 4 dies on the B35AM can actually be seen. Here’s one at 4,5V and yes the rumours are true
I’ve installed many quad E17As and had to deal with their inherent donut holes, but the CRI and tint was worth it. OP reflectors and frosted lenses took care of it.
Do the B35AMs have a donut hole in the beams? How did your S21A turn out Verodin?
It definitely needs a OP reflector. Initially I re-used a SMO reflector since that was what I had within arms reach, but that resulted in a donut. After changing to an OP reflector the beam was good.
Haven’t played much with it after assembling (other stuff came up), but initial impression was good. As with most Nichias, CRI is excellent and tint is great. The 219b sw30 next to it is clearly more rosy though. But difference in lenses that might affect this. The tool aa 2.0 doesn’t seem to have any coating, while the S21A has the purple reflection AR coating. Also did a very quick comparison with a GT FC40 3000K and that makes the B35AM look rosy (vs more yellow for the FC 40). Such a shame these emitters are relatively difficult to get, they are so nice.
I tried to upgrade my Sofirn IF25A to use Nichia 519A’s. Too low forward voltage. I started with four of them and lost two almost instantly after turboing the light.


 .
. .
. .
.


