I built a double XML headlamp thingy for my helmet a while back but, eventually took it apart because the heatsink, reflectors etc, were a bit heavy and cumbersome. If ambient temperature is low and you’ll be going fast enough on high mode, then, you may not need something that stresses your neck. I wish you luck with the build!
You guys were right it shouldn't matter which side the switches are on.
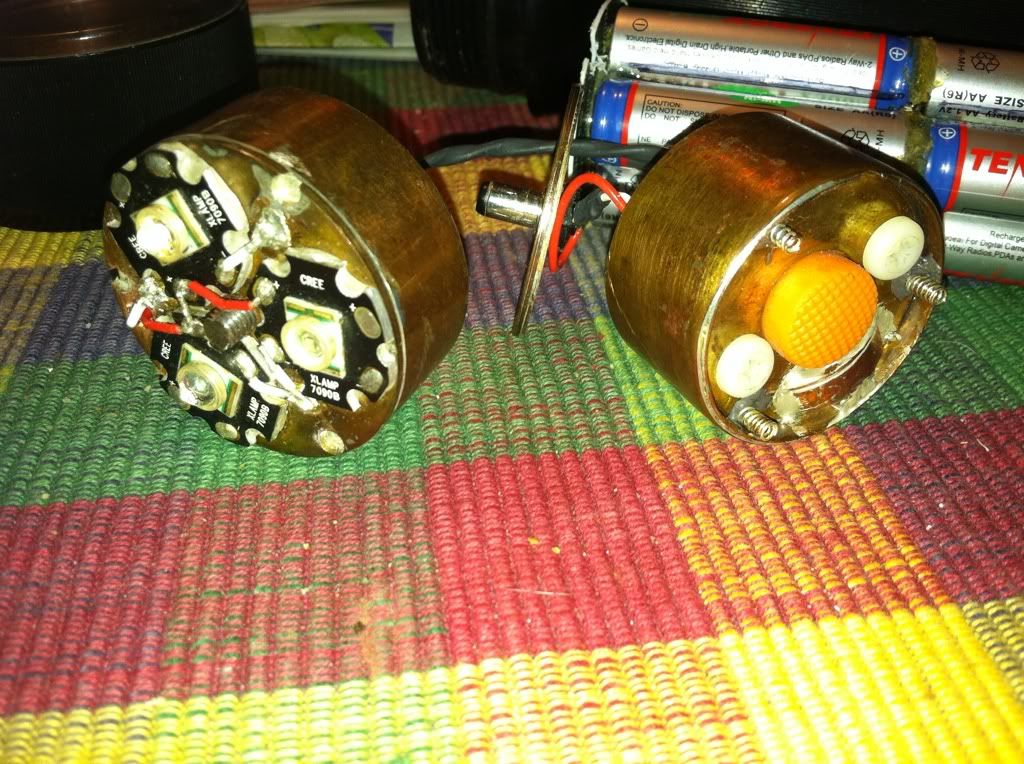
Newest plan thanks to some ideas here and at another forum. Basically adding dual switches like scaru suggested, and slightly changing the wiring to make sure that both batteries drain equally, even if one light is completely switched off.
This prevents the drivers from getting out of sync (meaning one is on medium, on on high, and being unable to get them back to the correct mode simultaneously), and allows even more adjustability. Aka I can cycle and have both on high, on high one medium, both medium, one off one on, etc.

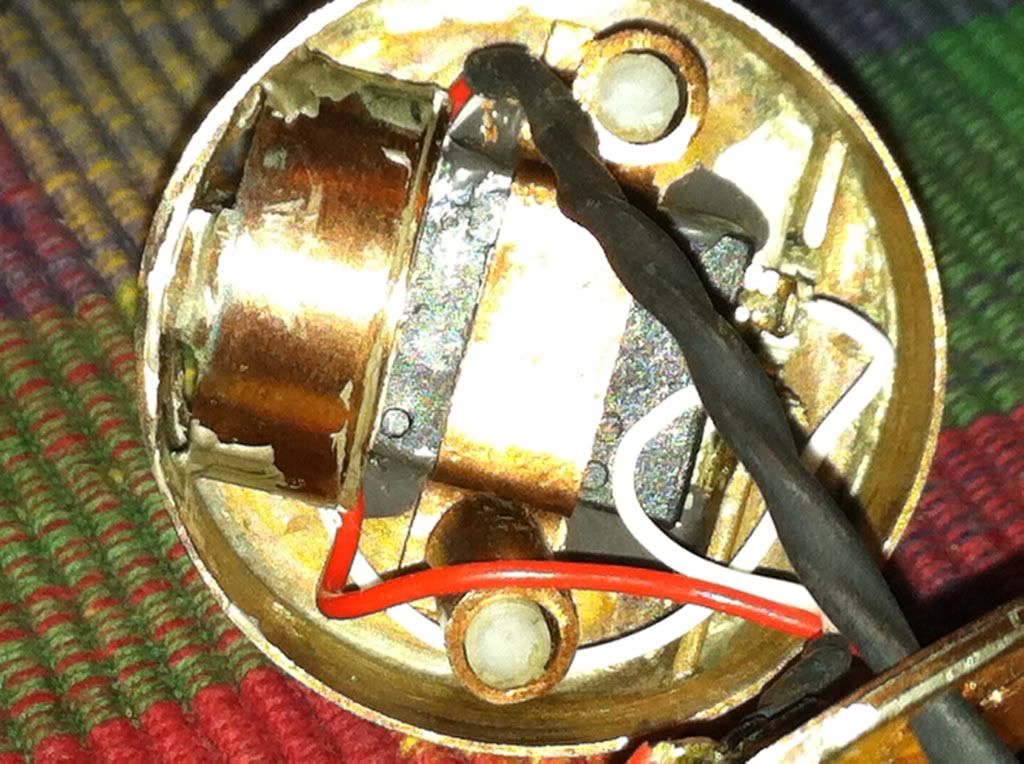
Does this look correct to you folks!?
These parts cannot get here fast enough!
Seems right to me.
Oops. Not sure how I missed this. Looks like it should work. I'm guessing the white lines are not wires or anything? Make sure you wire it up to test it before you do final assembly though.
scaru, the white lines were where the original parallel connections were.
y0bailey, the drivers I used were different from what you’re using however, I got ‘interference’ when both drivers were on ie, there was NOTICABLE flickering on low and medium modes. With one driver/LED was on, there was no flicker. Not saying it’s going to happen but just letting you know it possibly can.
Barely can INSTALL one, let alone: make one!
If I did, it would be as big as a haybale. And use a Farmall headlight.
Thanx for the encouragement....I'll just hang here & try to learn.
Sorry, late to the party. This looks much like one of my first mods. I think the driver is a clone of the KD Super output P7 driver. Mine is still going strong after 3 years. I used it to power 3 xreQ5’s in parallel from 14 nimh cells 7s2p. I found that with 5 or 6 cells the low voltage warning would cut in before the cells were actually low. The build thread is on mtbr under same Rufusbduck. I used vistalite nightstick bits for lamp housings, wire, switches, batteries, holders, just about everything but the bulbs. Swapped the original subc cells for new 4/5 subc to get 7 in the space of 5. I like your idea for 2 drivers/switches. The drivers are not great for efficiency especially on lower modes. I think Subjohan at CPF did some testing with them. See this thread. Others have found them to be of inconsistent quality which is not surprising for a buck driver that inexpensive. Do what you can to avoid the driver sharing heat with the led as the driver has a thermal cutout. I know they do work but some people have had issues. Good luck
Yea. I am thinking that in order to avoid the lower efficiency medium mode (I will never use low), I will just turn one off one on, for around 1000 lumens. That might be the realistic sweet spot, and I should get 3-4ish hours of runtime in that mode.
Did you heatsink the drivers at all? I am trying to find some good methods, and wondering if you had suggestions.
Yes I heat sinked the drivers. the CPF thread I linked above has a few different methods in it. The inductor and fet both get warm. Whether you use cu or Alu, get it as close to those two parts as possible(ideally touching with a thin layer of AA) without shorting any pins/wires and then pot it with fujik to keep the wire leads from breaking off. I built up layers of cu sheet to the height of the inductor, added another piece on top and potted it in 3/4” cu tubing ~1/2” long. The layered pieces were soldered together and AA’d to the tube which was then AA’d to the housing. The LEDs were mounted to a separate heat sink to avoid heat pollution of the driver. I’m out of the house today but later I can post some pics of another build that uses this driver( the “dog-walking” light).
Would love to see this. I am thinking of basically just building up some alu, and once tall enough sticking it to a small motherboard chipset heatsink. That should hopefully work.
The light is an old Techna-lite 8AA. I disposed of everything but the shell then dropped in 5 dead AA batteries and poured in melted wax. After it cooled I extracted the mess and used the wax core to make a mold which I then filled with epoxy. I made two of these and drilled down the center of each to run wires and a barrel jack. This gave me a rechargeable 5s2pAA pack that fit in the same space as the original. The light was a waterproof twisty that I did not want to drill through to install a switch so I did this:
The switch is mounted in the center facing the butt end of the light. A bump turns it on/off and a light jog is enough to compress the switch to change modes. it could also be operated by twisting the head to compress the switch. Note the three tiny springs that augment the switch spring.
The driver is located to the side of the cup in the short cylinder. It is very carefully installed with Artic Silver into that cylinder to closely couple the driver to the cu and in 3 years the driver has never gone into thermal shutdown. It blinks and drops to low mode when Vb drops to ~5.5V but only then. I use a 7.2V 350mA Vistalite charger and plug it in overnight. 2 plastic screws located on either side of the switch hold the switch and attach the cup cover which the barrel jack is mounted to. This allows me to unplug the battery pack and plug the pack into the charger. Both copper pieces plus the bits inside are cut, bent, soldered, and filed to fit by hand(I did not own a Dremel then).The leds are 3 xre R2’s run in parallel with a cheap Dx triple optic. It lights up the entire road at about 30’ and makes and 1’ circle at 3’(nice for locating dog business before I step in it) with some spill left over. I first drilled holes in the led sink to locate the optic then used the optic to locate the stars and hold them in place until the fujik cured. Although not an edc this is my light of choice when walking at night. Cars stop 50 yds away thinking a motorcycle or another car is approaching then come on more slowly when I dim the beam and shift it to the side. I’ve never bothered to do a tailcap measurement. I took it to work once and it fell out of an attic, bounced off a shelf, then the ladder and onto a ceramic tile floor changing mods at each bounce(think Jamie Lee Curtiss dropping the machine gun in True Lies). For a plastic light that was free, it has been a real work horse.
That is awesome dude. Thanks for the post.
I’m not sure if “awesome” is the right adjective but thanks. My work has been described as “steam punk” and ’though I don’t know what was meant by that it makes me think “early industrial age attitude” which is okay I guess. I really didn’t know squat when I made that light but it has held up well.
The more I am looking at this, the more I worry about my 6s2p setup not being able to supply the needed voltage to run these on full power 2.8amps. Can you take a quick look again and give me your opinion. I won’t know until I try, and I can always go up to 7s2p if needed, but I would have to jerry rig some battery holders to make that happen.
I’ve never done current readings on this light as I did not have a dmm when I made it but I did pretty much the same thing with a 3 up cutter 32 mm series board modded to 3s. That is a bike light running off of 7s nimh 4/5 subc that I usually run in pairs(7s2p) so I know it works either way. The driver is most efficient at lower voltage but doesn’t output the full current until it gets >7.2V. Even then, it’s a bit of pot luck. If you can, go ahead with the 7s since it will give you more run time. Some places have an 8s AA holder that would work with a dummy cell. For my dummies I use a length of 1/4” copper tubing with a drilled disc soldered ~1/4” up from one end. That end nestles into the spring with the disc acting as a stop. The length of the tubing above the disc = the size battery you are replacing.
Good luck with your headlight builds guys ;)!
One day Ill definitely try to make my dream head lamp, it must be real fun, because you can have more design variations than with flashlights which is awesome, because that gives you some creative feedom and some technical limitations are also absent!
For anyone who considers a similar build….DON’T DO IT.
These drivers are just pretty much suck. I had one not work at all, and the other required 8 AA cells to reliably power (1.2v Sanyo XX cells) and would just randomly cut down to a lower power despite multiple attempts to heat-sink. It also never felt hot. I have built enough LED bike lights and an LED array for my fishtank, so I have a good sense of when something is complete crap or not. This is an instance of you get what you pay for.
Good thing they were $6, and I will keep them for another build in the future, but I don’t trust them for 2 seconds in my “going 15 mph in the woods in the dark and am miles away from my car” primary light source.
Just sucked it up and ordered a TaskLED b3flex. Going to run the 2 XM-L’s in series with that driver and be done with it. Now I have to buy a new switch.
Might not of saved a ton of money, but I learned a great deal in the meanwhile….which is half of the fun! The cheapest light with similar output is around $190, and I have about $100 into the project, so I am still doing OK.
sucks about the duff drivers but at least you’ve ended up with a fantastic one in its place. They take a while to program (was that 8 or 9 clicks?!!!), but it’s worth it in the end. I was trying to explain the benefits of mine to someone on a ride last night and he said he didn’t mind cycling through flashing-SOS-low-mid to get back to high. I’d end up in a pile on some rocks if I tried to do that while riding ![]()
That’s too bad. The biggest problem with these cheap drivers has always been inconsistent QC. The soldering is often poor and sometimes the wrong parts are used. That business with switching modes was mentioned over at CPF while some found it would not switch modes at all. I have found that if you get one that works properly, it seems to be quite reliable.