Your English is fine. We appreciate your time in explaining your mod with all the photos and illustrations. There is obviously a lot of effort and time you've taken to explain this. Good job! The old D Mag is still one of my favorites, and yours looks great with the camo and 5 x XRE. If your driver could handle 13V (don't try this, it will probably blow the driver), I wonder if 3 x 18650 would fit without the screw and battery spacer. You can still flip or shorten the tail spring to make more room. Darn, now you've got me thinking about tearing the drop-in out of my TR-1200 (works with 3 x 18650 and burns with regulated current) to rob it of its 5 x XRE drop-in to stuff into my 3D mag. I could then use the TR-1200 host to drive a XML at full throttle in an easy to access host for experimentation and other mods.
Besides the outer lip, did you have to grind all the points with arrows pointing at them? Sorry, Im not very good with Spanish.
I wonder if 3 x 18650 would fit without the screw and battery spacer.
Yes, they do, but not with the original spring. You will need to use another one, or cut the original. You will have to bore the anodized of the bottom of the tailcap because it is not conductor.
I tried to translate the arrows in the text, put these labels in each arrow:
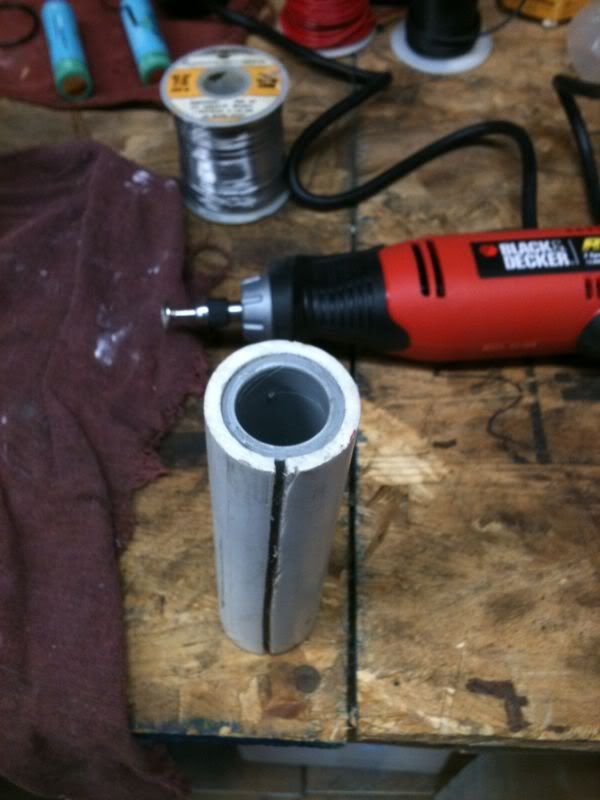
Anyway, it is not that difficult, i didn't know how to do it, so I took the module, the maglite head and the grinder and started grinding different parts, till it fit :)
Grind 1 mm of the diameter here This ring has 3mm of thickness, it must be 1mm
Thank you for sharing this mod. Very nice work. I'm now thinking about trying it out with an old 2C mag that I have.... I just need to figure out what to do for batteries. I was originally planning a ROP or variant thereof, but this might actually be easier. How hard was it to file down the drop-in (I'm guessing you hand filed it). Yet another reason I yearn for a mini lathe
Having no experience with a ROP or various bi-pin mag mods, how well do you folks think this would compare?
It is actually brighter, over 1000 lumens. But the most important for me is to have more than 1 hour of runtime (in high) with 2 cheap trustfire 18650. With a ROP, you need to use more than 3 expensive AW 26500, and wont have more than 40 minutes of runtime..
Okay, thanks for the nice information. On my hand I have a Mag clone, and I was thinking of how to use 18650 inside, and you just gave me an idea. Is that all 3/4" and 1" PVC pipe have exactly/nearly same inner diameter?
Here is what I recently did on a 2D Mag w/ (2) 18650's. I used standard 1" PVC cut just short of reaching to the tailcap threads. Cut a slit from top to bottom down the side of that 1" PVC pipe. Then I used 3/4" PVC electrical conduit cut to the same length. Don't forget to slit the 1" PVC. I did at first and was wondering where I went wrong.
I tried regular 3/4" PVC and it would work too, but the electrical conduit gave a little better fit (I think the inside diameter was better suited to the 18650's so there was a little less battery rattle. Here are some photos:
They don't have to be expensive. I picked up DX's XM-L module (same size as one in the OP -about $20. Bought 5 pack of DX glass lenses at a couple bucks. I ended up replacing my switch since I butchered my original but that was a couple bucks for a 10 pack of clicky switches. So I have about $25 into mine, although a lot of my time. I'm doing a 3C
Mag XP-G now and that one is running me about ) $18 plus the host.
I picked up two 2D Maglite look alikes from local grocery store, went to buy some food, ended up spending fantastic amount of money on them, 5.5$ total to be exact, so was kind surprised to see the high prices, all I want is one thrower and one super long runner, thats all, but not for 50$ both :)
BTW, ezeqdb, fantastic wall of light, well done, looks really impressive, now makes me want to have one like that too, except I want mine to be running off 2xD cells, is that even possible?
I also did a 2D mag mod using a P7 module from DealExtreme. This one got expensive, I put a voltage monitor in it from Western Electronics and used a small piece of fiber optic to relay the monitors color scheme right above the stock switch. So now when the light is turned on it runs a checklist then displays a color for the percentage of voltage left in the 2 32650’s, great for knowing if your light is going to get you through the chore ahead! These 2 cells will run the P7 for several hours, no modes so it’s an always on hi deal at some 900 lumens and a flood of light.
I cut the tower on this one as well and soldered wires from the switch to the driver. piece o cake. The drop in was something like $20, the monitor was $50 or so and $20 for a pair of 32650’s from Novae. I think the Purple MagLite was $19.
I used some 3/4” electrical conduit from Lowes that was a bit too big for the Mag tube once inside the 1” PVC. It expanded the split PVC so drastically I could barely get it into the tube. I ended up slotting both the 1” and 3/4” tubes and it fits perfect, with no battery rattle.
What I don’t understand is how to modify my spring to contact the the 18650 without too much pressure.
Cut the 2 bottom “turns” of the spring, so it can fit all the way down, then use one of the larger rings, compress and place it where the stock spring sits, use copper braid to make contact between the large ring and the cut down spring.
I found that when the spring compressed my battery spacer was actually pushing the spring end away from contact with the battery, and bending the spring end up a little bit kept that from happening. The one advantage to my slightly longer spacer is that it keeps too much pressure from being applied to the end of the battery by the compressed spring.
Now, to find a good, cheap LED conversion. I’m torn between doing a KD drop-in conversion ($20+shipping) a Malkoff Drop-In ($40+shipping), Fusion 36 ($25+shipping) or 3w LED PR-Bulb swap for ($15).