like texaspyro wrote.
Higher voltage and therefor lower current lead to less energy lost, thats why the power supply lines are normally in high voltage.
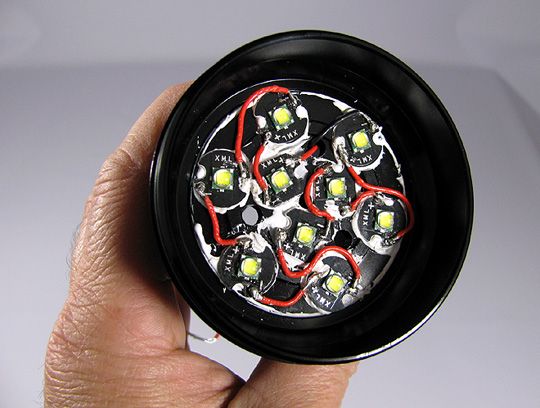
If you solder them in series the resulting current through all wires is 3A.
In Stock the tailcapcurrent flows through the wires between driver and LED and a third of that current flows through the LED wires.
If you mod it all wires see the same current from about 3A…
AWG22 is good for that. The stock wire is to small in anyway
You could try making a clay mould of the space you want to fill with metal and see if you have a local sculpture workshop - the one near me can do bronze and copper melting and pouring into a mould. It’ll cost a bit, but probably way less than paying someone at UK prices to machine a chink of copper for you. Machine shops here charge a LOT.
I have my Skyray 9x T6 LED’s about 1/3 rewired in series at this point. I don’t think I’ll complain about the price of these lights in the future. This is a lot of precision work to wire one of these. I’m used to rewiring 1-3 LED’s, but this is my first 9x light. Each 22AWG silver wire has to be custom cut to the proper length, pre-tinned, and care must be taken when soldering each wire to insure it is positioned properly so the reflector centering rings mount correctly. Not a job you want to rush through.
I rewired my Skyray 9x T6 in series with 22g silver wire, but one of the contacts on an LED fell off, so I can’t test it until I can get a replacement LED for it. The size of the star is pretty small at 13.73 mm diameter. Figures, it’s always the last one that causes issues…LOL.
I ripped one contact of an LED off as well, just scratch the paint of the conductive line which lead to the ripped contact. You can then solder to the copper path…
Oh that sounds confusing but I hope you get what I mean…
Hey Werner, sure I understand, but wouldn’t soldering to the copper path interfere with the plastic LED centering ring? I’m pretty sure without them or even one of them, the reflector will contact the wires and not work. If you do that, please let me know if it works. Thanks for the heads up.
For me it worked, but I don’t know how much you ripped off, I just scratched 1mm or so next to the pad so that there was enough space to the ring.
On mine the pad felt off while desoldering the stock wire, without any force applied.
These centering rings and the tight fit of the reflector could really be a problem, but wouldn’t it be boring if everything is to easy…
Also I have now some dust on my reflector and don’t know how to clean it, perhaps I order a photo brush or so…
Yep, that’s how mine came off, when desoldering. To de-dust the reflector and lens, I typically use my compressor to remove it. I never touch the reflector for any reason, but the lens is usually an easy job. Sometimes I’ll even rinse the reflector under water, than use my compressed air to dry it off completely. These lights are really nice with a dust free lens and reflector, or any light for that matter.
Hmm this is strange. I just got a nice Extech EX320 DMM and did a tailcap measurement of this light on high with 3 Trustfire “5000” mAh flames. Each battery tested at 4.12v. The highest reading I could get was 3.7A. I’m wondering if my DMM leads are sucky because according to the review, I should be seeing about 6 amps…Right now this means each XM-L is getting like 400mA…
Doing a white wall comparison with my Nitecore TM26 Quadray, which is ANSI FL1 rated at 3500 lumens, they seem about equal in output….The Nitecore might have a slight advantage, but just slight. This really has me confounded.
You can try shorting the tips while measuring tailcapcurrent, I guess the brightness will increase. On this light even slightly voltage loss cause less current.
So exchange your leads through thick wire.
As the LEDs are 3S3P 3A tailcapcurrent means 1A through every LED.
And of course the weakest point is the positive spring add a piece of copper braid and a you will need a pair of sunclasses
One thing I am not sure of is that the light has hearable Pwm even in high mode, perhaps this can cause false measuring to…?
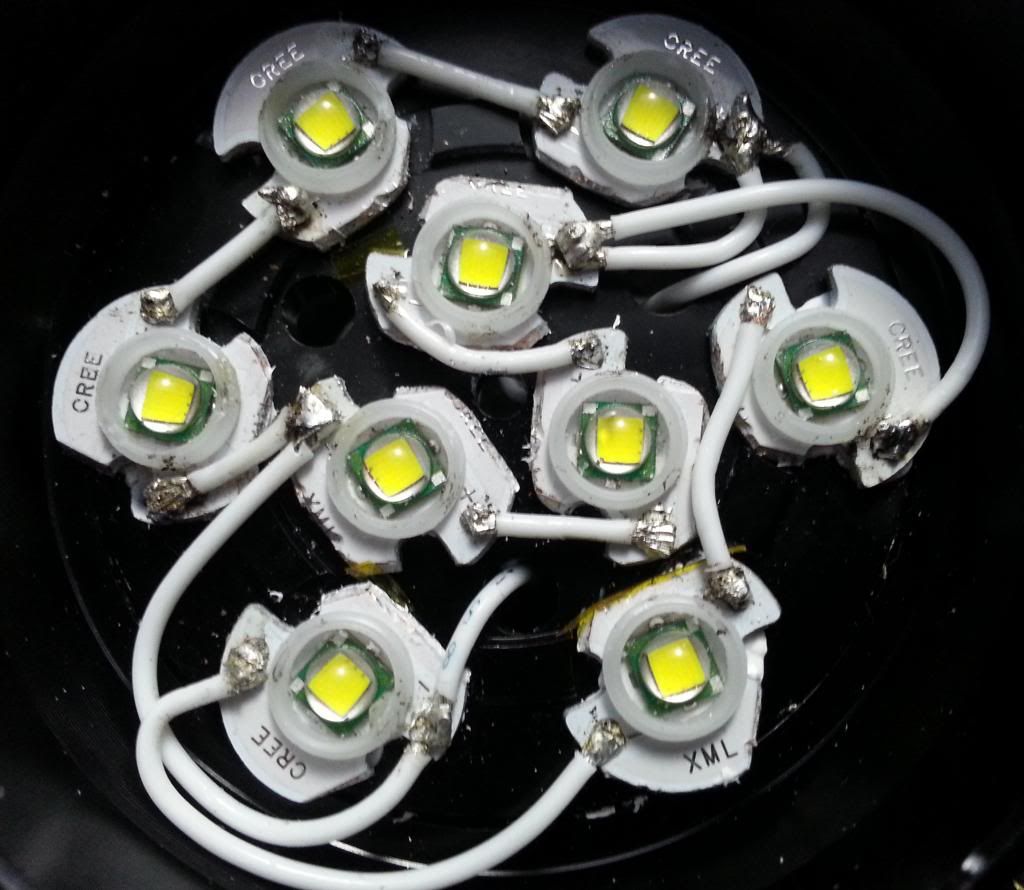
I haven’t checked out the forum in a long time and figured I’d post some photos of my mods here. I hope the OP doesn’t mind. I got a copper heatsink from some online metals website. It only needed light sanding to drop right into the back of the reflector head. I did have to drill holes for the lead wires though. I replaced the LEDs with neutral white ones and changed the wire to 20 AWG silver coated teflon wire. The tailcap didn’t seem to be making very good contact with some 26650 King Kongs so I soldered some small metal spacers, meant for recharging, onto the switch contact. I also followed Werner’s lead and kaptontaped the underside of the reflector. All in all, it wasn’t very expensive, but if I did it again, I would probably keep the cool white LEDs for brightness. The copper heatsink adds a ton of mass and makes the thing a beefy potential club, but it was a pain in the butt to drill holes into it.
I tried to maintain the same orientation as before to keep it simple.
Initially I thought the driver was dead and ordered a KD driver before reading that it didn’t work properly in parallel. At this point re-wiring sounds like too much of a pain. It turns out the original driver wasn’t broken, but rather the wiring was messed up. I am still very disappointed with the merchant I got this from, but oh well, it made for a good learning experience. I don’t have any beamshots, but the LEDs are NW anyway, so it’s less output than the CW ones.
I have learned a lot from the members of this forum, so if there are any questions about these mods, please feel free to ask and I’ll help if I can. I can also post links for the parts if anyone is interested. I did the mod for the learning experience but all in all it probably isn’t worth it from a practical point of view.
Very nice job! Can you please post the link where you purchased the copper slug from? Also, what is the thickness of the copper and does it come in thinner slugs? Thank you and we look forward to some beamshots.
Thanks! I bought the copper slug from this site: If the link doesn’t work, it is Onlinemetals dot com.
Click “Copper” on the left hand side of the home page. Then click “Copper Round Bar”. Then click “C101” for the pure Copper. There are various diameter rods available. I used 1.5” diameter and had mine cut to size (1” cut). I then drilled 2 holes for the lead wires (which I replaced with 20 AWG wire). The rod was marked as 10.25$. I also got 2 similar aluminum slugs for practice fitting, and because they were only 1.10$ a piece. Total including shipping was less than 20 bucks. This was the cheapest place I could find out of a few different sites. Hope this helps!
I tried to do a photo comparison of this light with my Sky Ray King in Neutral White, but all I had was a camera phone, and it’s hard to appreciate the difference in output. Right now the light is out of commission until I can find a better solution to the tailcap switch boot. If I jostle the light around, the batteries have too much play and contact is momentarily lost, causing it to cycle light modes. The spring for the positive end is also insufficient. It’s extremely thin and doesn’t seem to make very good contact either. I tried stuffing silver coated wire into the spring, but it’s hard to tell if it helps once the head is screwed on.
EDIT: Has anyone fully re-wired in series and tested out the KD 9 LED driver?
The positive tailcap needs to be upgraded if you want a real lumen monster.
If you add copper braid to that spring the tailcap current will raise up some amps.
I may have to do some mods to mine after reading this. Its somewhat sad this light isn’t any brighter than my Nitecore TM26, which has 4 fewer LEDs and is about 1/3 the size. I have shied away from this light because I always worry about it blowing up in my hands since I run it with Trust fire protected 26650’s. I just don’t trust those batteries. Perhaps this thing with some wiring upgrades, braided copper on the springs, and an upgraded driver could turn it into the monster it should be.
On my (Fanyfire) 9 XM-L light, the PWM whine/sound gets really high if i point the light towards my body and hold it fairly close.
Is that the case for someone else too?
No, its not a 1. of April joke or something!
As I mentioned in the other thread, Ive got a Fanyfire 9 XM-L on the way. When I get it, I’ll post my findings (amps, any anomalies, etc). Double check your grounding points. Does it buzz when you power it up without the tail cap (jumped with a piece of thick wire)? A poor connection isnt always obvious until you power the driver with a remote power supply. You can tape cells and test leads together if you dont have a power supply. If youre sure you’ve got good grounding points, maybe you need to power up the light with the driver removed to find out where the buzzing is coming from. A few of the lights Ive received were soldered using cold solder joints and required me to remelt the joints to make good electrical connections. Some required more solder to an existing joint. Ive also used lead based solder with existing lead free solder with good results. As you probably already know, put a dab of flux on the connection your about to touch with the iron to protect it.
How loud is the buzzing? Does it buzz in all modes? (h/m/l)
PWM on ALL modes. Werner have confirmed that in this thread too. As said, it was horrible at first, but then I tightened it up, and it got ok/decent. If I were out walking, holding it by the hip it would probably close to nothing… Its only a a very minor complain now.
I don’t remember how noisy a typical nanjg 105C is on medium, but Im quite sure its less than that. I have now added a super thin layer of solder to the spring side of the driver circuit, where the aluminium screw in piece/negative connection gets contact to the driver circuit. Connection should be is as good as it gets on that side…
I easily hear PWM in a silent environment. I don’t know about many people who complain on PWM noise as much as I do though.
Luckily im not visually sensitive to PWM…
The sound is there without the tailcap, using a thick wire and pressing it towards the battery and body as good as I can. Im fairly sure its not the tailcap despite the flaws in that.
My Power supply is good enough for checking most drivers in the 5-15V range, but it will not handle the amps on this one.
If a take the head of the flashlight towards my body when its on, the PWM gets quite loud… That is quite strange and funny…
Im quite sure its supposed to have some PWM whine even in optimal conditions. Some “older” men will probably not hear it no matter how good they try.
Seeing all the other tailcap readings in this thread mine seems fine, considering that im getting a bit under 5A with 3,9V 18650s. That is better than several guys with 26650. But the size/length of DMM wires, and quality of batteries may be limiting factors for some?
(Not saying my wires are perfect for 5-10 amps measurements. )
I just need fresh and good 26650 cells and some mods and the juices should be flowing even better. Im in no hurry with modding this light as I have several other lights I want to finish off first… Its not much darkness here at this time of year anyway. Im not interested in possibly pushing my 18650s up towards or beyond 6A if they are freshly charged and capable of that in this light…
What king of batteries will you be using FlashPilot?
Looking forward to hear your impression of the light!
When you mentioned the buzzing sound, I assumed it was very loud. Many drivers buzz softly but cant be heard outdoors while walking. I cant imagine anyone using this light for whitewall hunting.
My initial tests will be using Sanyo UR18650FM’s because of their ability to sustain the highest voltage throughout the discharge curve. If the light needs more amps, I’ll add copper to the springs, retest and go from there.