95% of those nicks will all but disappear with a few passes from a heat gun. I wouldn't strip & re-wrap just for the damage shown in that pic.
The silicone caulk junk in the white Acer packs is a lot tougher than what I've run into in other packs and a few of my cells had the wrap stretched out pretty bad but not torn. I went over them gently with my hot-air-blowing butane pencil iron and all the bad spots went away.
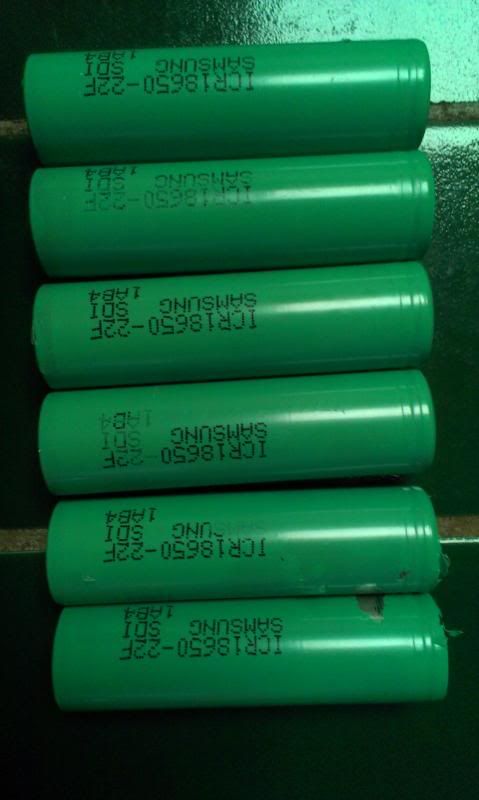
edit: OK, 4th one down from the top I would re-wrap, due to the nick at the top corner. The others will be fine after a little heat.
"A short" in this case will only be between the - and the light body which is the exact same 'short' the tailcap switch creates to make light come out the shiny end. Nicks in the wrap on the sides of the cell body will never be able to make electrical contact with the body of the light unless there's a corresponding burr on the ID of the tube, highly unlikely.
Unfortunately an i4 won’t help you measure discharge capacity. A bit tedious, but you can measure relative capacity by discharging them down to a particular voltage in a light — a lot of work for very little information. With a DMM and a resistor you can measure internal resistance.
I agree with Comfy, the battery body will only contact the part it is supposed to contact anyway. However, I would already have them rewrapped if my FastTech order wasn’t sitting in Hong Kong waiting for the bomb squad!
FYI, all the black and white gunk came off no problem. The gooey double-stick tape was harder, but it’s gone now too.
If you are into this old/new laptop battery pack adventure like me, I strongly suggest not only a good DMM, but also a good hobby charger. It takes out the guess work. A good voltage reading out of the pack is not enough statistic, but more importantly its discharge capacity, which a hobby charger can give. In my case I keep cells that retain at least 75% of its nominal capacity for my nicer lights.
A hobby charger’s digital readout of the growing voltage rise (abnormally fast) of a cell during charging can also give you another symptom of an unhealthy cell. A cell with a still high voltage reading after a charge will collapse when subjected to a hobby charger’s adjustable discharge rate, usually manifested at 2A or higher.
Oftentimes I got disappointed from cells that read good voltage readings out of a pack, only to show it ‘tiredness’ due to heat and cycles in its lifetime when subjected to hobby charger tests and readouts during after the tests.
The good new is I have not yet encountered a bad cell from a brand-new pack, regardless of its individual cell voltage when taken out of its shell. (some as low as a 1.78V pair)
Okay, I can’t stop calling them “smart” chargers, but I agree! But wait, there’s more!
It’s also takes out the “work” work! Just drop the batteries in and Know. Leave the dangly VOM leads and fiddly calculations in the box for “serious work”.
Recycling laptop packs gives you a slightly different ‘view’ on battery-related things. Smart chargers clarify that view.
I use the cheap-o chargers which I test as thoroughly as anything else, but I also don’t really care about capacity since I have packs of extra batteries (if I don’t pun it, who will) lying around. But I believe in knowing. If your time is worth money, smart chargers are actually revenue-positive, even if just to cull dying cells without having to carry them around…
Just trying to draw some attention to some Really Good advice…
Nominal Capacity* 2,250mAh
Nominal Standing Voltage* 3.60V
Charge Method* Constant Current-Constant Voltage
Charge Voltage* (V) 4.20 (MAX)
Charge Current* ( C ) 0.5 (MAX, above this may cause damage)
Discharge Voltage* (V) 2.75 (Below this, internal damage will be irreparable)
Discharge Current ( C ) 0.2
*
You have to remember these were not ment to be used as singular cells, they are supposed to be in a pack chargerd together, this is why the charge amps and discharge amps are low.
Apparently not. It’s like breaking into a wild-found honeycomb… You can tolerate a lot of waste and still come out with something sweet.
If you’re in OK, you know about ice. Specifically, Ice TRAYS. The modern plastic kind only release their bounty when you grab both ends and twist.
That twist motion works GREAT to break the welds on laptop pack shells, so you can see where to pry them open. Twist more and more welds break. The pack inside can take a surprising amount of this, but be careful. I’m not bragging a bit to say lately I don’t seem to need tools until I get to the nubs where the buss strips were welded to the batteries.
BUT… Full disclosure, I just wasted 3 batteries (awww) by grinding them together (not on purpose) until they shorted out and melted parts of the covers with smoke. I was able to solve it by dumping the pack out of the shell & pulling the ends apart. So now I only have SIX new (-ish) batteries to play with.
Anything above 3 volts is usable, I’ve revived cells below 2volts, and they are happily being used daily In my own lights(single cell), as mentioned above pick up a hobby charger if you want to harvest laptop batteries, then you determine the available mAhours in each cell and then accurately group them in batches.
No need to charge them in pairs in the i4 , the charger will simply finish the lower capacity cells first.
I’m using cells with 800mAh quite nicely (originally 1600Ah and 2200mAh), toss any that don’t keep their voltage above 4 after a few weeks.
Not damaging a single cell in extraction can be done. I can’t remember the last time I even scratched a cell. You just need to go SLOW. This isn’t a race. You don’t get a prize if you extract the cells in 1 minute, although that would be nice.
It’s actually the opposite. The object is to NOT damage a cell. If that takes 15 minutes … Oh well, that’s the way it is.
ALWAYS pull AWAY from the cells. Never rest your pliers against the cells to use them as leverage. If all you can do is snap off quarter size pieces of the pack, well, that’s all you can do. You’ll get ’em out eventually.
I’ve tried the twist method, but found the chance of damaging cells too great. They smash up against each other. I +DO+ need some of those fancy pliers though.
I will use a dremel cutting disk sometimes. Some packs are kinda boxy and allow you to safely undercut, so the blade stays away from the bottom of the battery. Hard to explain.
I don’t cut the whole pack open with a dremel. Just allows me to get a hold on a corner or whatever.
Also, many times I grab a piece of plastic with needle nose and then keep turning the plers so I end up tearing off a strip like an opening key will on a sardine can. The pack plastic ends up wrapping around the pliers.
Also on the subject of removing glue, I have found that edge of a wooden chopstick works wonders. Or maybe some other small piece of wood. The wood is soft enough to not scratch the label but is hard enough to chip off the glue.
Truth is, I have no idea how the chopstick works. Sometimes I use the square edge to physically scrape off the glue. But other times, I just rub the edge briskly over the glue and it breaks up and falls off. I know this sounds like it can’t work, and you’re thinking your thumb is just as good. Trust me, it’s not. Chopstick is MUCH faster.
Chopsticks? Hmm. I think that we have a few (like HUNDREDS) around here somewhere :)…
Also, after I do the “sardine can” think to pull the tabs off (using needlenose), I just take the flat side of the needlenose, and tap the (hopefully small) pieces of the tab that are still sticking up off of the contacts. The tab metal is pretty thin, so I end up with a pretty much even contact.
Youd’ think you’d mess up the neg poles more if you twist the spot-welded tabs, but the opposite is true. Twist in a circular motion, while pulling out. I have found that the bottom pops out more often, if you roll the tabs around your needlenose like a sardine can lid. It’s better — like I said — to pull but also twist in a circular motion.
I mean — whatever works for you — but the twist-and-pull method seems to keep neg-pole deformation to a minimum.
Also do it quickly with a wrist twist. The quicker the better. The welds will pop off, but the bottom will stay flat.
The one (and only) pack I’ve done so far was maybe a worst case type thing. There was no room to do much of anything without running into the batteries. I now have a Dremel at my disposal so that may help, but every other pack I’ve seen had an area to work on that wasn’t right up on the batteries. Should receive the one from ebay this week so I’ll review all your helpful hints before tearing in to the new battery pack. (it was good to have one to practice on that didn’t matter as much)
>>>>>>There was no room to do much of anything without running into the batteries. I
Yes, you can’t use a cutting wheel when the pack is roundish and curves with the batteries. And you don’t need one with these acers because they’re so flimsy.
But if you look at even the acers for just a “what-if” kinda deal, you can see where an edge is squared off and not rounded. Because a battery is round, if I cut into the pack at the very bottom edge of that square side, going in just enough to cut the 1/8” plastic, the wheel will miss the bottom of the battery by quite some distance. Okay, now if the other opposite edge (running the LONG way) is also squared off and not curved, I can also go in and cut that lengthwise. Now, I only have to snap off a couple inches of uncut plastic on the ends, and the whole pack is breached, and the batteries just about fall out.
Man, so easy to do, but so difficult to explain. :–0
Also, anyone planning to do tool packs, do yourself a favor and get some torx bits, especially the torx security bits, also called “tamperproof” bits. They have a hole in the center, like thissa one here:
Save yourself a lot of colorful language and trying to drill out the torx screws, which just pop out with the correct tools.
These cheepie sets fit the screws in about 99% of the tool packs I run into.
Drill packs are tough as nails .....i had a few and wanted the batteries out ...'Right now ' i took and used really sharp shear cutters and nipped the plastic all the way around the security torx screws ..It looked like a rabid beaver gnawed his way around each corner and then across the top . I've done it twice ..You just need a proper tool
Don't try to clean up your welds with these .It will work but will ruin your shears .Use needle nose .like ubehebe said twist them more than lift and most welds just pop off .I use a small hand file and knock down any remaining edges on the weld spots
If you’re Googling , those are called “Flush Cutters”. The XCelite ones you show cost <$10 almost everywhere. I love ‘em! Used mine at work today! They break, rather violently and quite suddenly, at the point where the ’brake’ press bent the jaws to bring them together, but they’re so useful and so cheap, I don’t usually bother taking them back, just pick up a new set. Usually when a jaw breaks off, it ‘pings’ away with some force — and it’s Quite Sharp. The “Safety Glasses” warning is no joke.
The ones that don’t break cost dozens of dollars! (EDIT: Not “ALL”…)
Everyone who works on wee electronics should have a set, no BS!
(EDIT: These are the style that doesn’t break as easily for rabid beavers and Dimbos, and they’re quite cheap. Thank you for sending me to look them up!)
 Don't try to clean up your welds with these .It will work but will ruin your shears .Use needle nose .like ubehebe said twist them more than lift and most welds just pop off .I use a small hand file and knock down any remaining edges on the weld spots