would it be possible to mod this board to charge 4.30v li-ions?
You cannot change the 4.20 volt reference in the chip. Technically you could lift the 0 volt pin of the chip to 0.1 volt, but it is not a good solution.
henrik, what is your recommendation for cc/cv charging 4.30v cells? i want something i could leave overnight
I am not aware of any good solutions for 4.30 volt. You can get a few 4.35 volt chargers.
Some hobby chargers can be used, because you can trim the voltage. In that case you could trim the LiPo setting to 4.30 volt and the LiIo to 4.20 volt.
I wonder if Kreislers dream charger will have that possibility.
Has anyone tried the 1.5a versions?
http://www.ebay.co.uk/itm/390683333577

Also if I stuck a 10k variable resistor as the current resistor could I then install one of those cheap led ammeters for checking the current or would that being there mess with the charging?

Hello. Does anybody know if it exists a module like this, but for charging LiIon in 2S configuration? Or should I use one of these cc/cv modules adjusted to 8.4v and one of these FT protected battery boxes ?
I like these charging boards, i wired one of mine to a lipo volt meter and a male usb plug.
Also gave it the resistor mod which was a real pita.
The volt meter may not be totally accurate but gives a good idea of cell charge.

Is there a NIMH charging board like this one?
I’ve searched but could not find anything.
Nice mod crx.
Changing the current resistor isn’t hard if you reflow the board on a hotplate or stove. You can keep a eye on the temp with an inexpensive food thermometer. 0805 resistors fit ok on the pads. Needs just a tiny bit of solder paste.
FT 0805 3.9K-62K Resistor Pack
Thanks for the tips.
I haven’t tried reflowing yet but it’s on the agenda, plus i have a gas cooker and no old pots…
What’s the temp range to aim for when reflowing?
I aim for as low as will flow my solder. Sn63 Pb37 should flow around 183°C.
Probably better to keep lead solder out of your kitchen if possible. People use a portable electric hot plate / stove or griddle. If you have any, a piece of scrap metal is usable instead of an old pot or pan. Could even try a flatened piece of a soda can aluminum if nothing else is available. Not sure if the heat on such thin aluminum might be uneven on a gas or coil electric burner. Worked ok on a flat top electric burner.
~ edit ~
Guess you don’t really need solder paste at all for this. You could pre-tin the new smd resistor with any solder. Then reflow the board, remove original resistor & place the new resistor while its hot with tweezers.
Recommend buying from Chip_Partner, ICs_Processors or RMM (usa BLF seller).
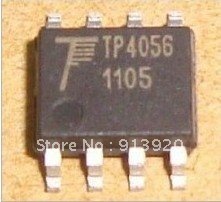
I just noticed there are now some boards on ebay with a different chip, marked “TP4056” but lack the stylized TP logo. Seems to be the cheapest $1 boards on ebay. Have to love chinese companies. ![]()
<img src=http://i.ebayimg.com/t/1pc-5V-Micro-USB-1A-1000mA-Lithium-Battery-Charging-Board-Charger-Module-/00/s/NjAwWDYwMA==/z/JTwAAOxyBXNSVO-m/$T2eC16h,!zIFIeoE4OF-BSVO-kYP7g~~60_1.JPG>
I would guess these chips (without TP logo) are likely Tapower “tp4056” chips. Pavithra_uk reports that he has one & it seems to behave different.
Original tp4056 NanJing Top Power chip. Datasheet
The chip that HKJ tested. Also pictures that others posted have all shown this chip.
I’ve bought from Chip_Partner and ICs_Processors for $1.54. Always received original tp4056 Top Power chips. RMM now has them for $1.42. Once brought a cheaper board elsewhere & got an unmarked chip. Was not cc/cv at all. I did get a refund tho.
I didnt re-read the whole thread, so excuse me if this has been adressed already :D!
The question is - should the battery be connected to charger prior to plugging charger into electricity or not?
Im asking this because in both of of my TP4056 boards if I instert battery after they have been plugged into electricity then it will show it as fully charged(red led on) even though the battery is well below 4.20V.
When I put multimeters probes to test voltage then the blue LED will light up indicating that it has started charging the battery.
When I connect battery first and only then plug chargers into electricity, then it will seem to charge fine, however, not always, at least on one of the boards it might as well display battery as charged even after multiple attempts unplugging and plugging back into electricity outlet.
I suspect that Ive messed them up during soldering+accidental polarity swap while checking magnets might have ruined them :D!
It is good policy to power up the charger before attaching a battery to it. This is a must for my iCharger to avoid damaging the charger (according to an email from the German representative of the iCharger where he warns against the risk). Therefore I also do that with my TP4056 charger.
Likewise, the battery should be removed before turning off the charger.
The TP4056 is supposed to work both ways.
In my test I usual connect the battery before I power the charger, because it is easier for me.
Vēer, do your boards have Top Power chips with the TP logo?
Sure thing, the logo is there.
I think I wont be using any of them, seem to be unreliable in this case ![]()
Thanks for all the great info. I have bought several and some are labeled mini USB in the auction. some micro, so you might watch for that.
Also found this:
http://www.ebay.com/itm/TP4056-5V-1A-Lithium-Battery-Charging-Board-Charger-Module-/370931033670
???
Much larger
Also can these be used with the solar panels labeled 6V300ma? How?
Those boards aren’t actually much larger, just longer & a bit narrower.
But I can’t see the TP logo on that one. Doesn’t look like the original tp4056 NanJing Top Power chip that HKJ tested. See post #43.
Instead the markings look like they might be 4056ES A1319N. Some kind of symbol or logo seems to be before A1319N. It could be yet another clone chip. Unless you can test it and chart its charge profile I would just stick to the original chip (stylized TP logo) that HKJ tested.
The datasheet for the NanJing Top Power chip claims a max input voltage of 8 volts so 6v should be fine.
Just connect positive from the solar panel to IN+ (next to the usb jack) on the tp4065 board, solar panel negative to IN-. Do not use the usb jack if the solar panel is connected. You could use a couple 6V300ma solar panels to charge faster. Check with a multimeter that the solar panel are actually providing enough voltage & current.
Has more components in addition to the 4056 chip, and costs a bit more. Wondering what the diiference is.
The board cuts the power at 5.5V but I don’t know what that solar panel delivers. Wonder if I could cover part of the board , if V too high, or does that cut A?