UF W-200 Build (dive light mod)

UltraFire W-200


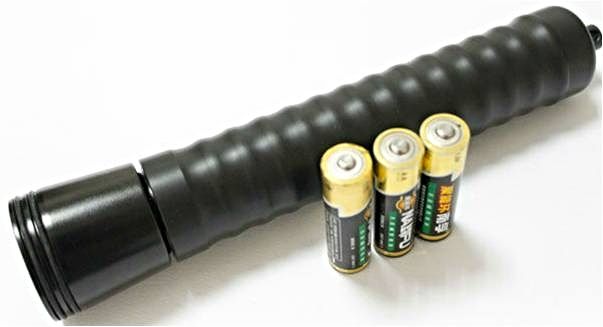
Where to purchase: (TIS, 1Ali, Ali) - 1 I received UranusFire instead of Ultrafire from this seller.

Don't buy this light if you don't intent to mod it. Several cases of flickering and poor light output (Cree XR-E @ ~1A?). Unless you buy the Brinyte DIV02 - their line of dive lights I've found to be of good quality. But I haven't tested their DIV02 either.

Here I'll be doing a simple mod of what used to be a popular dive light. Some years ago there were several threads about modding this light (cf. Packhorse, jspeybro). This build is different from others because I basically throw in a P60 drop-in and call it a day.

My build could use some improving to make it better so feel free to chime in.

1. Using a pick remove the front o-ring, pull off lens, and disassemble the light to this point...

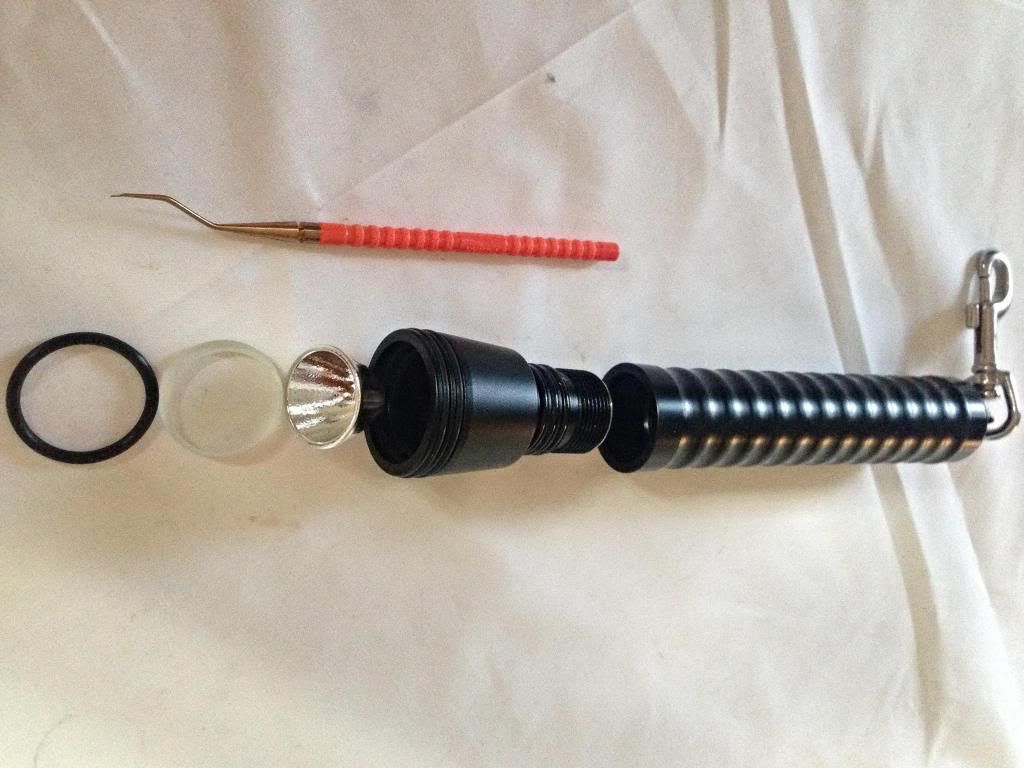
This is the light head looking directly at the LED w/reflector removed... this is what's left of the light head.

disregard aluminum piece & numbers for now

2. Now tap the aluminum pill out from the light head. One of my spark plug sockets works perfectly.

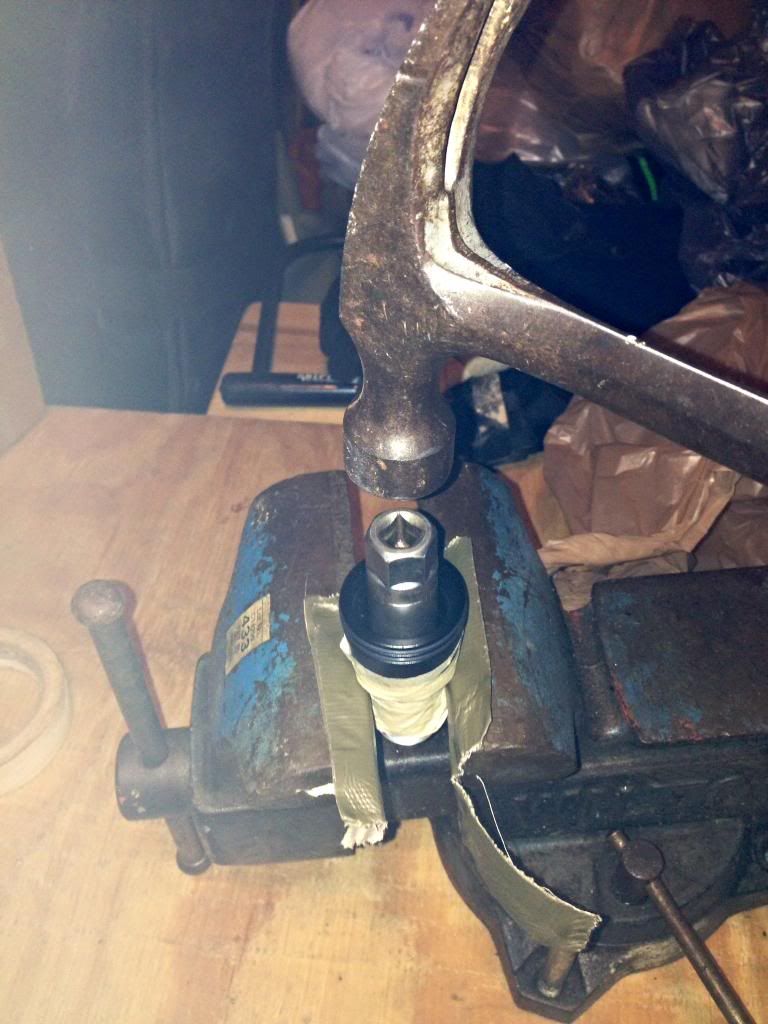
Make sure to protect your light head assembly in the Vise with lots of wrapping (cloth, tape, whatever). Don't want to mar the threads.

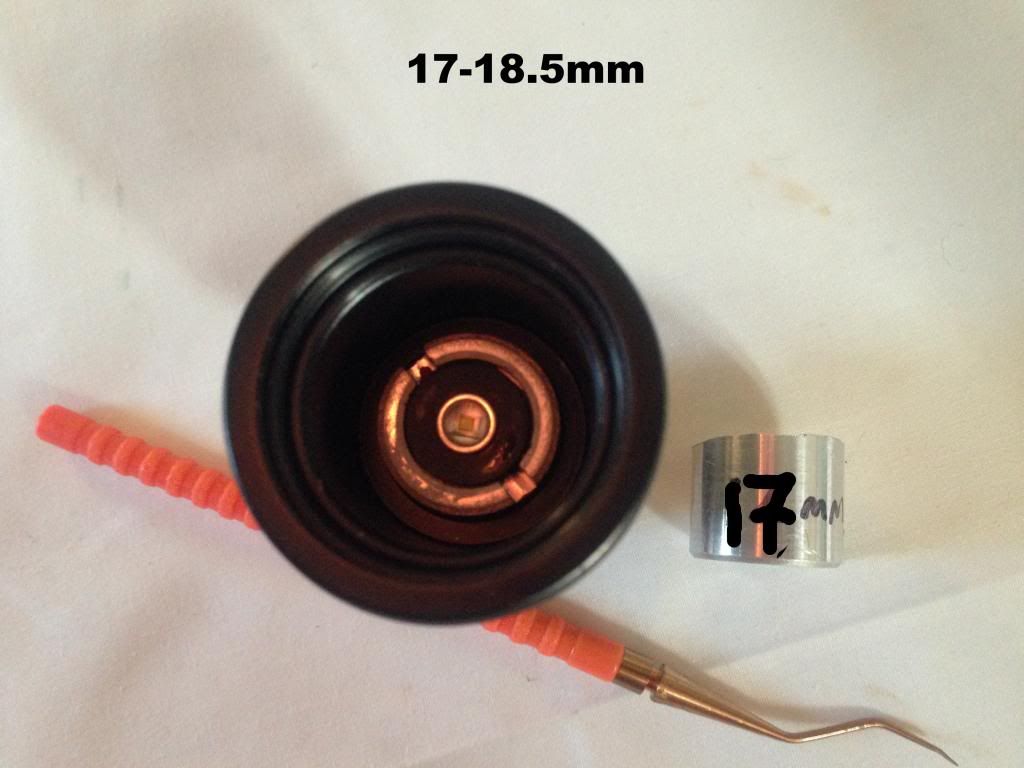
3. Remember those numbers I posted (2 pics above)? You'll need to cut off that amount from the pill (17-18.5mm / 0.67''-0.73''). To be on the safe side I'd cut off ~17.5mm (0.69'') piece. You only save the end with the lip, not the end with the LED.

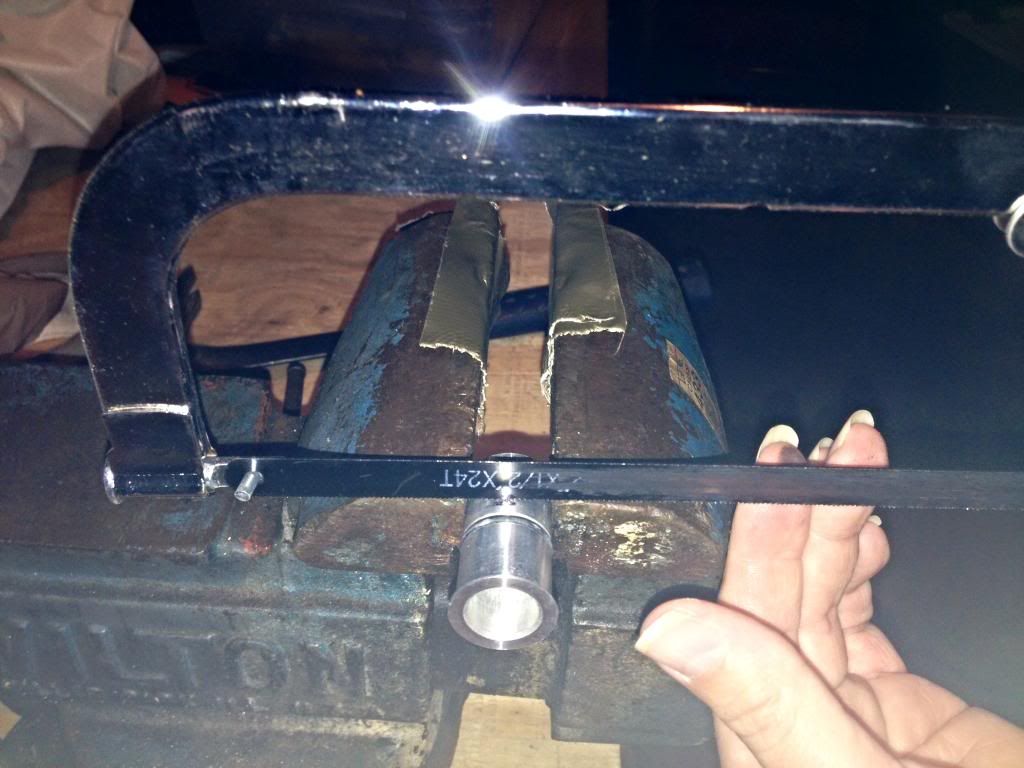
The trick is keeping it straight as you saw.

4. Now you can re-assemble... Lube the aluminum piece you just cut with silicone grease and place it back in the light head. And add your P60 drop-in. You'll need to use the negative contact spring (the large one pictured) on your drop-in.

For Heatsinking to the light head... don't forgot to Wrap the drop-in with aluminum foil or alternative method. Last one I wrapped with 1/2'' copper tape (eBay). I'm looking for better and cheaper solution.

5. The final pieces will be inserting the glass lens with press fit o-ring. You can add GITD (glow-in-the-dark) o-rings for a nice touch.

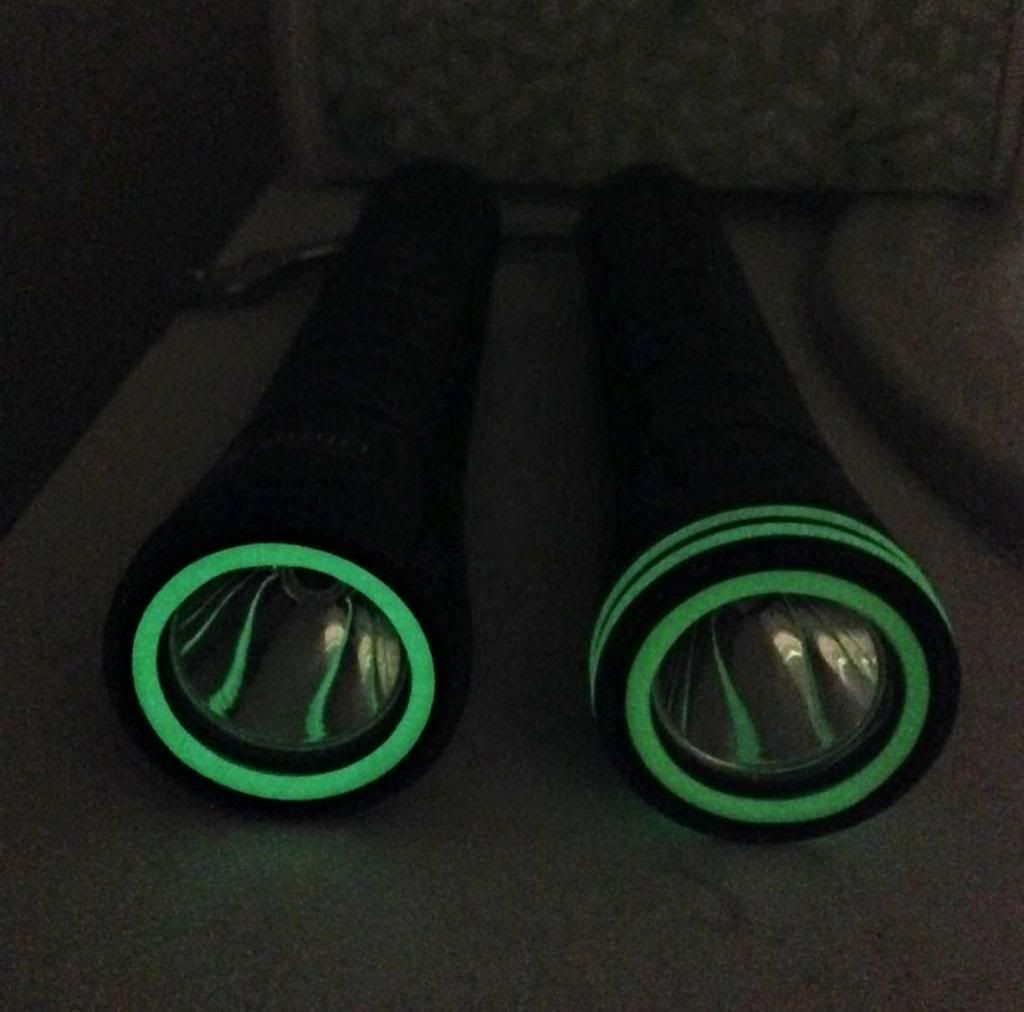
The o-rings last about seven minutes per charge. Here's where I got the 1'' size GITD o-rings (Sigman CPF MarketPlace).

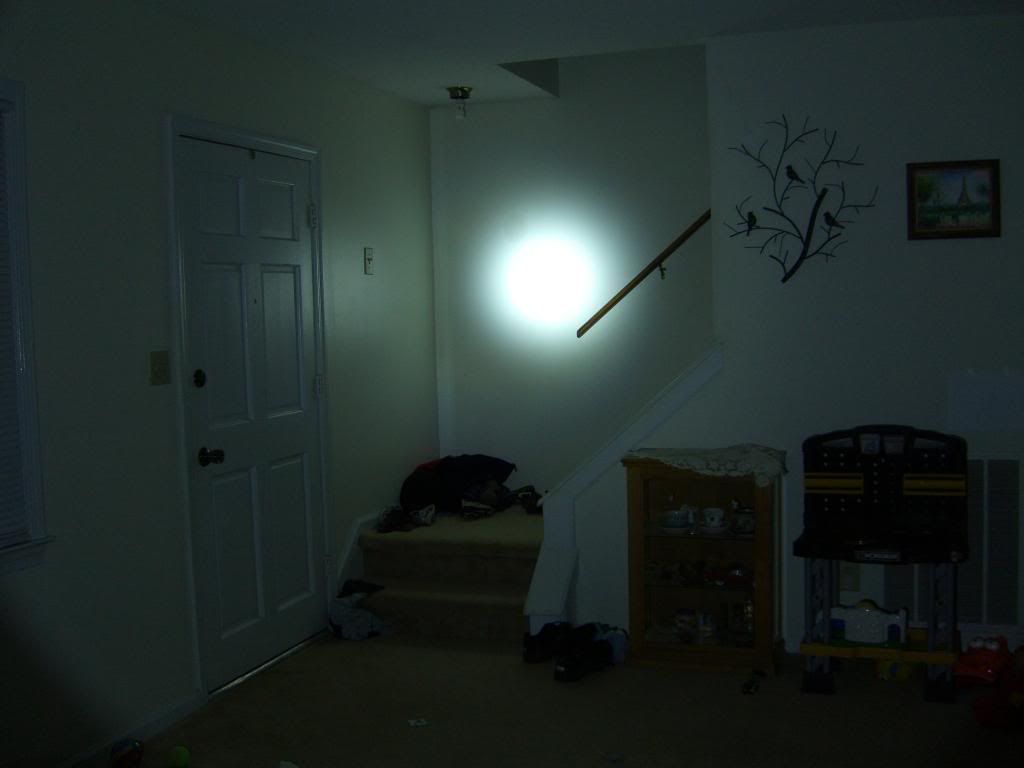
And Wala! a bright dive light

Hello. I don’t recall seeing a beam like that before! It’s BIG and BRIGHT! It’s only a max of 2’ from the wall. It’s like a floody beam but much brighter. Is it a function of the P60 and nothing more? Running on (3) AAs?

thanks,
patrick

hey patrick (saypat),

No, that beamshot is not good. I took it quickly with a iPhone5.

I only get that kind of beam when I completely remove a reflector. BTW you can make video lights this way.

In real life you see a defined hotspot and then the spill. I stood in the same place to confirm this.

yeah it still runs on (3) AA cells. Does anyone know of a 17mm driver that can handle 2 or 3 Li-ion cells in series? preferably single mode, maybe a High/Med too.

Beamshots: stock XR-E light vs. mod w/XP-G2 (mouse over)

Camera settings:
1/8 sec.
f 2.8
ISO 100

Somewhat better pics.

what a difference! So, you purchased a P60 XP-G2 drop in and replaced the XR-E with it? How much does a P60 XP-G2 drop in cost?

I’m not a modder at all, very little knowledge of all this, but learning. Seems like there is more to it than meets the eye. Batteries must be able to power the new LED, modes come into play, heating, etc, etc? Or, is it all fairly compatible?

thanks for the info!

patrick

The drop-in I posted came from nailbender, he's a modder on CPF (cf. customlites, or nailbender P60 thread 1, XP-G2 thread)

there's also V54 (Wayne): P60 thread. Those are some of the brightest. But runtime will decline with higher current, so choose what's important for your use... super bright ↔︎ long runtimes. Or maybe a happy medium

I usually make my own now. Mountain Electronics can provide most of the components for DIY. around $12.

re. LED: what I prefer now is either a de-domed XM-L or domed XP-G2 at ~3 amps. Both of these provide descent throw, which is what I like.

It's not efficient to use Alkaline cells for over a 1 amp application... they don't perform well in high amperage requirements. Best to use something like Energizer ultimate lithium or Nice cells when at higher amperage. But the light takes (3) AA's in series and my drop-in was ~1.7A, so no issues running Alkaline.

I like single mode because it's just simpler when using it diving. Other people may prefer multiple modes - that would require twisting the light on-off-on to cycle through modes.

re. heat... dive lights have an advantage over land based lights because we take them underwater. As long as there is a descent heatsink from the drop-in to the light head then the colder water can conduct heat away and reduce LED Tj (temperature junction) keeping the emitter nice and bright.

Water removes heat generated from the flashlight quicker than air. How many times better does water conduct heat away than air? ~20 times? And water being more dense can absorb more heat. Water is approx. 770 times more dense than air.

Did you use copper tape as in adhesive aka insulator vs just a long strip of raw copper so there is no "glue" to slow heat transfer

Empty pill

http://www.fasttech.com/products/0/10002206/1164600-empty-aluminum-drop-in-module-wbrass-pill

XM-L2 emitters

http://www.fasttech.com/search?XM-L2

Here are some 925ma 16vdc drivers (might not push that XM-L2 to it's full potential

http://www.fasttech.com/products/1612/10001268/1105800-36v16v-925ma-constant-current-led-driver-board-for

It looks like the guy at Mountain Electronics might be a better route

http://mtnelectronics.com/opencart/

How much space between the p60 and the head? Depending on whether you use sheet copper or pipe coupling you can get from .5mm to 1mm thickness(1-2mm fill). I’d reccommend using slightly thicker than you need and gluing that into the head with AS epoxy and reaming it back out to press fit with a drill and W/D 220-600. Add AS compound if you want even better transfer.

How is the quality on the pill threads from RMM? I’ve had some from KD and DX that were very poorly mated.

Hi,please …… which is a measure of the o-ring in the head that stops the glass? I have lost……Thanks

This is the outer most o-ring. holds the glass in place.

I.D. (inner diameter) = 26.9mm (1.060'')

O.D. (outer diameter) = 32.72mm (1.288'')

width/thickness = 2.79mm (0.11'')

these are my measurements, so may not be exact, but it's close.

Usually I use the tin foil wrap method. To hold the wraps together I'll tape the P60 module with a small piece of CU tape. Then the P60 can go back in.

I think I like some method like this better than using Arctic Silver compound or Fujik, because if the P60 dies it can be replaced rather quickly.

Thanks!!!I would like your help again …… where I can buy the o-ring the head? thanks

to order a replacement you can use the GITD o-ring see Sigman's thread - he's still selling them. Order the 1'' (25mm) size.

Or if it's not real expensive (>$4) I could mail them to you. One GITD and one original. PM me with full address.

I never seen any issues with RMM's P60 modules. they were fine.

From KD I recently got some P7 size P60 modules for a MT-G2 mod. I have RMM's zener mod driver to run it. Should be a blast of light.

I find that this light in the unmodified version makes a good backup dive light as well.

It’s more like a light sabre but diving at night in limited visibility (local conditions here) the works well as a backup and for signaling. I use rechargeable batteries for my main dive light but for a backup I also prefer regular batteries since they last a long time and has a gradual discharge curve (I don’t check my backup batteries often and like to know they will work when needed).

Everyone’s diving condition are unique however.

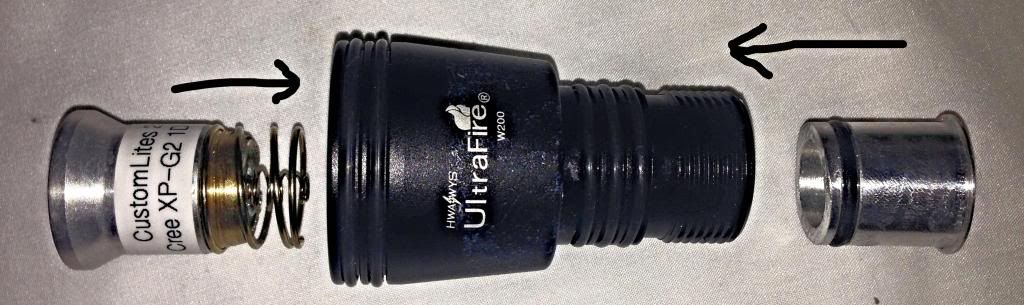
this shows how the pieces go together

I need a solution to fuse together the P60's negative outer spring to the aluminum piece on the other end. The people at JB weld say that regular JB weld is NOT conductive. I'm thinking of something like JB weld that I can smear on both ends and when I put it back together they will become permanently connected.

This is just to make the light that much more dependable. Any good ideas?

Hey gcbryan,

Reliability is a good thing. I did a little diving in Oregon... gives meaning to "braille dive".

If your light ever craps out what do you think about an XP-G2 drop-in replacement? Maybe 2.5-3.0 amps, maybe de-domed? that would be a Jedi sabre, you think?

I use a solid copper spacer in P60s instead of that awful spring. Gives better heat transfer and better ground connection and still allows easy disassembly, all at the same time.

Height of the spacer is cut to be just tall enough that when the light's screwed together, the spacer is clamped down tight before the head/bezel bottoms out against the body, so that max pressure is applied to the spacer. It's just copper pipe, slit lengthwise so it's a tight fit inside the ID of the head.

Any way to get the spring to engage the other aluminum piece the way it engages the brass pill? i.e. snap into a groove.

On your light with a much bigger ID in the head the spacer will never be able to be spread enough to contact the inside and still land on the bottom of the reflector. Skip the lengthwise slit and leave it round, maybe pinch the top edge inwards a bit so it's tight(-ish) on the OD of the pill instead.

I gather the earth spring is not long enough to make contact? I’m not sure if it is possible but can extra spring(s) be soldered together to make contact with what looks like the aluminium adaptor?
Another solution.
http://www.rebreatherworld.com/dive-lights-torch/37127-modified-w200-backup-light.html#post352657

Springs suck, throw them away. That was a good idea when they still used xenon bulbs where hotter = better, they have no place in there with a LED.

Make as many spacers as needed to bridge the gap if it’s large, solder them together, then use Arctic Silver Thermal Adhesive to bond copper to aluminum with electrical conductivity. :wink:

If you could get the spring stuck onto the right hand piece then attach the pill, slide that through the head from the right, and thread the p60 reflector on from the left last.