On high, it is direct drive, so the current draw will be whatever the cells can handle.
High drain cells will give you higher current levels. I would guess the Trustfires would give about 5.5A on high.
With the Zener modded FET, there is no protection. Those are big cells, with lots of capacity, you would notice them dimming before they’re drained. Besides, they have protection. You can order the FET driver with a Turbo timer, so it will step down to the next mode after 45-90 seconds…whatever you want. Once it’s stepped down, it’s using half the current, and the brightness drop is barely discernable. I really wouldn’t be too concerned, you seem to understand the fact that you should pay attention to what going on with your cells…you have tons of capacity.
If any light wants a FET driver, it’s the massive J19.
I have been running electric RC for some time and from what I understand, the undervoltage protection ( either a cut-off or at least a lipo alarm) is a must. I will not risk damaging lipo cells by overdischarging, it destroys them and they can be dangerous as well.
Too bad all small lipo alarms for lipo cells work with single cells, so I can not use them to monitor the voltage of the entire series.
The flashlight is big, I think a small lipo alarm could just squeeze in its head, but all lipo alarms I know use 1s voltage as a monitored value, not 3s voltage…
Has anyone been using this FET driver with unprotected cells for a while? I need to know whether the increased current draw it allows can damage the cells??? I want batteries that will last, not a set that will be toasted after 10 cycles.
I am all for the FET driver but I must find a way how to keep the cells controlled somehow…
The TR J19 has arrived and it is far bigger than I imagined!
But I have run into a few problems:
How do I take it apart to change the LEDs and the driver???
this is where I am stuck right now
Pop the driver out. If you look inside the head there is a small screw (maybe two…can’t remember)… It holds the reflector onto the base. Remove the screw/screws, unscrew the bezel and remove the reflector. ( I think that’s how it goes)
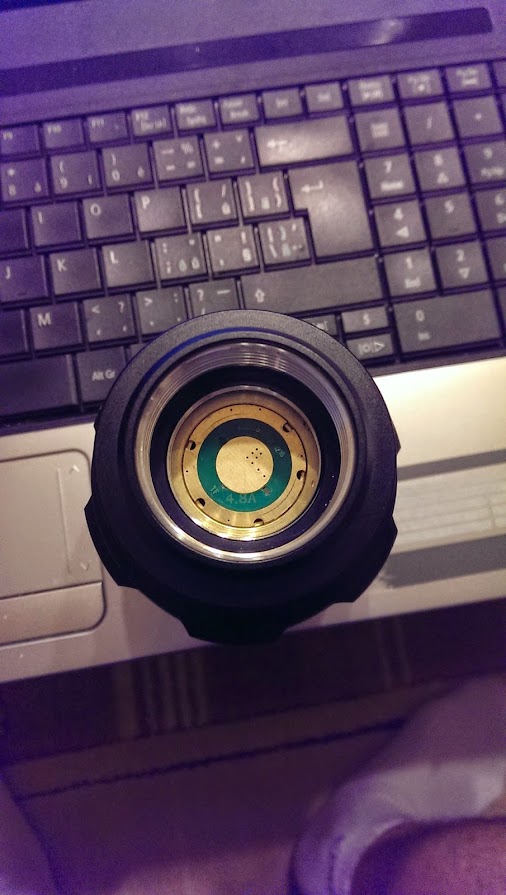
I do not see any screw(s). The pic I linked is where I stopped. I unscrewed the brass ring that holds the front spring and this is right under it. There are no screws, no visible threads etc, so I dont know what to do right now. Any ideas?
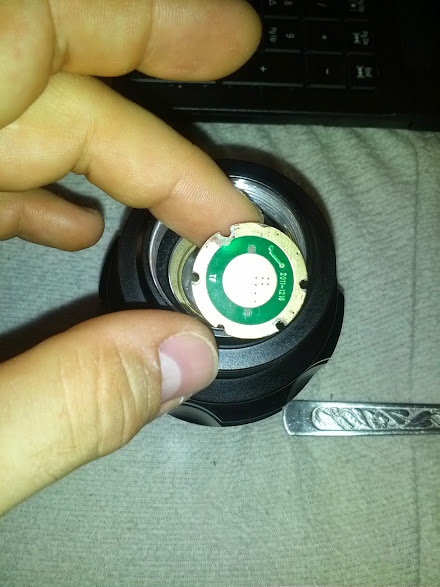
I managed to get the stuck driver out from the head…
I think it was bad from the factory, it was pressed into its place with some serious force ( assuming from what it took to get it out)
the contact board got damaged a bit, but it still works. The current is not high, so it will be OK until my new driver arrives, but I will need to either repair this contact board or make a new one, it will not hold up to high currents in its current shape. But I had no other choice, I just could not take it apart ( I have LOADS of experience in taking delicate stuff apart, but this driver just could not be moved a bit)
Other than that it is OK.
I will take some beamshots in its bone stock form and then some after I have modded it.
Apart from that, I emailed the Mountain Electronics about the current draw of a stock LCK driver and a FET driver. This is their reply:
Jan, the LCK-LED driver is actually pretty good and you won’t see much of an increase from it. From the stock driver it would be a big increase, but from the 5A LCK-LED you will probably only see about 1A-1.5A difference.
Richard
which makes me really dithery…
is it worth it? Or not???
Both are great drivers. I have the LCK in mine at the moment. The stock driver on my j19 was about 1A per emitter. The LCK will give about 5A per emitter. The low resistance FET on the FET driver will squeeze some extra current from the cells on high. It will drain your cells faster on high, but Richard can give you as many modes as you want at whatever current levels you wish.
If you’ve already ordered an LCK driver, go with it. Six months from now if you want a different driver, it’s just a little project.
The bottom of your stock driver looked a little different than mine. I’m sure it will still be fine to use as a contact board. Hacking it up a bit shouldn’t make any difference. Take a picture of the driver.
You didn’t say whether you pulled the reflector yet. Did you see the screws that hold it in?
I think I will make a new contact board. I have loads of those fibreglass copper-plated PCB boards, so making one should not be a problem. I think I will use that old driver somewhere else ( it would be sick to mount it on one of my rc trucks and use 3 xml-2 leds left from this flashlight, I dont think I will need them in the J19 when my xml2s on noctigons arrive :D)
I already have an LCK driver on the way somewhere between America and Slovakia. I actually ordered it before knowing what a FET driver is. And after realizing I would gain only an amper more or so for the leds, I dont think I really need it now. I dont like keeping redundant stuff. Using the FET driver would also mean more tinkering with my protected cells to rid them of protection circuits… I will buy a FET driver and new unprotected cells when these go south.
I did not take the whole head apart yet. Since I still dont have the new driver and the leds on noctigons and a good thermal glue, I did not want to disassemble it to pieces. I also did not want to let dust or some dirt get into the reflector. But I saw the 2 screws you mentioned, so taking it apart when all parts arrive should not be a problem.
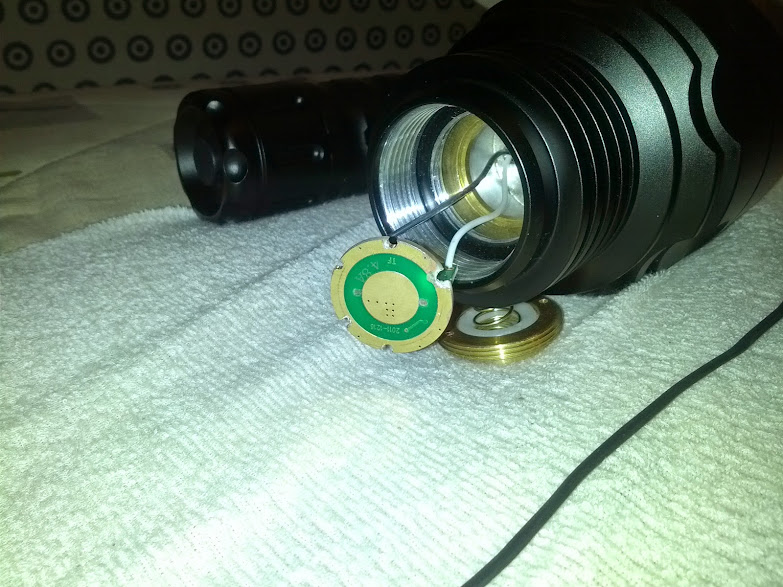
this is the driver. It took some punishment when I tried to take it apart. It might be different to yours. There is also no big spring like you or johnny mac or sixfifty had. The big spring on the right is not in my flashlight
my driver- the cables are short, so I could not take better pictures
Now that I see it, it looks like the same driver as mine. I’m surprised it was pressed in so tight, mine almost fell out by itself. If you’ve got circuit board, you’re all set for contact boards. I hope your driver doesn’t take too long to arrive.
There are all kinds of arguments about the thermal properties of adhesives and pastes. On single emitter lights that the reflector centers itself on the LED I use Arctic Silver Paste. On multi-Emitter lights where you need to center and stabilize (glue down) all the LEDs before you wire it up, I just use Fujik Adhesive. Some will tell you that it’s thermal abilities are not the greatest, but when you are pushing the emitters at 5A, the heat moves where it wants…fast. I haven’t had any problems, and I can feel the heat outside the head immediately. I paint the underside of the MBPCPB with a thin layer and tighten down the reflector and bezel so it squeezes it tight…leave for a day.
If you have to remove a dead emitter, it is easier to remove than thermal epoxy.
I save my copper dust and have mixed it with Fujic to attach copper rounds to my pills, but have never used it with MBPCBs. You don’t need it, better to have only a very thin thermal layer between the Noctigon and the pill.
I’ve never seen copper dust online before though, thanks for the link.
Which thermal glue should I buy? I think I need a thermal glue that is not epoxy based, but more like silicon. So that I do not damage anything should I need to remove it. ( I will also use it in other applications) Are there any except for the Fujik? I do not orientate on the market well, ebay churns out too many results when I search for it… I dont need brand top end stuff, just something decent that will do the job without damaging circuit board during removal
It doesn’t really matter what thermal paste you use, just lap the pill and noctigon so you use as little thermal paste as possible. Most people prefer Arctic Alumina.
Since he’ll be wiring up three emitters, he really should use adhesive, not paste. Trying to line up and center three emitters with wires attached that are not already secured by adhesive can be an unnecessary nightmare.
Resetting it did not help. I have already contacted DX, hope it will get solved soon. I dont want to remove the protection, because all the other batteries are protected, so I would have to do the same on them too.