BTU Shocker Triple MT-G2 with a twist -- Aiming for >100Watt ~9000Lumens -- With external 2S power pack, handle etc...

Well I’ve been having fun with graphs again.

To check whether my thoughts in my last post where correct I did another test. This time eliminating the battery pack and cable entirely, plugging the two packs across a reinforced harness and directly into the light. I also rigged up my hefty power meter to measure current.

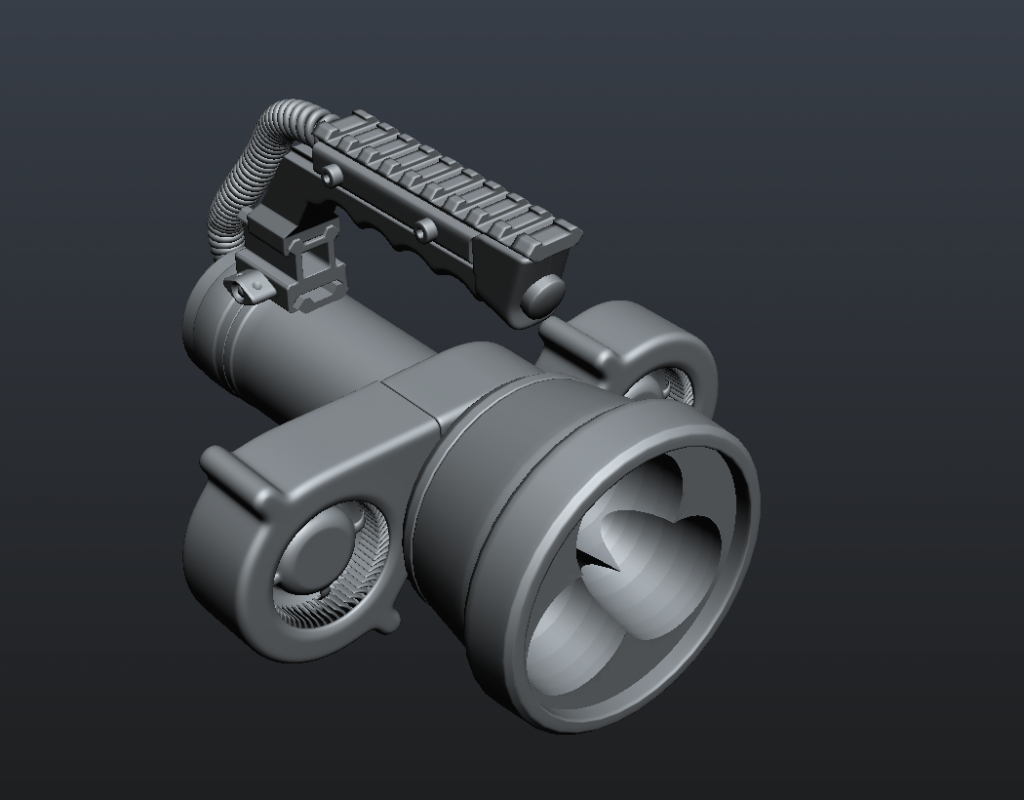
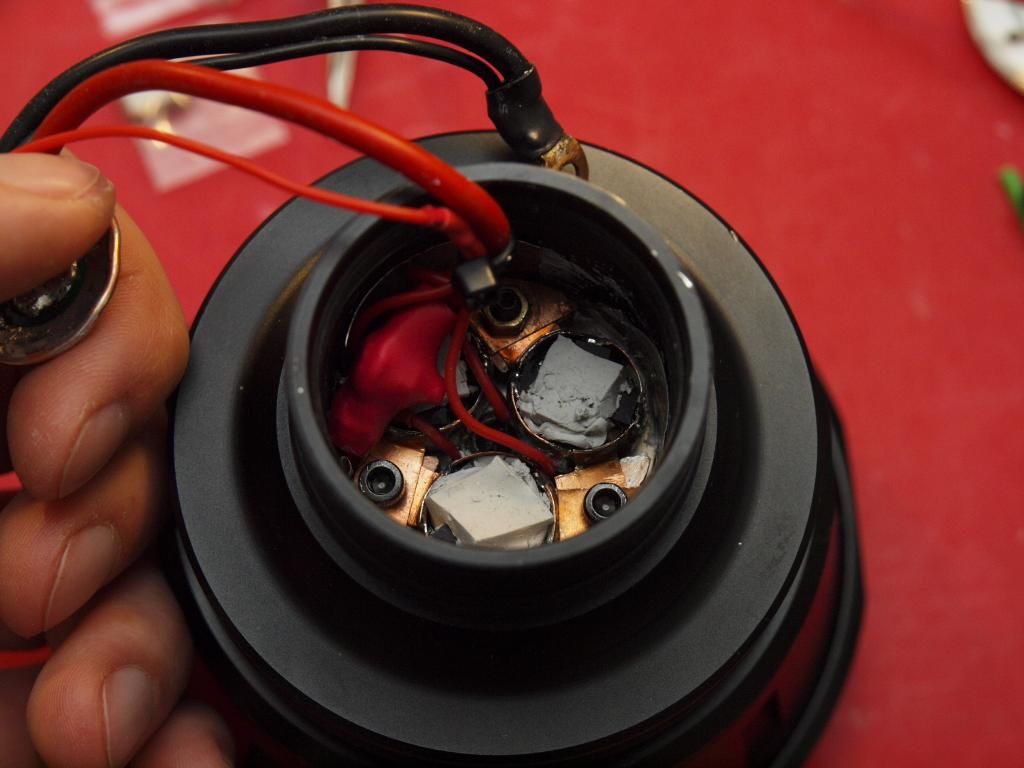
Here’s my test setup

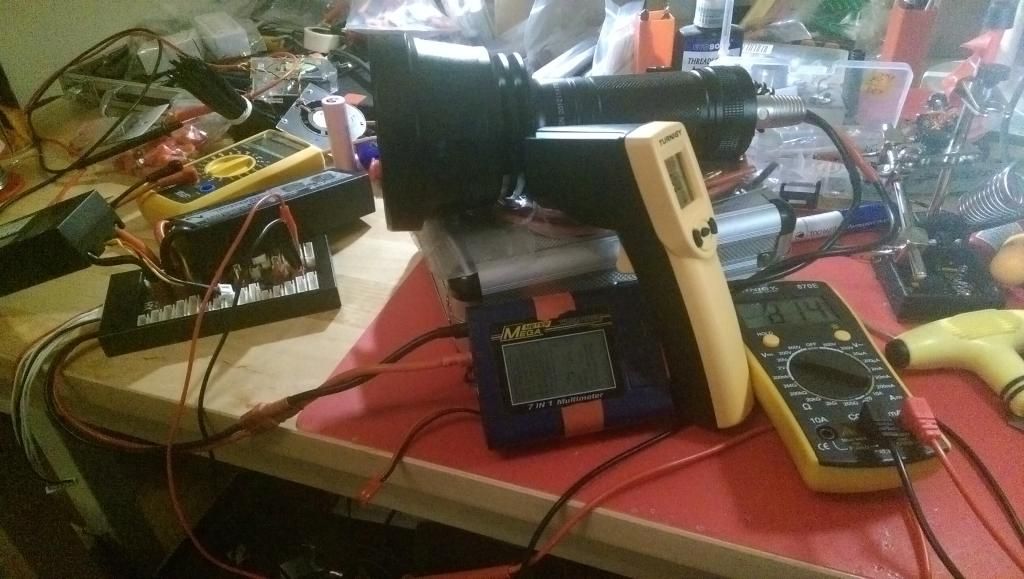
And the balance board reinforcements I needed to make to reduce resistance losses to a minimum

This way (by eliminating the resistance loses across the spiral cable and relays in the pack) I am verifiably gaining 0.6v in voltage overhead compared to the fully assembled light. That should eliminate any concerns that the voltage is dropping too low and causing the sag in output/regulation.

The test was carried out in two parts.

1. I ran the light on high from cold taking Battery Pack voltage, Battery Current, Lux, and Heatsink Temperature readings every 30 seconds.
2. After 6mins I turned the light off and let it cool down for around 5 mins.
3. Then I ran the light again for another 3 minutes taking all the measurements again.

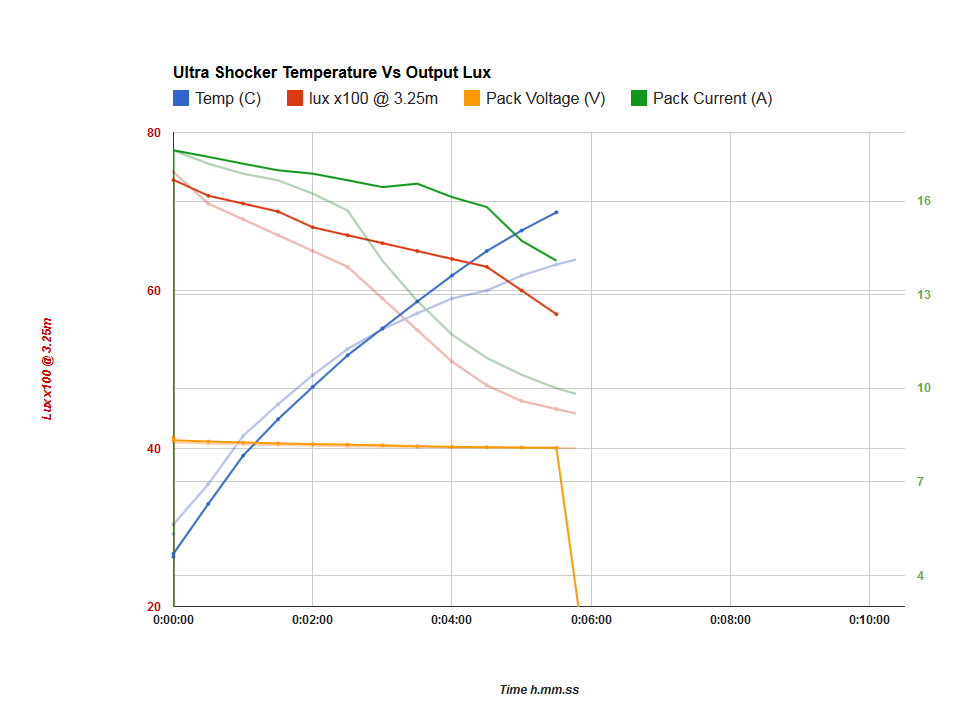
So here’s the graph.

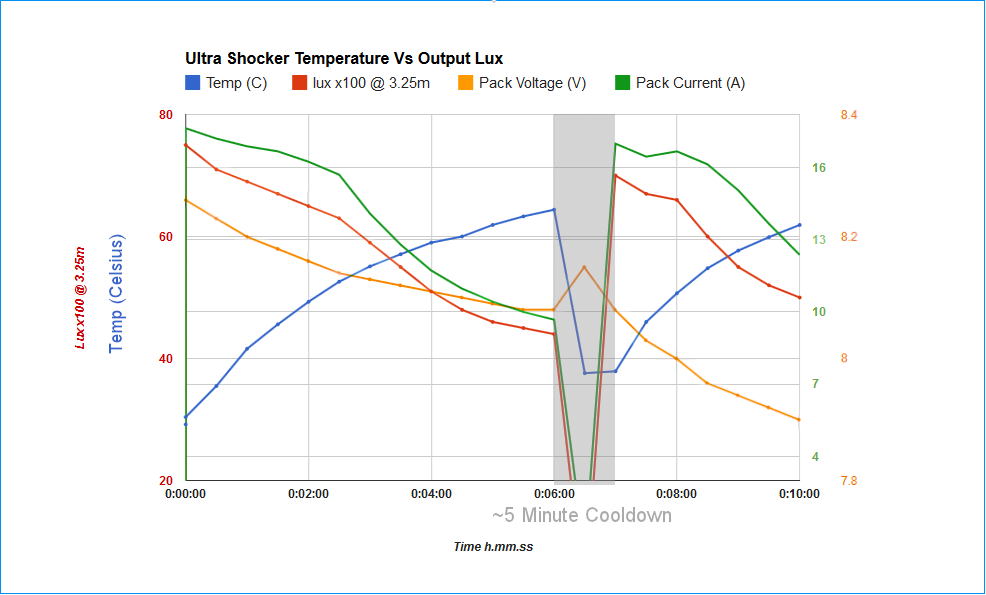
It’s quite interesting, and I think it verifies quite nicely my thoughts that driver heat is the primary cause of the drastic output drop overall, but especially after about the 2minute mark.
In fact with the higher voltage reaching the driver this time, I see a less stable regulation phase initially that drops more quickly and more steadily than with the fully assembled light. Last time between 1:00 and 1:30 I saw a flat spot in output (indicates decent regulation), this time it’s all downhill from the start.
After the 2 minute mark again output takes a nose dive. And this time it took only 4 minutes before the output had collapsed to 50klux while on the fully assembled light it took a minute longer to drop to the same level.

The voltage gradually drops as expected during the test but the crucial bit regarding this aspect of the situation happens after the cooldown period.
At the 6minute mark battery voltage under load was 8.08v, during the cool-off period with the light off it recovers up to 8.15v however crucially upon turning the light back on for the next part of the test it is bang on again at 8.08v.

As a result the output and current readings taken right after the light is turned back on can be compared directly to the ones taken before the cooloff period. With battery voltage being bang on identical between these two points the only variable to blame for the massive difference in output/current draw has to be heat. Aha!

You can also see that with the lower battery voltage at this point, the driver actually has more of a chance to try and regulate current and there is even an increase in driver current and output a minute after the restart. Unfortunately it doesn’t last long before the sharp drop once again kicks in.

Finally, having the current readings and seeing them track pretty neatly with the output measurements rules out thermal deterioration at the leds being the primary cause of output sag.

My conclusion is that the driver assembly is choking on it’s own heat and can’t shift it away quick enough, as a result it drops output prematurely.
It’s probably just keeping up while the temperature of the pill is below 50degress, but once it’s environment has reached that temperature and beyond it’s a losing battle and things start getting really toasty quickly.

I will try to do something to maximize thermal contact between the aluminium driver assembly and the walls of the pill. Maybe by stuffing some aluminium foil in there are and applying a bit of thermal grease. In any case I’ll redo this test to see if it has made any noticeable difference at all, suspect it won’t do all that much but it’s worth a try.
There’s just too much heat involved here, liquid nitrogen might be the only solution :slight_smile:

Next one of these will have a copper slug sinking those 7135s! Or a bunch of ventilation holes and a blower fan keeping things in check :bigsmile:

If anyone has any thoughts on this dataset it’d be appreciated, hopefully I’m interpreting the data correctly and not barking up the wrong tree here.
Cheers

Nice testing LH. I wonder how a small fan blowing on it would go to simulate the light being taken for a walk?

Not a bad idea, how about two? :wink:

Does BTU actually stand for “Bi-Turbo Unit”?? :bigsmile:

This light just keeps looking better and better!
I know it’s just a concept, but hot damn that’s awesome

i was pretty sure heat generated from amc was the problem. they have some sort of self protecting thing regarding temperature . when u push hard them and they cant radiate enough heat, u could have than all sorts of exotic problems in output. in one of my projects one stack with amc start to periodically change output for example. apart from this little problem everything looks cool on your project and i am enjoining the investigative part of your project with graph and so, even more.
seeing all this new projects and cool works that is being done around here, is starting to awake my sleeping appetite for projects.

usually its hard to realize how complex similar projects can be and how much work and effort they require. thank you for your effort and for sharing this.

make it liquid cooled version :wink:

I do like the potential or these new integrated water cooling solutions don’t see a way of making it work here though. Maybe someone else can build/modify a light around something like that, be cool to see.

i always ” shoooh! ” my thoughts away when a liquid cooled Light comes into my mind.

(un)fortunately i don´t have access to a lathe and a mill…

I just caught up on this after a few months…WOW!

Yeah it’s not gonna happen here, best thing I can try is something like that concept with a blower a form of duct that directs the airflow around and over as much of the limited fin area as possible. Think it could work and I have a couple of those fans on order to give it a go.

Fan noise is pretty lame though, so not sure how much use something like this would actually get, if nothing else it would at least look cool and act as an anti roll aid. Can’t have this thing flopped on it’s side or sitting on it’s face and hiding those lovely emitters when it’s sitting on the shelf now can we. :slight_smile:

DIWdivers 13.5 amp linear driver may be of interest to you. It is fully dimmable via potentiometer. There are also 10, 8, and 5 amp variants.

Very clean mod btw. I like it. :party:

Thanks, I didn’t know about that option.
Tbh I like having a standard clicky ui on a light like this (with all the nice firmware options that this hacked up 7135 driver offers), but there’s something to be said for a nice clunky multi position pot switch or dimmer combined with a driver like that. Bit more old school.

Tempted to find a use for it somewhere now. I’m also fond of the predictability of linear drivers, every time I play around with switching boost or buck drivers something usually ends up smoking…haha :wink:

Well I asked Ric about his BTU shocker stock and apart from a few battery carriers and switch boots he’s completely cleaned out. Until I asked him the BTU kit (no driver) was still on the webpage, looked like it was still in stock and available for a good price, now that’s gone too.
Looks like this is the end of the shocker. :frowning:
I did ask about another possible production run but he didn’t get back to me on that yet.

lol - don’t hold your breath.

Don’t give up mate! PM Vinh on the other forum, he has rooms of spare parts! Perhaps slight exaggeration!

Alright, hope everyone had a good break over the holidays!

Still no beamshots I’m afraid, we have half a meter of snow outside so those will have to wait a bit.

-

I’ve got some new super exciting runtime graphs though! Yay! :wink: :stuck_out_tongue:

I had a go at maximizing the heatsink stuff inside the driver cavity and then ran the same setup as the last test to see if I could see any difference in the output behaviour.
All I really did was wedge some bits of thin aluminium sheet in between the driver assembly and the cavity wall, press some TEM cubes into the middle of the 7135 slaves (just to try and homogonize the temperature within all those 7135s) and apply a bit of thermal paste where needed.

I also touched up a solder joint on one chip that looked suspect and could potentially have caused a flicker on one particular emitter. That was something slightly annoying I noticed each time the light was warming up. I probably didn’t solder one 7135 ground tab perfectly with the copper sink rings causing it to heat up faster than all the others.
Not sure yet if that has been fixed but I definitely hope so.


It’s a mess in there and I wasn’t too hopeful that it would actually do all that much but the test results are pretty significant!

( Faded graph is old comparison test done before the heatsink improvements, solid is the new test. )

Everything was set up the exact same way as the first test except that the starting temperature of the light was around 4 degrees C cooler.

So I’m very pleased with these improvements. It’s really obvious that the light is now able to maintain considerably higher output for longer, the steeper part of the output curve now starts at 4.5mins rather than at 2. Temperature on the outside of the light also gets considerably higher and continues on towards 70 degrees, at around the 5.5 minute mark I saw a larger flicker in the output and decided to call it a day at that point! Haha, made me jump a bit tbh! :stuck_out_tongue:
I suspect that was caused by one entire driver puck getting too hot and calling it quits, didn’t investigate which one because I wasn’t too happy running the light at that kind of temperature.

Next I’ll do a test with the battery pack cable again and see what real world performance looks like now.
Seeing how much better things are running now, I may well go back in and pot the entire driver assembly.

Cheers
Linus

You gotta love that temp line.

Haha there’s no stopping that bugger! If I keep tweaking I might just get it vertical! :wink:

But to be fair I’m loving the waft of nicely heated air rising up to my hand on the comfy cool handle! Only need to bring one glove out in the snow. 8)

Edit: Dammit, the flicker is still there. Number 1. driver/emitter (top center) is the culprit, my re soldering didn’t do the trick. Really hope I don’t have to take everything apart again…urgh…
I’m really starting to hate these 7135s! :frowning:

Test done with fully assembled light, (no current measurements for sake of seeing real world output performance)

…too tired to really figure out what’s going on but I’m a bit surprised. Is driver heat STILL the dominating factor dropping performance or does pack voltage now come more into play?

You can see the two output lines are perfectly parallel for a small section of the test, the cable setup a bit lower output (are we seeing the 0.6v cable losses?) but not much resembling a regulation phase before that. Just a bigger collapse in output over the first 1.5minutes.

Aha! Think I’m onto something here, environmental cooling system! Bet you wish you had this type of thing down in Aus ey MRsDNF? :wink:

Not the most portable system but very effective! 8)