Courui "Even Bigger Head" D01 Projector: 113mm Lens , Luminus SBT-70 @ 13.5Amps *Build Stage*

Thanks for the nice news :slight_smile:

Very interesting, do you think this melon baller will be possible to use with the UF-1405/1504? Thats the light i would want to try this on next.

I hadn’t noticed that these already had a hole in it :slight_smile: very nice.
As an drop in for potentially 15% extra where these 31.75mm reflective apertures will fit, for $4 this is really good.

EDIT and now 24% that is truly a WOW :smiley:

Is the pic before or after the polish?

Picture is before the polish, I don’t have one showing the polished one yet but it’s a bit shinier overall. Most of the hazing is gone but some of the deeper lines/scratches are still apparent.
More can be done there anyway, depends on how patient you are :slight_smile:

Forgot to mention the actual size of this collar (the 1.25” version) is 35.5mm wide by 20mm deep.

I’m curious to try it with the 1504 as well, though the hole will probably need to be opened up some to account for the different lens diameter and shorter focal length. Also I doubt you’d still be able to get much of a flood mode with the collar in place. We’ll have to see. Oh and the recessed retainer for the mcpcb doesn’t look particularly well suited to getting a collar in place, but again I haven’t seen on in person yet so I’m sure it won’t be too hard to make it work.


Quickly polished version on the right

Oh and watch out when mounting this type of collar. It will get seriously hot when the light is on! So don’t use double sided sticky tape like I’m doing! :stuck_out_tongue:
Obvious even with the polish there’s still loads of photons dying a painful, ping-ponging death in there! :wink:

I know we won’t get much flood with the collars in place but, if i want flood i use a triple XP-L X6 thats much brighter and much smaller & lighter :wink:

For me these aspherics lights are purely for throw.

EDIT nice you see it is much less hazy on the polished one.

I like very much your design, well thought, clean and elegant. not much time lately to be active in BLF lately but find some time to say one or two things.

Luminus SBT-70 is something unique and can give you decent throw @ factory settings, so choosing one to build a thrower is quite an OK decision in my book if one want to play safe and not overdrive.
but, (as always, is a but around that change things :stuck_out_tongue: ) if you want to go extreme in numbers(as was my impression, pardon me me if I am wrong ) u have to take in consideration over driving a led.
lets see numbers when led are driven @ factory values:
SBT-70 @ 10.5 A output 2000 lumen and considering it have 7mm^2 surface, it produce an luminance of ~ 285lumen/mm^2 which is not bad

in the other side if u take in consideration xp g2 s2 or even s3 led from Cree:
s2 @ 1.5A output ~ 500 lumen and assuming it have 1.92 mm^2 surface, it produce a luminance of 260lumen/mm^2 which is slightly less compared with SBT-70 and that is why I support choosing SBT when playing safe.
however XP g2 can be easy over driven by a lot, and this change the result.
lets say we put an xpg2 @ 5 or 6 A than we have ~ 1000 lumen and that translate in ~ 520lumen/mm^2 which is an very high luminance and so it throw further.

we can easy overdrive xpg2 to the limit and even if it burn its relatively a cheep led to be replaced, especially compared with an SBT-70.
so i strongly suggest change emitter if you want more throw. i really like all other effort, and the work on collar. I myself have looked at ice cream tools as use for collars, but in the end i change route in my project. however i was getting approximately ~20% gain in throw, and i can confirm that.

keep up the good work and this wonderful project :slight_smile:

@MEM hm… i thought the collar recycle light so blue light have an second chance to excite atoms of phosphor, but dome in other side is the opposite effect, it lets more light escape from the phosphor die. its not acting as an reflective surface but its quite the opposite, having a lower refractive index than phosphor but higher than air it act as an medium than make it more easy for light to escape phosphor substrate helped also by spherical shape. more blue light escape than. this blue make the output more white :wink:

Thanks Ervin, and those calculations certainly are interesting. My intention wasn’t to go after massive numbers with this light but once you build it there’s always that itch for more performance! :stuck_out_tongue:

I’m not sure what the sbt-70 could take in terms of overdriving. I’m pushing it slightly at about 13.5Amps but others have seen 16A DD and I’d be rather surprised if it couldn’t handle 20A. There’s lots of bond wires and it seems well connected thermally. As you say though, I don’t have much interest to find out the limits, would be such a shame to fry on of these things.

I’m really curious about the performance gains that swapping to an overdriven XP-G2 will achiever however. I think I have an XP-G2 R5-2B somewhere so as soon as my next courui host get’s here I’ll be doing a body swap with it and seeing what kind of throw I can achieve with an led like that in this lens/setup. Should be fun.

Cheers

Playing around with some xhp70s today and I decided to see what the collar does to that die running in moon mode.

The tint shift towards the warmer end of the spectrum is very apparent with these emitters. Can’t see that effect by eye on the sbt-70, probably because the missing dome isn’t allowing as much unconverted blue light to escape when compared with the domed xhp-70.
Cool to see anyway.


Bare emitter on left, same emitter with stainless steel reflective aperture on the right.

The difference is reflective indexes, period. One substance has a reflective index of X for RGB colors. Second substance (reflective-aperture) has a reflective index of Y for RGB. Blue light does not only excite blue light. Blue light has a higher eV per photon, capable of higher energy release, per photon. A red photon cannot excite green from phosphor matrix on a Cree LED, because the eV is lower than green. You can throw as many red photons at green as you can try, and green does not care how intense the red is, because intensity is total photon count, it does not depict individual photon energy, measured in eV (electron volt). The excitation works on a photon-by-photon basis, as the excitation energy states are quantified. I.E. quantum mechanical in nature. So the difference of final RGB tint, is a result of final amount of photons excited. A factory dome is reflecting some colors at the medium-interface, the reflective-aperture reflects more—being a mirror. Though, a mirror still has a refractive index. :slight_smile:

This is true because, slice an LED dome off, but leave the dome-die-interface there, or a thin layer there. Result=same tint. Now de-dome in a solution that dissolves the die-dome-interface, magically, but not so magically, the tint is different. This tint now is the “natural” LED tint. Only when you place an object with a reflective property over the die do you get a tint change. So the dome is adding lumens which is known. If it is adding lumens, more phosphor must be excited. Lumens are more easily made when blue/green spectrum light is greater in the RGB mix. This is also known. Press a clear lens against a de-domed die surface as a final experiment. Result is instant excitation change upon touching them. Blue light refracts/reflects more easily against clear surfaces of common, un-coated lens substrates (also it does this on air, resulting in more intense beam appearance).

Photo source: Wikipedia on eV (photon energy levels):

Nice pictures LinusHofmann. Yes an XP-G2 would be incredibly more intense. But I believe you knew that to begin, and the SBT-70 was personal preference. We can always make a light brighter, but sometimes CRI is nice, though. It all comes down to final application. Sometimes we have to build it first before we know we want something to change. :slight_smile:

What do the melon ballers look like from the side; are they hemispheres? To me it looked like the were hemispheres which were squashed at the top, in one factory photo with the green handle I believe. Not sure yours are the same. You have a ton of light getting trapped if they are getting hot of course. Though, that just means you can unleash it. :slight_smile: I zero and center them, then turn them. When they are pressed by a machine, the dome will likely be off-center, since the metal forms out of the edges how it likes. Then the MFGR either leaves them like that, or cuts them. This is a centered aperture below, turned to fit the host body (the body itself mounts the aperture tightly):

Thanks for the writeup on the excitation behaviour, I had a rough idea of those principles but that makes it very clear indeed.

The melon ballers I have here are very spherical. At least they look to be by using the outside surface as a guide. The inside looks equally smooth and spherical but I have no way of measuring that.
I would say it’s about 5/6s of a “perfect” hemisphere. You’ll see in the silouhetter image that there’s a slight bell shape/flattening out as you approach the cutting edges. For the critical parts of the collar however the surface looks very good to me.
Not sure how centered the stock hole is but that would need to be opened up on the majority of builds anyway.

The real reason for using the sbt-70 in this light was definitely the round die for me. I’m not a big fan of the square die aspheric look but I should have probably tried to track down a cooler white version of this emitter to maximize the throw. The high cri output is gorgeous but with the lens on it’s entirely wasted…

Damn, there is some serious R&D and theory lessons going on in here. Way to go guys. Definitely, pushing the hobby (atleast for DIY'ers) up to a new level. Watching with interest.

where did you get your SBT-70?..

I got mine from Mouser, they have only 3 left in stock after Dale went slightly insane and started cleaning them out… :crown: lol

They’re discountinued so I doubt mouser will be getting any more.
Kaidomain also has some available but no idea if they are listed correctly.

Thanks… I just checked the site, it still has 3 left but the price is an eye opening that want to make you think twice about your project, what a shame they discontinue these LEDs… I have Nitecore MT36 which using SBT-70… it’s an awesome thrower
You really going to need a big reflector for this LED to work perfectly.
unfortunately it’s not something budget conscious mind want to tinker around with :_(

hmm… maybe if they drop the price to around $15… I’m sure it will sell really well :smiley:
btw… what kind of board do you mount this LED to? or is it unnecessary?

Yeah it’s a pricey bugger but the emitter is worth every penny unfortunately. It’s gorgeous, the 90cri light this one puts out is just…. :heart_eyes: Nothing else I’ve seen comes anywhere close.
I have a second one waiting for a project and I think I’ll be putting it in a courui with one of those 86mm reflectors from kaidomain, really can’t wait to see what it can do in that kind of setup.

It will reflow onto a standard mt-g2 footprint.

should I… should I… should I replace one of the MT-G2 on noctigon with this LED?.. :weary:

Big die format, little die Vf. That’s part of the appeal for me, as well as the color, the round die, the elaborate suspension bridge of bond wires. Yeah, I still have 2 after putting one in a Courui D01, used that tonight spotting a Coyote at about 400M. :slight_smile:

Very interesting MEM :slight_smile:

It filled out some holes in my understanding of this, i get most of what you explain :slight_smile: and it is really thought & intuition provoking.

I wonder if it is better then to leave a tiny slice of silicone, on as cold led as we can find in the size that we want for maximum throw, to keep the color as blue as possible if we are going to use an reflective aperture to recycle light.

someone save a SBT-70 for me! lol been wanting to build a thrower with one for a while

To the OP; LinusHofmann,

I hope you don’t mind the side-discussions going on in here. I have undoubtedly introduced other topics being discussed, which I initially found to be relative to projects like this, but more so when tweaking a design for “optimums” are being considered. So, I don’t mean to dump info here, which may be useful in its own thread. What do you think? If at any time you’d rather I do that, I can start a thread on the various principles of LED emission as to not discuss such things, next to your project. Anyone who feels that would be better suited discussion on these topics, please make mention or PM me.

Anyways.

What Cajampa just mentioned is a very interesting configuration which I myself have pondered.

So one thing which can be found in experiment is that in fact yes, if the dome can be sliced-off effectively leaving a thin gel layer, a reduced-die-size image will thus be presented to the focusing optic, as is the case in a complete de-dome scenario. The reduced-sized image is beneficial in one clear way in either type of de-dome method, lux is boosted as the natural die size is not virtually expanded. Many consider the boosted intensity-per-area the best benefit from a de-dome; a complete de-dome that is most often. But the second thing we have come to expect, is the loss of total lumens after a de-dome. This negative seems to be traded equally by most minds for the additional gain of a lower kelvin tint, which some view as a benefit to higher final CRI. But the final CRI values are not often known as well as they are when the LED has a specified, or specific manufacturer recorded bin. That bin value thus becomes lost. We don’t really know the final bin, and if it is productive towards actual CRI. My guess like many would be that it is beneficial to CRI even if now unknown, as we generally see warmer tints represent higher CRI values. Unfortunately, little data actually confirms the final benefit beyond our eye-sight. So if we achieve what is considered a good color tint after a de-dome, and we further change that tint-shift using a reflective aperture, the next question would be, now what is the tint bin? Have we gone too far? And etc. It might be assumed that the gel used by the manufacturers over the LED surface is their optimum choice for boosting lumens, and if it is a perfected technique they use to in fact boost lumens, should we remove all of its benefits when we merely seek the smaller die image only? These are questions which could only be solved by an integrating sphere. If we can attain higher lumens, and a smaller die image by slicing the dome, we have just increased the potential light density attainable which previously is not being met in a complete “solution de-dome” method. If we can then lower its kelvin temperature a desirable amount, while still increasing surface intensity using a reflective aperture, might we be able to yield the most energy-dense configuration attainable for an LED?

I think these are good questions to ask, because while many thought they found an “easier” de-dome method, it seems true they did not consider all variables with the solution or “dissolve” method. It seems like this could have easily been overlooked by the hundreds if not thousands of people now currently using this method. Is it really the proper way to gain maximum effectiveness and benefit?

Someone should definitely want to consider what I have stumbled across here, and tests could be performed to verify, or prove a null-concept, by one with access to an integrating sphere. Of course the multitude of configurations would play into effects. How clean is the slice? Is a reflective aperture then used? Each variable has an outcome to the method’s final benefit. But these are clear options right there all along, and no one has really documented any of this. We go on a wing-and-a-prayer that it is just done the way it is done properly, without ever really knowing. Substantial lumens are lost in a complete de-dome. That seems to me like there could be a substantial benefit to keeping those lumens there, while achieving the original goal of a reduced image size. Intensity should seemingly only go UP^. :slight_smile:

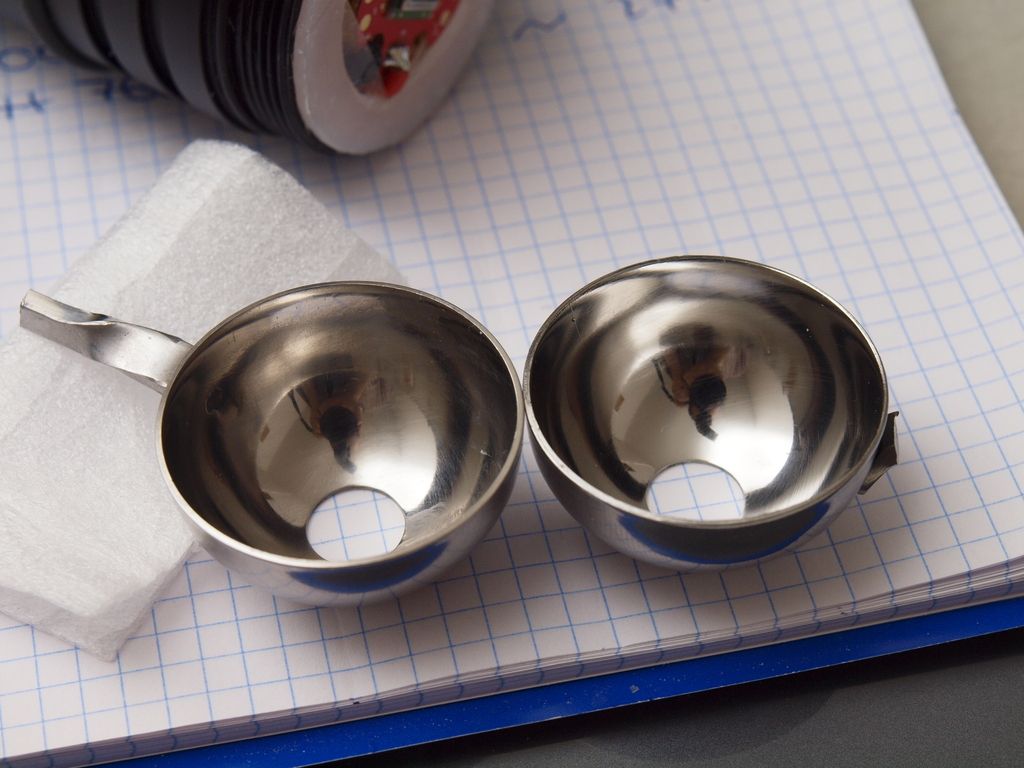
The second problem, to me, is the reflective aperture. Some surfaces are not suitable mirrors, regardless to how well you polish them. Certain metals will still collect photons of certain wavelengths, even though they may appear shiny and reflective of all colors to the eye, some light is still lost/scattered in the reflection. This would bring the mirror process of the aperture into question. A mirror coating with proper reflective index would be used, on top of a properly machined hemisphere surface. A guy from a club I belong to claims that he can machine hemispheres to very-high tolerances such as required in optics. Unfortunately he won’t do this for free or I would have many by now. He has a very high-end CNC machine at his shop, which I do not. What he has told me is that the apertures would come out with a near polish—just due to the machining accuracy. So if some of these could be made, then coated by a mirroring process that is efficient with LED light colors directly (unlike uncoated metals, such as stainless steel), a “super-combination” could potentially exist, within arms reach. Don’t mean to sound too overwhelmingly certain this would be the solution to maximum attainable LED surface-intensity, but the logic put behind thinking about it does make sense, all things considered. We aren’t currently using coated apertures, nor precision ones, in an optical sort of context. While going about such a design through a professional optics route would undoubtedly cost some $$$, going about it the “custom way” via a machine shop with a good CNC, and then coating, is what would put such a design within arms reach when I say it.

Just things to consider. Maybe more would be interested in pursuing a group project, or a design intended to be mounted on a specific light pill. One design applied to the optimum host, in other words.

I personally don’t see a problem with OT discussions in any thread, that the OP hasn’t explicitly asked for it to be no OT, BUT i am a serial OT poster myself here at BLF :wink: :smiley:
And i of course will follow whatever the OP Linus wants :slight_smile:

The very lenient attitude to let discussions weave in & out of various thread here at BLF, i feel is a big reason for the collective high level of intuition that constantly pushes the boundary’s of what is possible here.

And back to the slightly OT, output optimization discussion thats always my favorite in all its forms :slight_smile:

Interesting :slight_smile: if such a high quality reflective aperture could be produced for a group buy, i would say of the big lens lights the UF-1405/1504 looks to be the one gathering the most interest here at BLF, and i would think most of us who want that kind of light is after the potential high kcd it can produce. An RA as short for an reflective aperture designed to fit that platform i think has the biggest chance to gather enough interest for a GB.

Maybe the same places that can do AR coating on uncoated lenses can do various mirror finishes on metals also.

The coldest XP-G2 in the highest flux bin available, i believe is the S3 1C cutter sells them also.
This should be the best starting point for maximum lux when combined with light recycling, like an reflective aperture or an sliced dome or even possible an uncoated small lens.
To bad there is always the led lottery, i read that some are buying several & tests all of them & chose the one with the lowest Vf, to get higher on the top flux bin variation scale.

I wonder if a slice left will up the lumens more than an tiny uncoated lens will, but it is very easy to damage the dedomed emitter so i don’t really believe this to be a usable option. If not such a combination would show to be worth the extra risk by raising the performance to make it worth it, much like the normal dedome is.

By all means, discuss whatever. It’s all interesting stuff and I don’t have any progress to post on the light at the moment so carry on.

I don’t have much to add on the dome slice approach but I’ve done it in the past and foudn it fairly fiddly. Crucial is polishing the surface and I never really got a good result so I was rather pleased when someone came up with the gasoline/solvent dedome method.

CerealKiller illustrates his method for dedoming an MT-G2 here.